17. Automate & Updates
This document provides a walkthrough of Automate and Updates module available in Hub 2.0, including:
- Automate
- Automation with Safe Update Checks
- Automated backups
- Update scheduling
If you haven’t set up your WPMU DEV account yet, visit the Hub page, where you can explore the features and see pricing packages.
Already a member? Visit your Hub dashboard to get started.
17.1 Getting Started
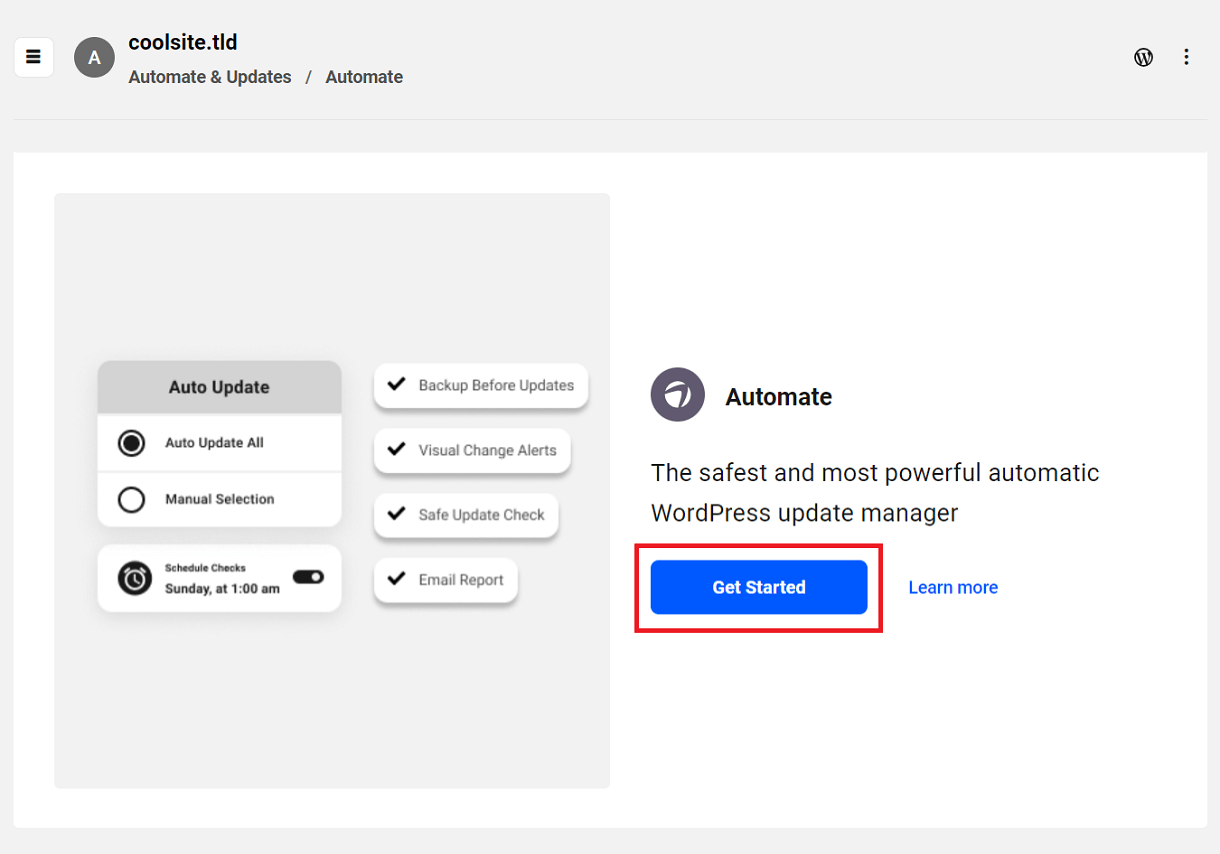
Copy chapter anchor to clipboardAutomate is a safe way to automate WordPress core, theme, and plugin updates on your website.
Use safe updates to ensure your site does not break when it is updated. Automatically backup your website before updates so you don’t ever have to worry about updates or backups.
Get instant, daily, weekly, or monthly updates reports by email.
17.1.1 Setup
Link to chapter 1If Automate is not already activated on your site, click the “Get Started” button on the Automate tab to open the Quick Start setup wizard
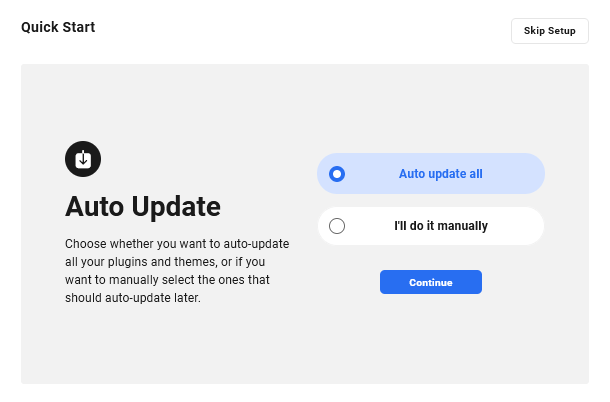
The Quick Start setup wizard includes the following steps:
- Auto Update – Choose whether you want to automatically update everything or select which plugins and themes you would like to automatically update after the setup wizard is complete. Note that if Auto update all is selected in the setup wizard, any plugins or themes added later will default to auto update as well. If I’ll do it manually is selected, any plugins or themes added later will default to ignored and would need to be updated manually or set to auto update.
- Schedule Checks – Set how frequently Automate should check for updates.
- Auto Backup – Choose whether you want to automatically back up your entire site before each update. Note that on 3rd-party hosted sites, enabling this option will install our Snapshot plugin on the site.
- Safe Update Check – This scan will tell you if your site is down and show any visual change on your selected pages after updates have completed.
- Safe Update Alerts – Receive an email notification if Safe Update Check detects a change equal or more than the percentage value you set.
- Email Updates – Receive email summaries of Automate updates.
After running the Quick Start setup wizard, you can make changes to any of the selected configurations in the settings tab.
A detailed overview of each of these features is covered in the Automate Settings chapter below.
When Automate is activated for the first time, all the email notifications associated with Automate will be sent to the email of the person who activated it, not to the owner’s email. For example, if a team member activates Automate for the first time, the HUB will send email notifications to the team member’s email, not the owner’s email.
17.2 Automate
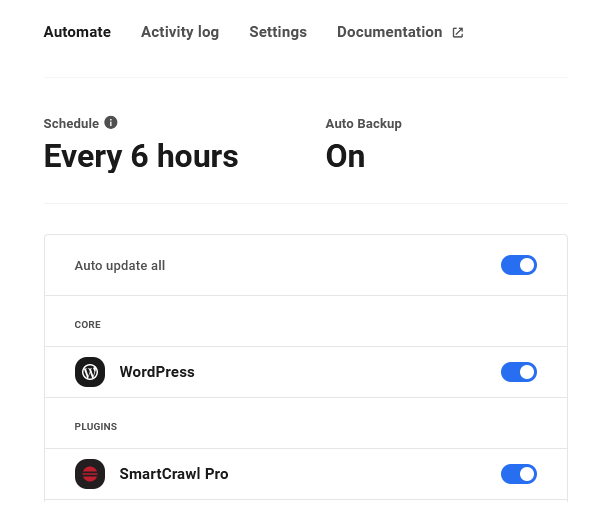
Copy chapter anchor to clipboardAfter Automate is set up, clicking Automate will open the Automate tab with:
- When your next update check will run
- A notice if backups are set to run with your update check
- A list of all installed core, themes, and plugins
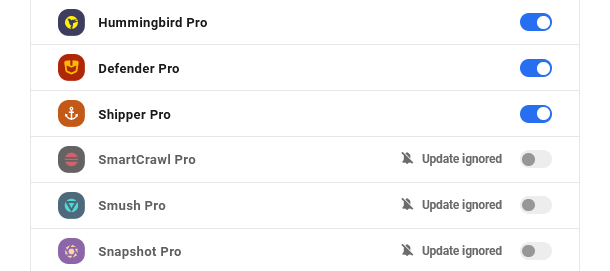
Use the Auto update all toggle to enable auto-updates for everything on your website.
Use the toggle next to WordPress, or any specific plugin or theme, to enable or disable automatic updates for your individual core, themes or plugins.
Note that if WordPress core is selected to be updated on your multisite, that would only update the core files. Automate cannot trigger the network database upgrade for you. You would still need to visit the Dashboard > Upgrade Network screen in the network admin and manually trigger the Upgrade Network feature there.
Only the selected options will be updated on your website.
Any updates that have been ignored will be marked with an Update ignored tag. Please visit the Updates documentation for more information on ignoring and unignoring updates.
If you have Hummingbird plugin page cache enabled, the site cache is cleared automatically for any automated update.
17.2.1 Activity Log
Link to chapter 2The Automate Activity Log tracks all your automated updates.

Activity Log information includes:
- Date – Day the action was run
- Time – When the action was run
- Action – What action was taken (Backup, Safe Update check, Plugin, Theme, Core)
- Note – Version number pass/fail message where applicable
- View result – Opens safe update check results
- What’s new – Opens available changelog for updated item
17.2.2 Settings
Link to chapter 2The Automate Settings tab opens all the available tools for managing scheduling, Safe Updates, backups, and alerts.
Schedule Checks
Schedule Checks defaults to check for updates every 6 hours, except if you are a free Hub user. See Free Hub Restrictions for details.
If you do not want to run checks at that frequency, clicking on the schedule opens a popup for customizing the time and days Automate runs update checks. As an example, you may not want to run backups over the weekend. Setting weekdays and a time, limits your update checks to only weekdays.
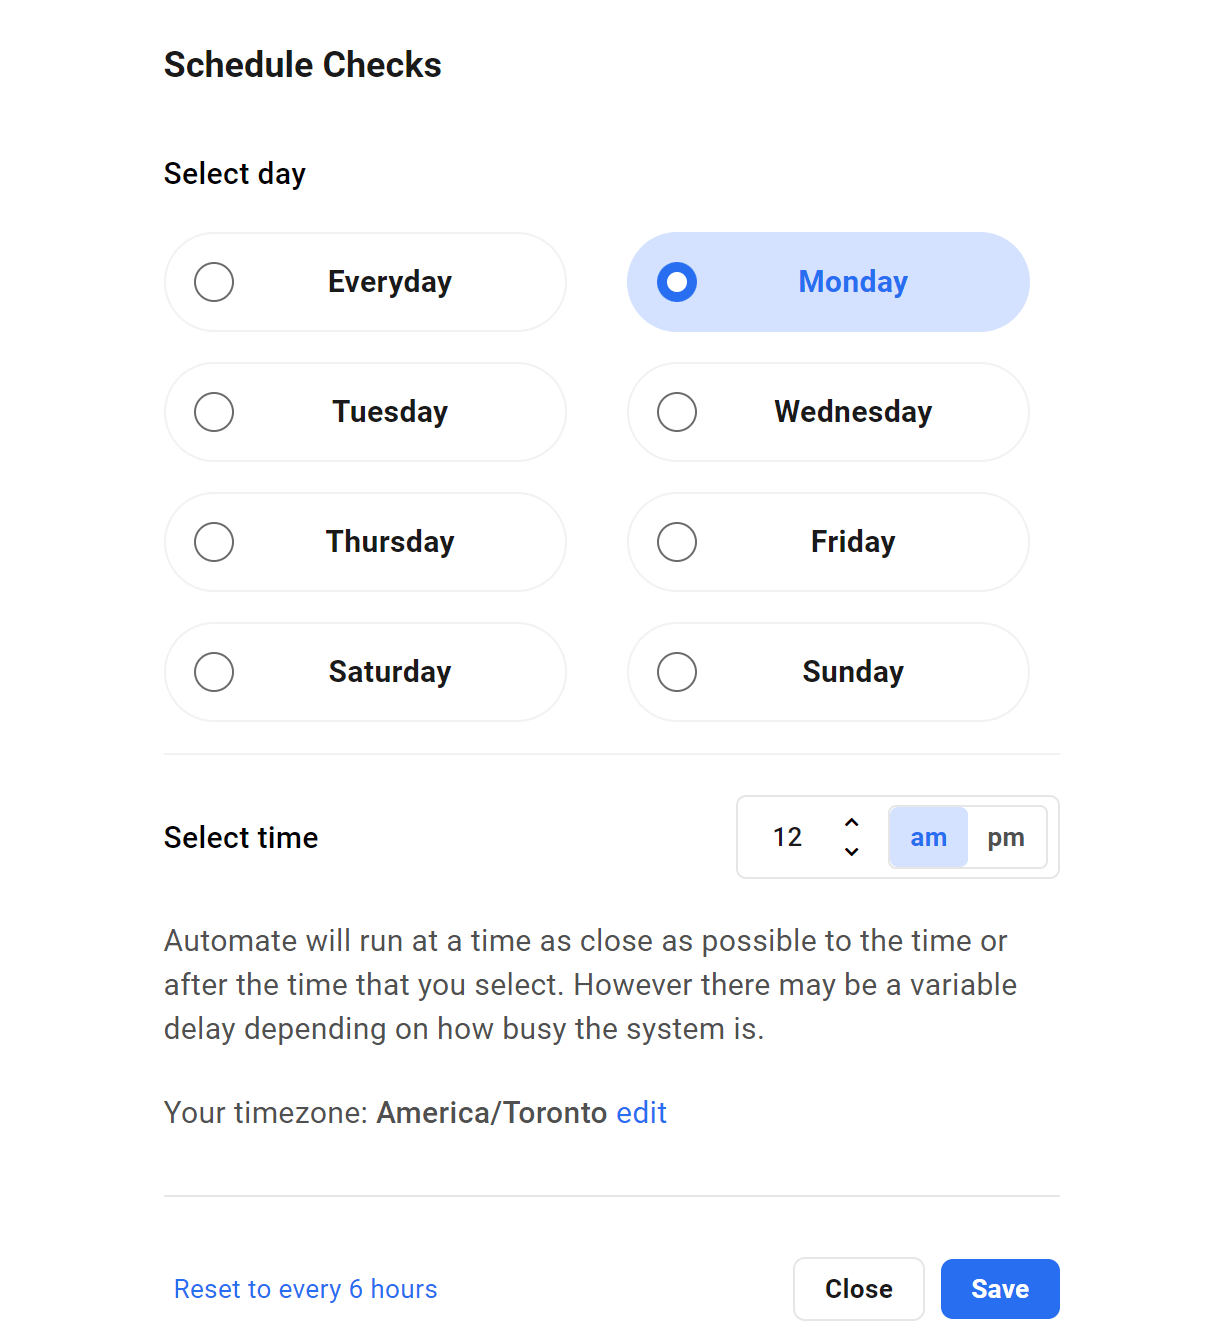
Click Close to close the module without changing your Automate schedule or Save to save your schedule.
Automate will run at a time as close as possible to the time you set here. However, there may be a variable delay depending on how busy the system is. If it does not run at the selected time, it will reschedule itself to try again 20 minutes later.
Note that the timezone used is the one you set on your Account page under Details & API Key.
Also note that plugins may occasionally be updated automatically on your site via native WordPress cron before Automate cron is triggered. You can of course disable automatic updates for any plugin in your site’s wp-admin. However, we strongly recommend that you keep that enabled for the WPMU DEV Dashboard plugin to ensure up-to-date connectivity with the Hub, regardless of the schedule you set here.
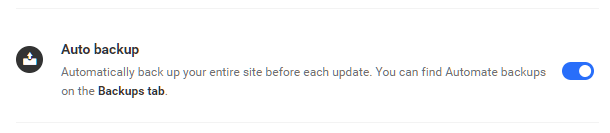
Auto Backup
Choose if you want to set Auto Backups to automatically back up your entire site before each update. You can find Automate backups on the Backups tab.
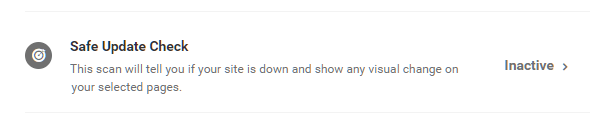
Safe Update Check
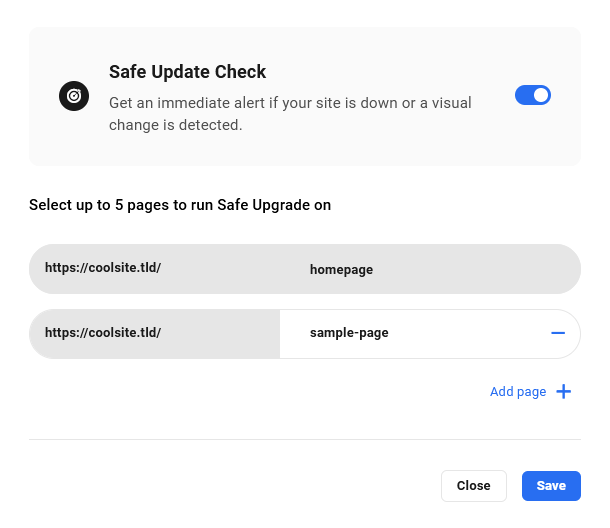
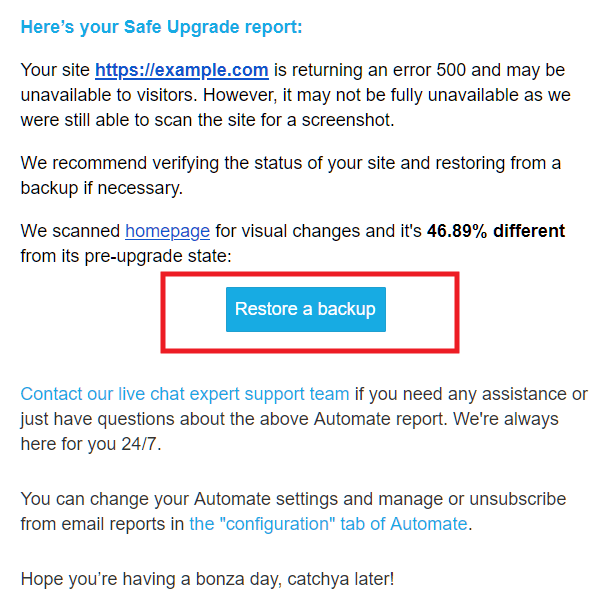
Safe Update will take a screenshot of your pages before and after an update, compare the images, and if changes are detected notify you of potential problems. This scan will tell you if your site is down and show any visual change on your selected pages.
Click the Safe Update Check option to open a modal:
- Home Page – Choose Home Page to set only your Home Page for Safe Update scanning.
- Custom – Click the Add Page icon to add a custom URLs to run Safe Update scans on (You can add up to 4 custom URLs to scan)
- Inactive – Choose the no option to continue without setting up Safe Update.
Click the Save button when you’re done, or Close to exit without saving your changes. Click the blue toggle at the top of the modal to disable the feature if no longer needed.
Safe Update Alerts
If you choose to use Safe Updates you will be asked to set when notifications are sent based on change percentage. By default, the change percentage is set to 25%. Receive an email notification if Safe Update Check detects a change equal or more than the selected percentage value.
Click and drag the slider to the desired percentage of change. Then add the email address(es) of the recipient(s) who will receive notifications of any changes that are greater than that threshold.

Note that if Auto Backup is enabled, and the Safe Update runs into any trouble, like 3xx, 4xx or 5xx errors, the email it sends you will include a Restore Backup button. Clicking that button will take you to the backups screen in your Hub where you can easily restore the automatic pre-upgrade backup (or any other) if needed.
Email Updates
Choose if and when Automate reports are created and emailed to the designated recipients.
Click the drop-down menu to view the scheduling options.
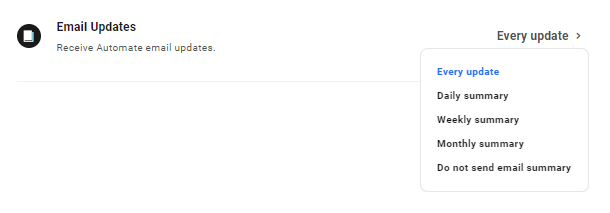
Options include:
- Every update
- Daily summary
- Weekly summary
- Monthly summary
- Do not send email summary
Email Recipients
This is the email address Automate reports are sent to. Click the address to change the recipient. This address will default to the account admin.

Deactivate Automate
Clicking the Deactivate link at the bottom of the settings screen will open the Deactivate Automate module. Confirm you want to deactivate Automate with the Yes button or click Cancel to close the module without saving your changes.
17.2.3 Failed Updates
Link to chapter 2Automate will alert you if updates are disabled for any plugin, theme or core WordPress. Updates are disabled if there are 3 consecutive update attempts that fail for that specific plugin, theme or core.
It’s important to note that even if you have Email Updates turned off, Automate will still send a notification to the address(es) you have set in the Email Recipients section if updates are disabled for any plugin, theme or core WordPress. However, if you have set Email Updates to email you with Every Update, the above emails will not be sent. This is to avoid sending you duplicate emails, as the failed updates information will already be included in the reports sent to the address(es) you have configured in Email Updates.
If Automate itself is disabled due to multiple consecutive failures, you will be emailed regardless of how Automate is configured.
Possible Solutions
Define Your Site URLs
If Automate fails repeatedly on your site, it may be due to a 301 redirect that is interfering. You can try adding the following constants to your wp-config.php file, before the line that says “That’s all, stop editing”. Be sure to change the URLs in each one to the correct ones for your site.
define( 'WPMUDEV_HUB_HOME_URL', 'https://your-site.com/' );
define( 'WPMUDEV_HUB_SITE_URL', 'https://your-site.com/' );
define( 'WPMUDEV_HUB_ADMIN_URL', 'https://your-site.com/wp-admin' );
Allowlist WPMU DEV IP Addresses
Add WPMU DEV IP addresses to the allowlist in your firewall, security plugin, or CloudFlare account. See WPMU DEV IP Addresses for more info.
17.3 Manual Updates
Copy chapter anchor to clipboardThe Manual Updates tab lists all available WordPress core, plugin, and theme updates. Updates are sorted into three categories:
- Core – WordPress core updates (see note below)
- Plugins – Installed Plugins that need an update
- Themes – Installed Themes that need an update
Click the Update button next to the core version, plugin, or theme to run the update.
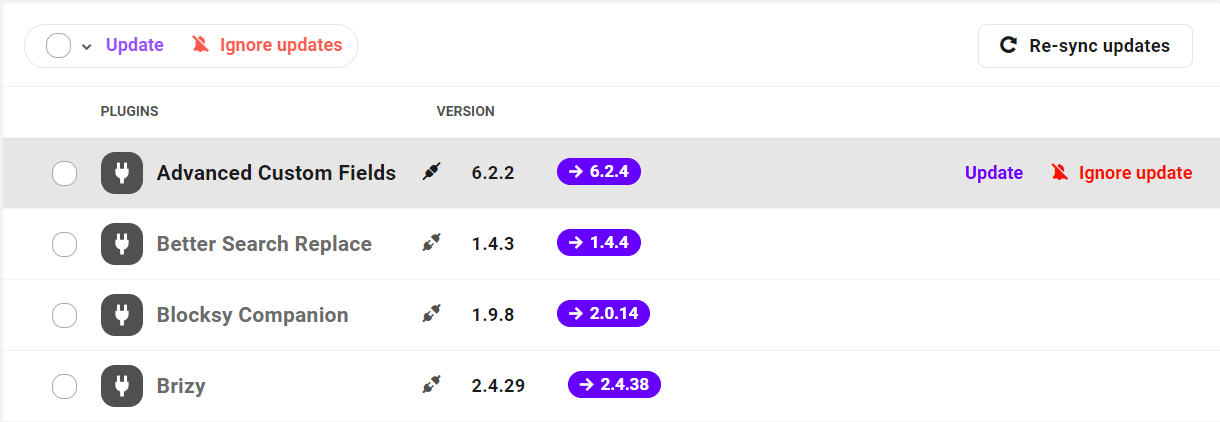
Click on the version number of WPMU DEV plugins to open the changelog information about the available update. Close the changelog by click the X icon at the bottom of the screen.
Bulk Manage Updates
Use the checkbox at the top of the screen to select all or deselect all if a group of updates are selected.
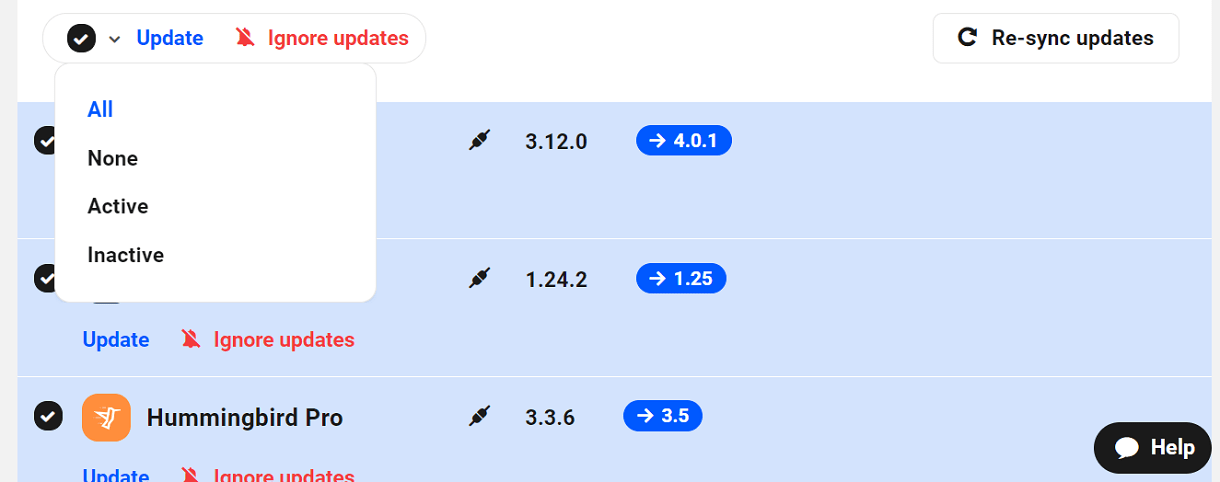
Use the dropdown caret next to the checkbox to select or deselect:
- All – Select to run all updates
- None – Deselect all selected updates before running
- Active – Only select the active plugins and themes to update
- Inactive – Only select the inactive plugins and themes to update
Quick Updates
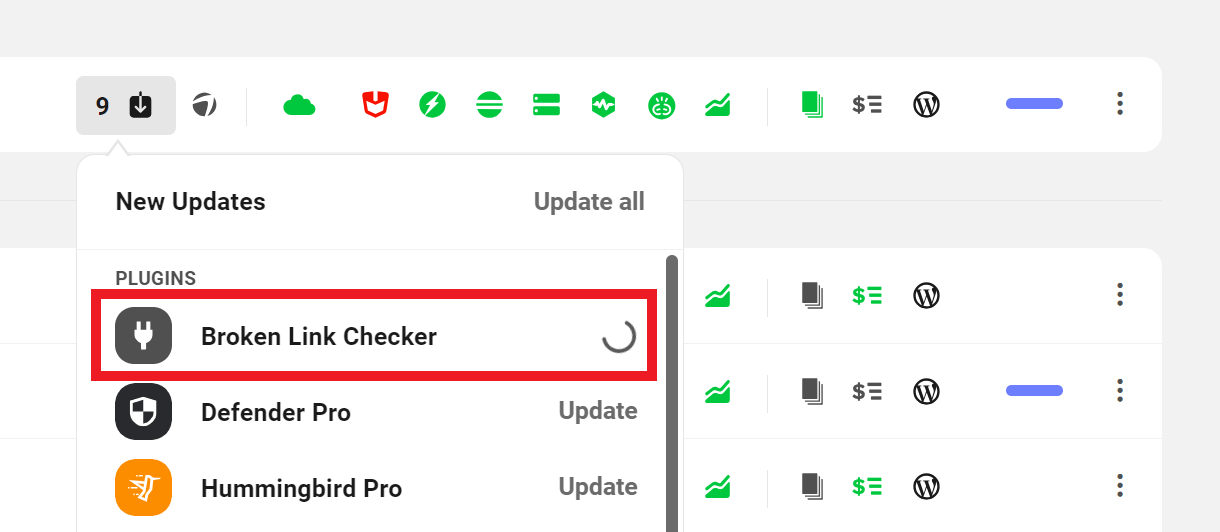
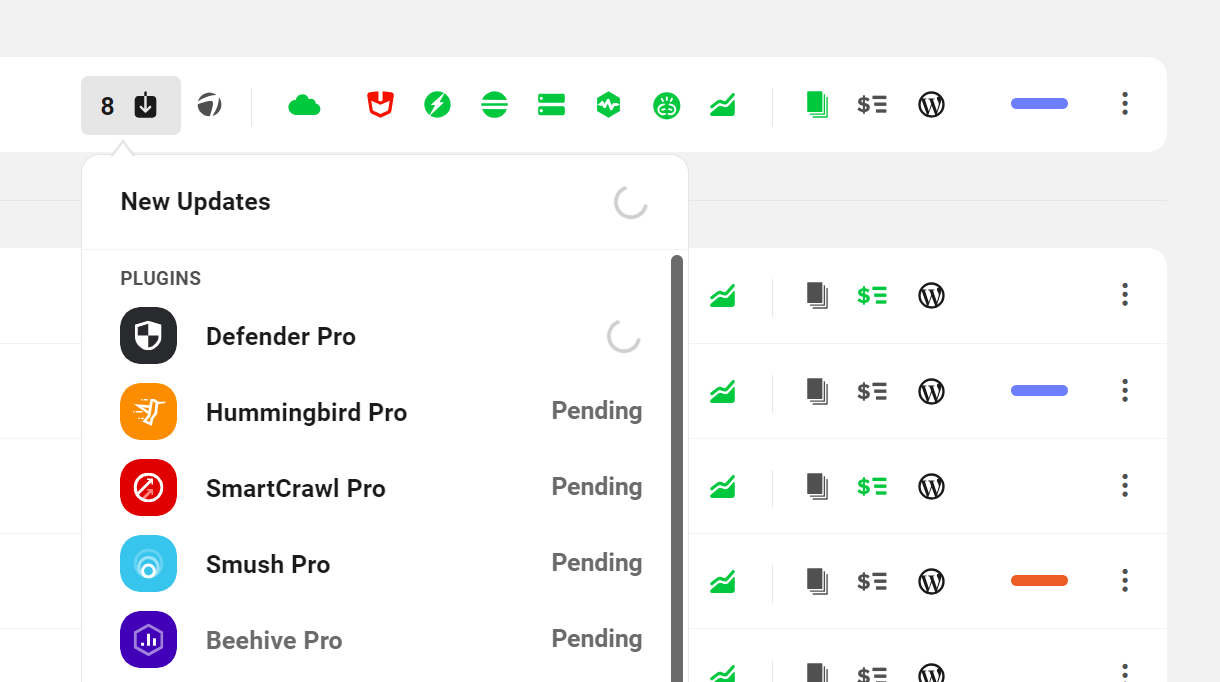
Don’t have the time to dive deep into updating your sites? Each site can easily be updated from Hub without even needing to navigate to the Themes & Plugins tab. Simply hover over the updates icon to view the dropdown menu for that site. This menu lists all of the available updates for your core, themes, and plugins.
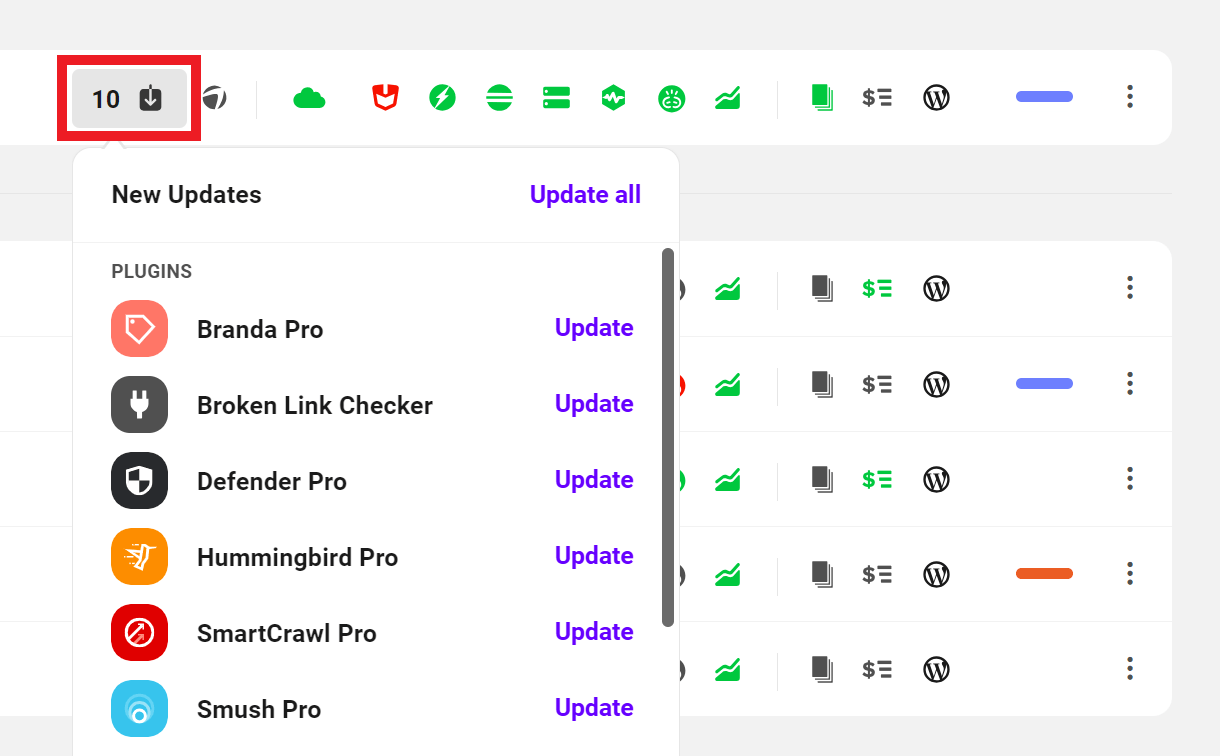
Individual updates can be actioned by clicking Update. The loading spinner next to the item you are updating will keep you informed of the progress of the update.
You can also trigger all of your updates at once by clicking Update all.
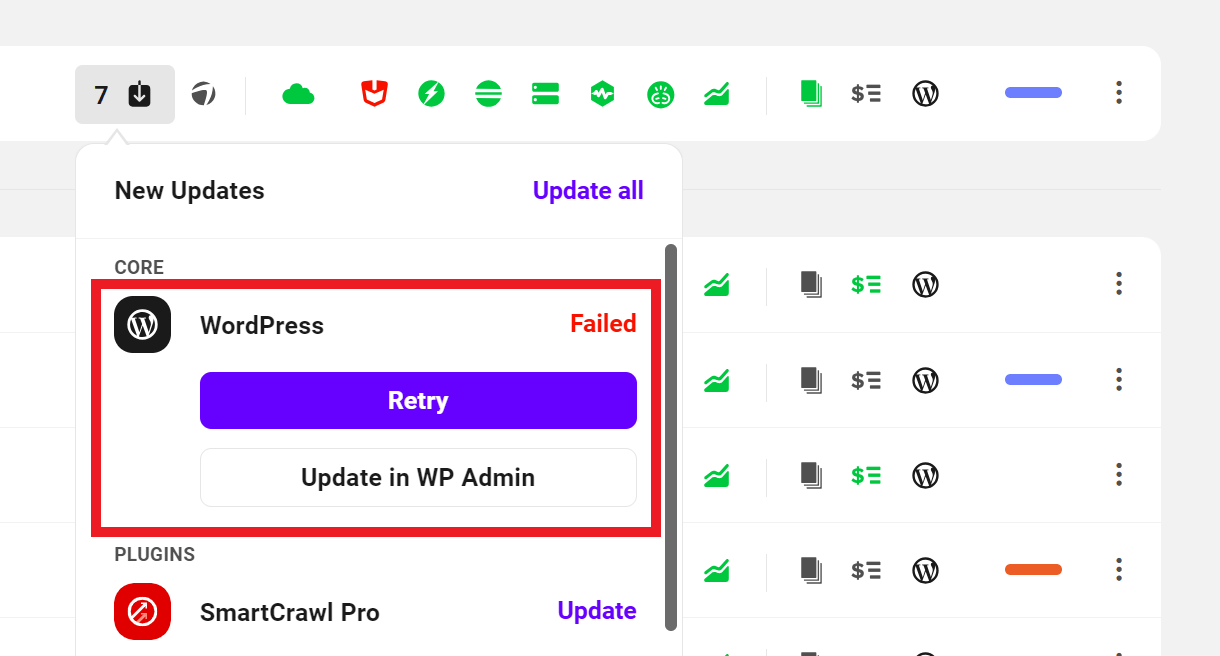
If the update fails, it will be indicated with a red Failed status. Click on Failed to reveal options to either Retry the update or to Update in WP Admin.
Syncing Updates data with your site
If you manually update some plugins in your site’s wp-admin, it is possible that the data may become out of sync in your Hub.
To remedy this issue, all you need to do is visit the Dashboard > Updates screen in your site admin at ../wp-admin/update-core.php, or click the Check Again link at the bottom of any screen of the WPMU DEV Dashboard in your site admin. Then refresh your Hub to view the synced updates data.
Core updates disabled?
If you or your host have added define( 'WP_AUTO_UPDATE_CORE', false ); to your wp-config.php file to prevent automatic WordPress core updates, that will also affect both manual core updates and Automate core updates in your Hub, and prevent them from working as well.
If that constant is present in the wp-config.php file of your site and you try to update WordPress core, a notice will pop up to inform you of the issue. Please remove that code if you wish to use the core update features in your Hub.
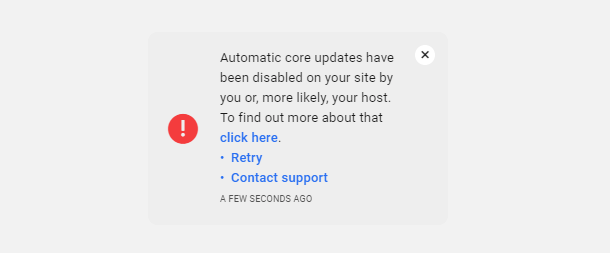
Note that this same notice will appear if you have intentionally locked your site into a desired WordPress version using a plugin like Core Rollback.
Not ready to update? Check out our blog on Ignoring Updates For WordPress Core, Plugins, and Themes to find out why and how to ignore updates on your site.
17.4 Ignored Updates
Copy chapter anchor to clipboardThe Ignored Updates tab lists all themes and plugins for which updates have been set to be ignored for the site.
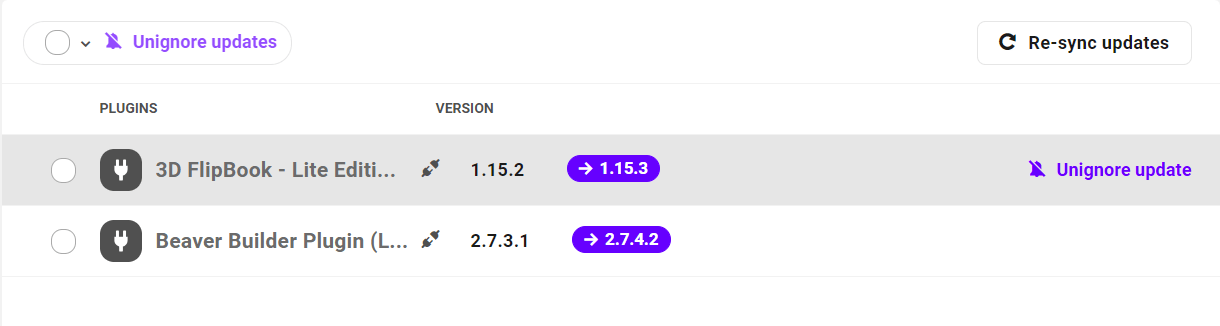
The installed version will be shown, along with the current version highlighted. To unignore updates for any theme or plugin, hover over its row and click the Unignore update link that appears there.
You can also bulk unignore themes & plugins by checking the box next to each one and clicking the Unignore update link at the top-left.
Note that all ignored updates for all sites can also be managed in the Updates section of your Hub.
Not ready to update? Check out our blog on Ignoring Updates For WordPress Core, Plugins, and Themes to find out why and how to ignore updates on your site.
17.5 Get Support
Copy chapter anchor to clipboardIf you still have questions or need assistance after reading this document, please don’t hesitate to contact our support superheroes using the available options under the Support tab in your Hub or via the Support tab in your WPMU DEV Dashboard.
