4. Plugins
This document provides an overview of the features available in The Hub for managing all your WordPress plugins from one convenient place. From the Plugins page, you can add and manage plugin installations for all your sites.
If you haven’t set up your WPMU DEV account yet, visit the Hub page, where you can explore the features and see pricing packages.
Already a member? Visit The Hub to get started.
4.1 Getting Started
Copy chapter anchor to clipboardThe Plugins page is accessible from The Hub’s navigation menu. Click Plugins to get started.
![]()
If you haven’t connected a site to the Hub, or if none of your sites have plugins installed, the Plugins page will indicate that no plugins have been found.
To connect a site to The Hub, see our guide on Adding a Site to Hub 2.0, and to add a plugin to an existing site, see the section on Adding a Plugin below.
Check out the video walkthrough below to see The Hub’s plugin management features in action.
4.2 Adding Plugins
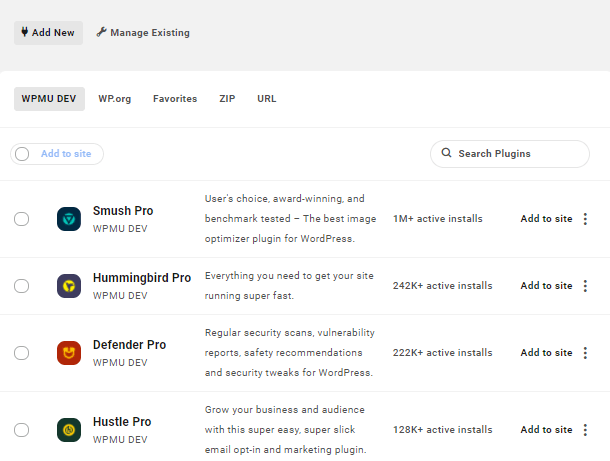
Copy chapter anchor to clipboardA keystone benefit of plugin management from The Hub is the ability to add new plugins to any site with ease. So you’ll land on the Add New screen when you first enter the Plugins area.
This page allows you to add new plugins from WPMU DEV, from WordPress.org, from your own list of starred Favorites, as well as uploading plugins by ZIP file or URL.
Note that free Hub users cannot install Pro versions of WPMU DEV plugins, so are limited to installing plugins from wordpress.org, their favorites list or via ZIP/URL. See Free Hub Restrictions for details.
To switch between plugin sources, click the appropriate tab at the top of the Add New page.
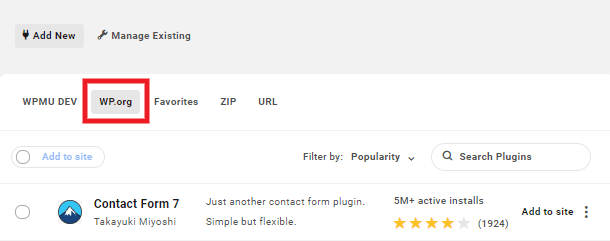
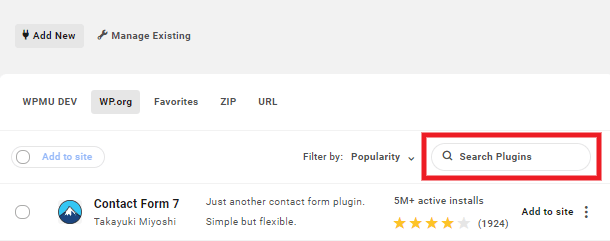
To search for plugins by name, click the Search Plugins field and enter a name accordingly.
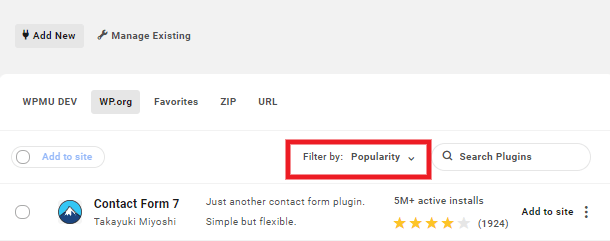
WordPress.org plugins can also be filtered according to Popularity, WPMU DEV plugins, Featured, and Recommended. To filter WordPress.org plugins, click the Filter by dropdown menu and select your preferred filter.
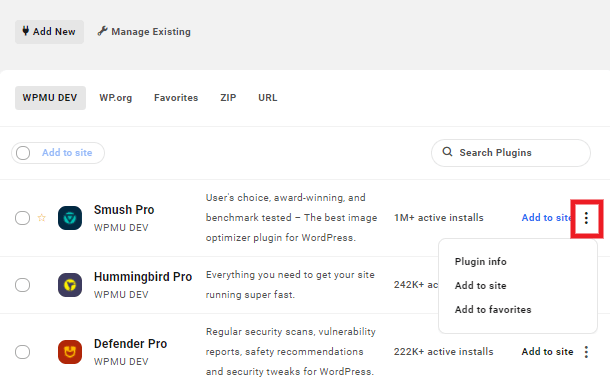
Click the Options Menu button (three dots) to the right of any listed plugin to access additional plugin options. Plugin options include:
- Plugin info – Click to view the WPMU DEV product page or WP.org page for a plugin.
- Add to site – Click to add a plugin to your site(s).
- Add to favorites – Click to add a plugin to the Favorites tab.
You can also add WPMU DEV and WordPress.org plugins to the Favorites tab by hovering over and clicking the star icon to the left of the plugin name.

4.2.1 Adding A Plugin
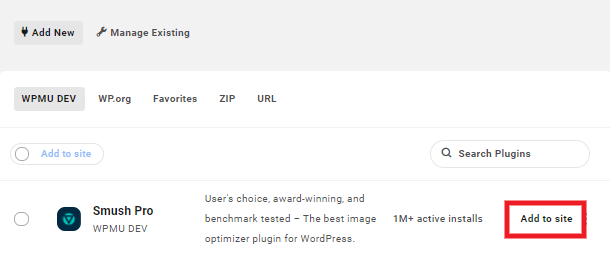
Link to chapter 2To add a plugin to a site, click Add to Site to open the plugin installation page. Alternatively, click the Options Menu button (three dots) and select Add to Site.
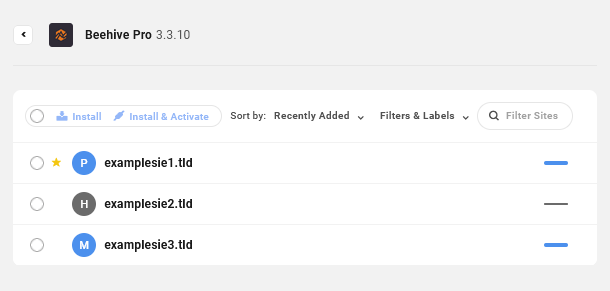
The plugin installation page lists any sites that don’t already have the selected plugin installed.
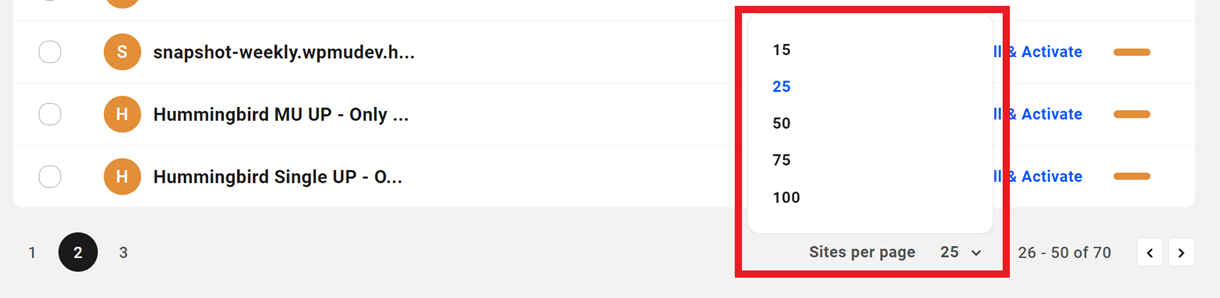
Click the Sites per page drop-down at the bottom of the page to select the number of sites to be displayed on each page.
To filter sites by name, click the Filter Sites search field and enter a name accordingly.
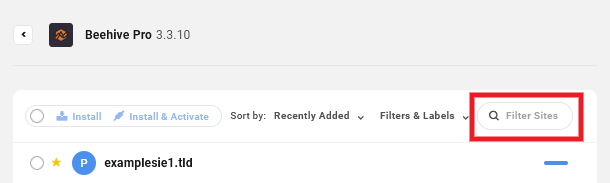
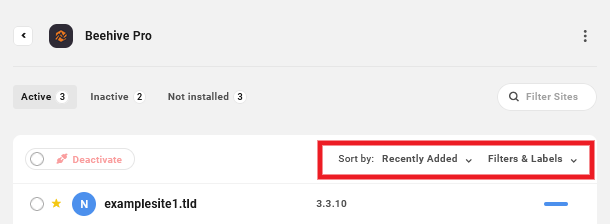
Listed sites can be sorted alphabetically or by recently added, and the list can be filtered to include only sites with any of your specific labels, or those hosted by WPMU DEV or 3rd-party hosts. To change how sites are sorted, click the Sort By dropdown menu and select your preferred sorting order. To filter sites by labels or hosting, click the Filters & Labels dropdown menu and select your preferred site label(s) or hosting.

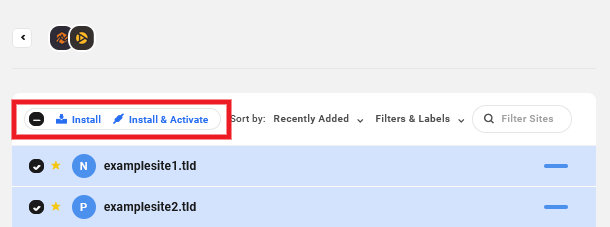
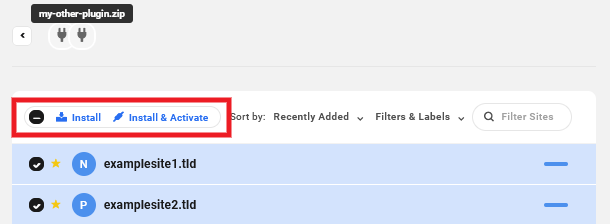
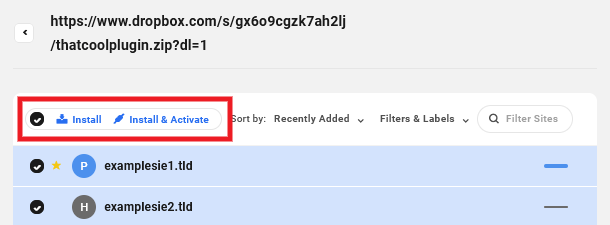
To install the selected plugin, hover over the site to which the plugin should be added, and click Install. Alternatively, if you’d also like to automatically activate the plugin upon installation, click Install & Activate.
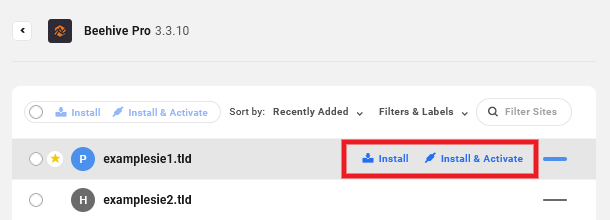
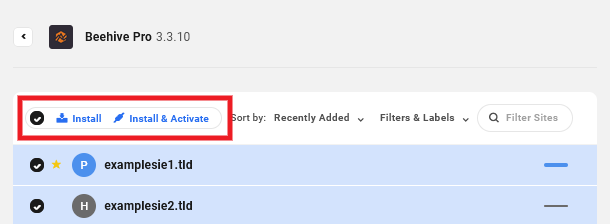
To install the selected plugin on multiple sites at once, first select any sites to which the plugin should be added, and then click either Install or Install & Activate at the top of the site list.
If you need to cancel the installation of a plugin on a queued site, click the X button to the right of the queued site.

Adding Multiple Plugins
Multiple plugins can also be added to a site in bulk. To add plugins in bulk, select the desired plugins and click Add to site at the top of the list of plugins.
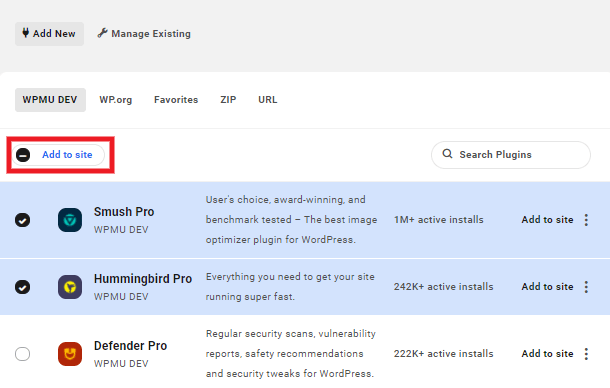
Then, select any site(s) to which the plugins should be added, and click either Install or Install & Activate.
4.2.2 Adding Plugins Via ZIP or URL
Link to chapter 2If a plugin already exists on a selected site, it will be overwritten with your uploaded plugin when adding via ZIP or URL. So this method can be handy when you want to update custom or premium plugins on sites connected to your Hub. Remember to always back up your site(s) before performing any updates.
Adding Plugins via ZIP File
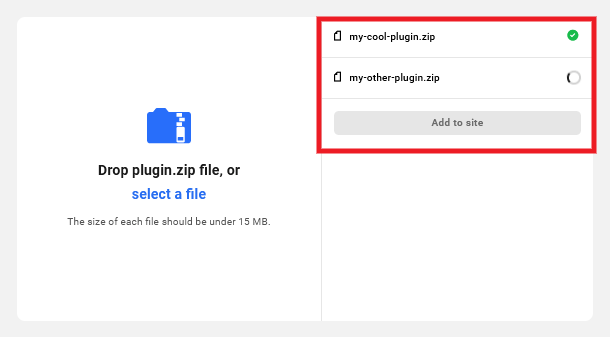
To add one or more plugins as ZIP file(s), first navigate to the ZIP tab under Plugins > Add New. Then either click the select a file link, or drag and drop the ZIP file(s) into the space where you see the zip file icon. Note that the maximum allowed size for any one file is 20Mb.

While your plugin ZIP files are being uploaded, a progress indicator appears for the one currently uploading, and the Add to site button is disabled.
When all files have finished uploading, click the Add to site button to continue.
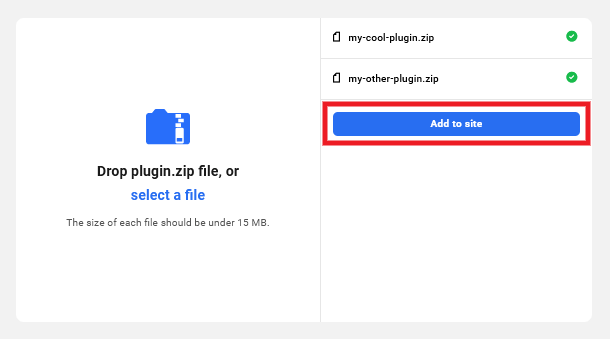
You’ll then be directed to the same screen as when adding a plugin directly from WPMU DEV, wordpress.org or your Favorites list. Follow the same process as when Adding a Plugin above and choose to either Install or Install & Activate on your selected site(s).
Adding Plugins from URL
You can add a plugin from a publicly accessible URL, a Dropbox link or a Google Drive share link. Unlike the ZIP option above, you can only add one plugin at a time using the URL method.
Navigate to the URL tab under Plugins > Add New, and enter the full URL of the zip file download link in the Plugin package URL field.
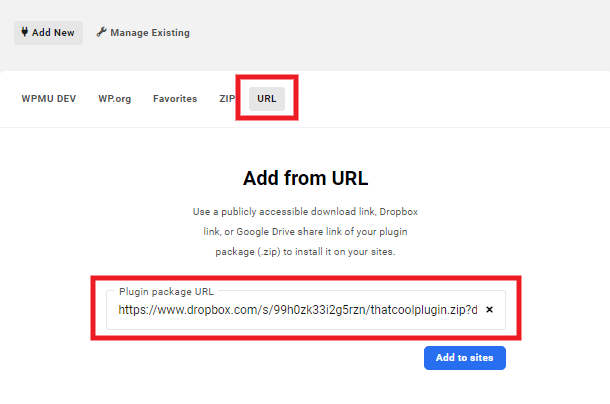
Then click the Add to sites button and you’ll be directed to the same screen as when adding a plugin directly from WPMU DEV, wordpress.org or your Favorites list. Follow the same process as when Adding a Plugin above and choose to either Install or Install & Activate on your selected site(s).
4.3 Managing Plugins
Copy chapter anchor to clipboardUnder the Manage Existing tab, you’ll find an overview of all the plugins you currently have installed on sites connected to your Hub, along with their configurations.

If you want to manage plugins on a site level, check the Hub plugins updates guide.
Navigate between pages of listed plugins by clicking the page numbers or the arrow buttons. To change how many plugins are listed on a single page, use the Plugins per page dropdown menu.

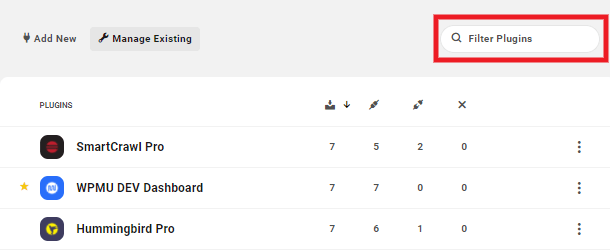
To filter your plugins by name, click the Filter Plugins search field and enter the name accordingly. Search results will be displayed as you type.
You can find an overview of your plugin configurations in a row next to each listed plugin. For each plugin, you’ll see the number of sites for which the plugin is installed, activated, deactivated, and not installed.

By default, plugins are listed alphabetically. To list plugins by configuration status, click the status icon at the top of any status column.
![]()
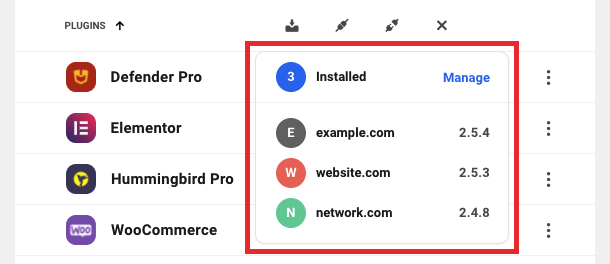
To view in-depth details about a specific configuration status for any plugin, hover over the relevant status number for that plugin. For example, hover over a number beneath the Installed icon for a plugin to see a list of sites for which that plugin is installed, as well as the plugin version installed on each site.
Click the Options Menu button (three dots) to the right of any listed plugin to access additional plugin options. Plugin options include:
- Manage – Click to manage installations of a plugin across your sites.
- Plugin info – Click to view the product page for a plugin (WPMU DEV plugins only).
- Add to favorites – Click to add a plugin to the Favorites tab of the Add New page.
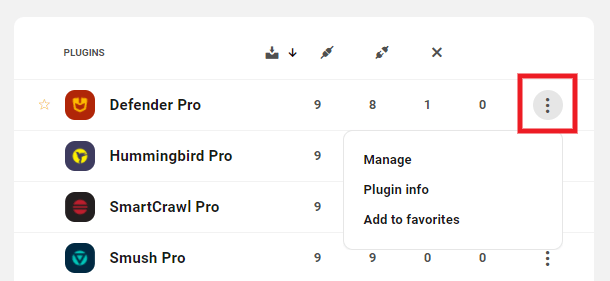
You can also favorite plugins by hovering over and clicking the star icon to the left of the plugin name.

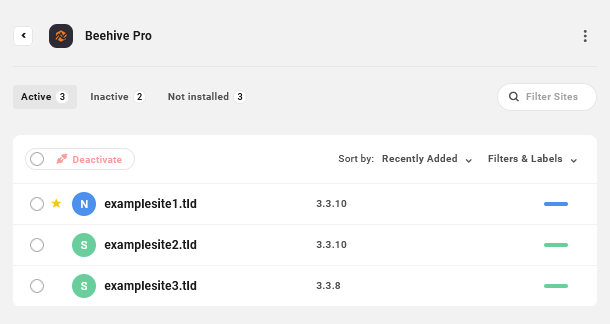
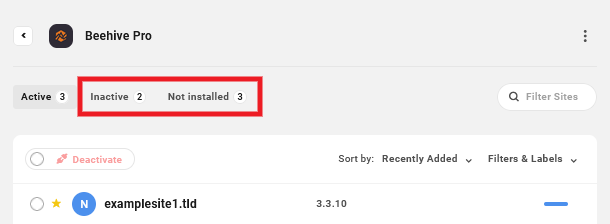
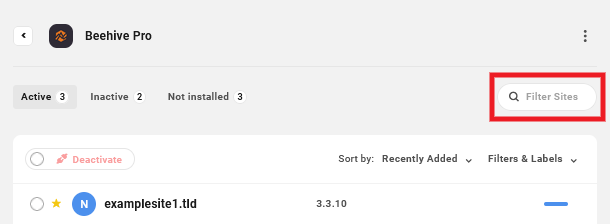
To manage site installations for a plugin, click the Options Menu button and select Manage. The plugin management page lists all sites that have the selected plugin installed and active, as well as the version number for each plugin installation. Sites for which the plugin is inactive or not installed are listed in separate tabs. To view these sites, click the appropriate tab at the top of the Add Plugins page. To filter listed sites by name, click the Filter Sites search field and enter a name accordingly. Listed sites can be sorted alphabetically or by recently added, and the list can be filtered to include only sites with any of your specific labels, or those hosted by WPMU DEV or 3rd-party hosts. To change how sites are sorted, click the Sort By dropdown menu and select your preferred sorting order. To filter sites by labels or hosting, click the Filters & Labels dropdown menu and select your preferred site label(s) or hosting. Click the Options Menu button (three dots) in the top-right corner to reveal an option to view the Plugin Info.

4.3.1 Deactivating a Plugin
Link to chapter 3To deactivate an active plugin for a site, first switch to the Active tab on the plugin management page. Then, hover over the site for which the selected plugin should be deactivated, and click Deactivate.
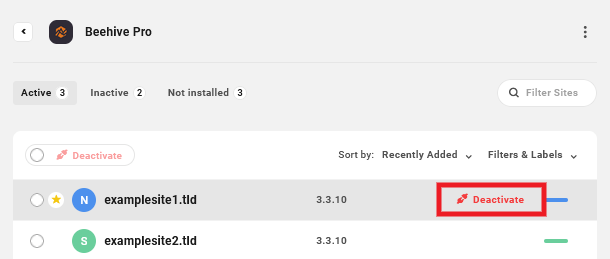
To deactivate the selected plugin for multiple sites at once, select any sites for which the plugin should be deactivated, and then click Deactivate at the top of the site list.

If you need to cancel the deactivation of a plugin on a queued site, click the X button to the right of the queued site.

4.3.2 Applying a Config
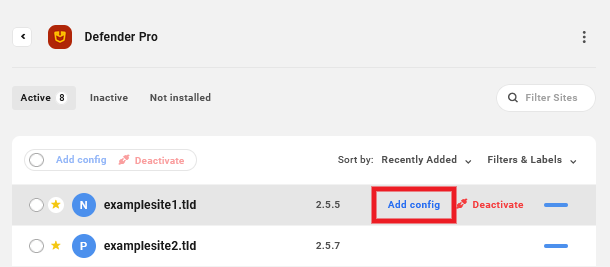
Link to chapter 3Some WPMU DEV plugins support preset configurations to easily save and quickly apply your plugin settings across multiple sites.
To apply a preset plugin configuration to a site, first switch to the Active tab on the plugin management page. Then, hover over the site to which a preset configuration should be applied, and click Add Config.
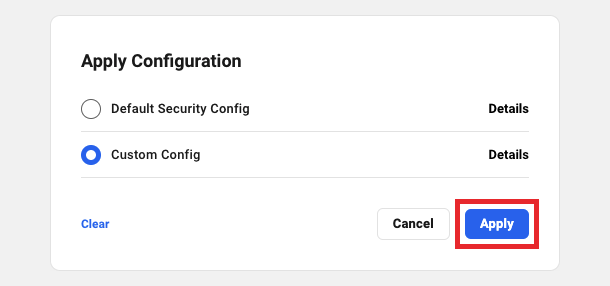
Finally, select the desired preset plugin configuration, and click Apply.
To apply a preset configuration to multiple sites at once, select any sites to which a configuration should be applied, and then click Add Config at the top of the site list.
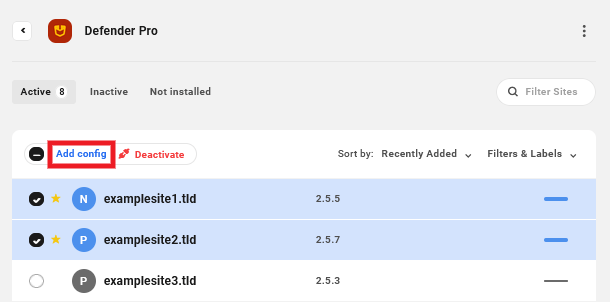
If you need to cancel the application of a config for a queued site, click the X button to the right of the queued site.
4.3.3 Activating a Plugin
Link to chapter 3To activate an inactive plugin for a site, first switch to the Inactive tab on the plugin management page. Then, hover over the site for which the selected plugin should be activated, and click Activate.

To activate the selected plugin for multiple sites at once, select any sites for which the plugin should be activated, and then click Activate at the top of the site list.
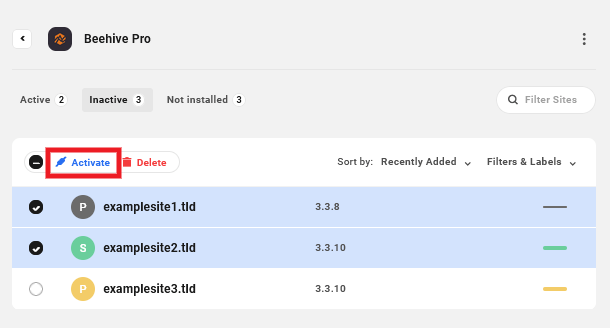
If you need to cancel the activation of a plugin on a queued site, click the X button to the right of the queued site.
4.3.4 Deleting a Plugin
Link to chapter 3To delete an inactive plugin from a site, first switch to the Inactive tab on the plugin management page. Then, hover over the site from which the selected plugin should be deleted, and click Delete.
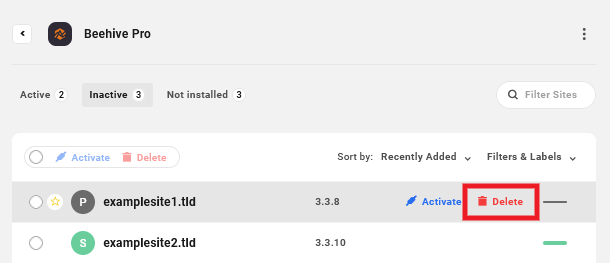
To delete the selected plugin from multiple sites at once, select any sites from which the plugin should be deleted, and then click Delete at the top of the site list.
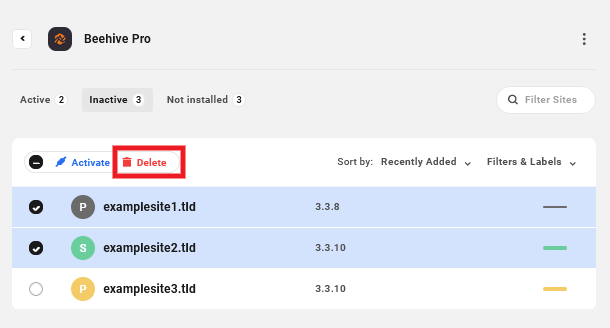
If you need to cancel the deletion of a plugin from a queued site, click the X button to the right of the queued site.
4.3.5 Installing a Plugin
Link to chapter 3To install a plugin on a site, first switch to the Not Installed tab on the plugin management page. Then, hover over the site on which the selected plugin should be installed, and click Install. Alternatively, if you’d also like to automatically activate the plugin upon installation, click Install & Activate.
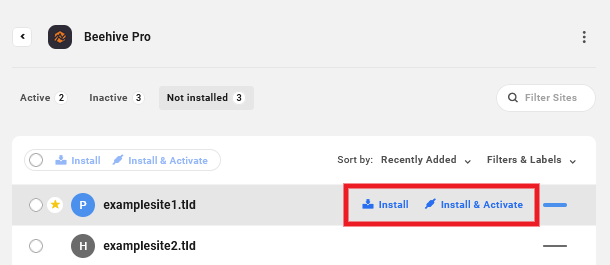
To install the selected plugin on multiple sites at once, select any sites on which the plugin should be installed, and then click either Install or Install & Activate at the top of the site list.
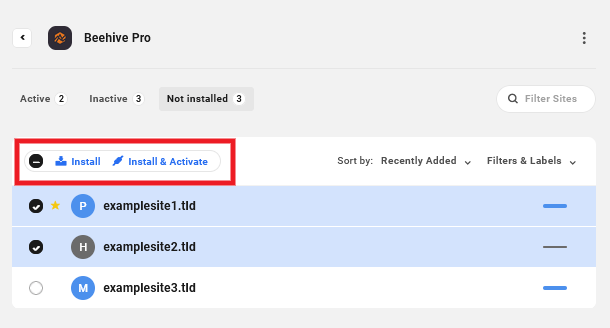
If you need to cancel the installation of a plugin on a queued site, click the X button to the right of the queued site.
Plugins that have been installed to one of your sites from a source other than WPMU DEV or WP.org cannot be installed to your other sites from the Hub’s plugin management page.
4.4 Get Support
Copy chapter anchor to clipboardIf you still have questions or need assistance after reading this document, please don’t hesitate to contact our support superheroes using the available options under the Support tab in your Hub or via the Support tab in your WPMU DEV Dashboard.
