5. Tools
This guide is a detailed look at the features and configuration options located in the WPMU DEV Hosting Tools tab.
Use the index on the left to quickly locate details about a specific feature.
If you have not set up a WPMU DEV hosting account, visit our hosting page to explore the features and view the pricing.
Already a Member? Visit your hosting dashboard to get started. More on getting started with WPMU DEV hosting can be found here.
Note that several features detailed in this document are not available for sites on the Quantum plan. See Quantum Plan Restrictions for details.
5.1 Getting Started
Copy chapter anchor to clipboardAccess the hosting Tools tab from the sidebar menu when viewing your site in the Hub.

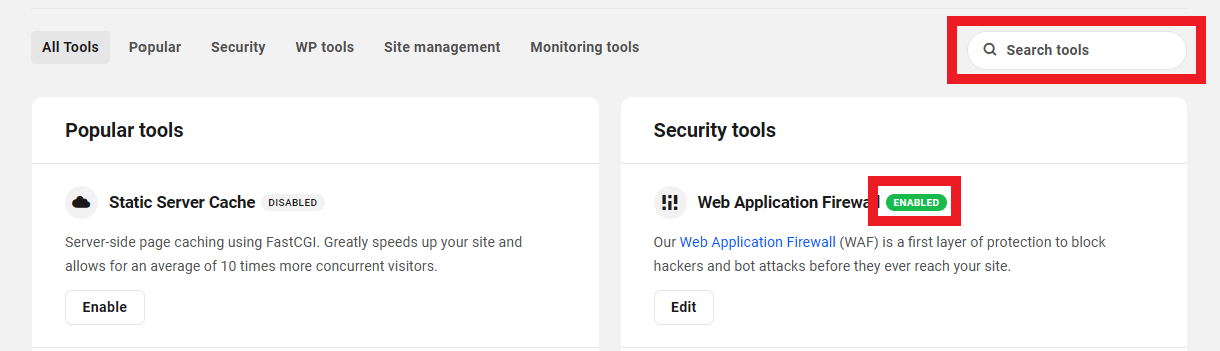
The tools are organized into categories, and you can find a complete list of all tools under the All Tools tab. Navigate between tabs to see tools within a specific category.
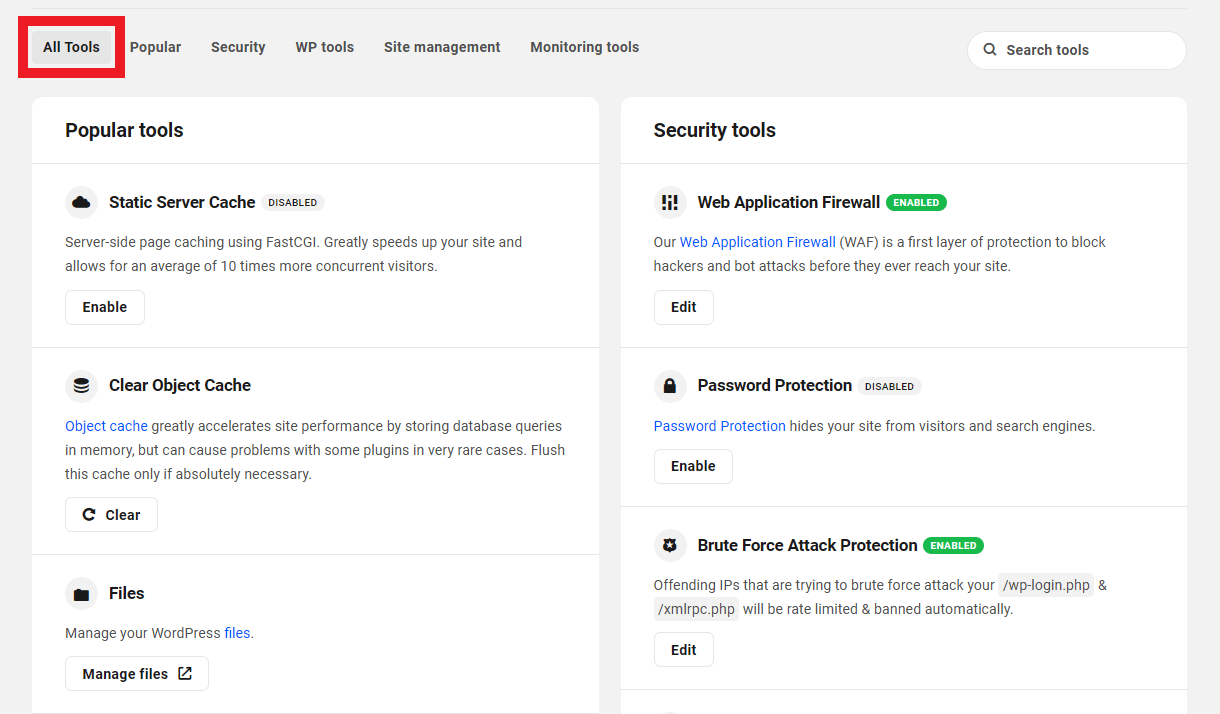
To find a particular tool, use the search bar in the top right corner. The tag next to a tool’s name indicates whether the tool is currently enabled or disabled.
5.2 Popular
Copy chapter anchor to clipboardUnder this tab, you will find all the popular hosting tools.
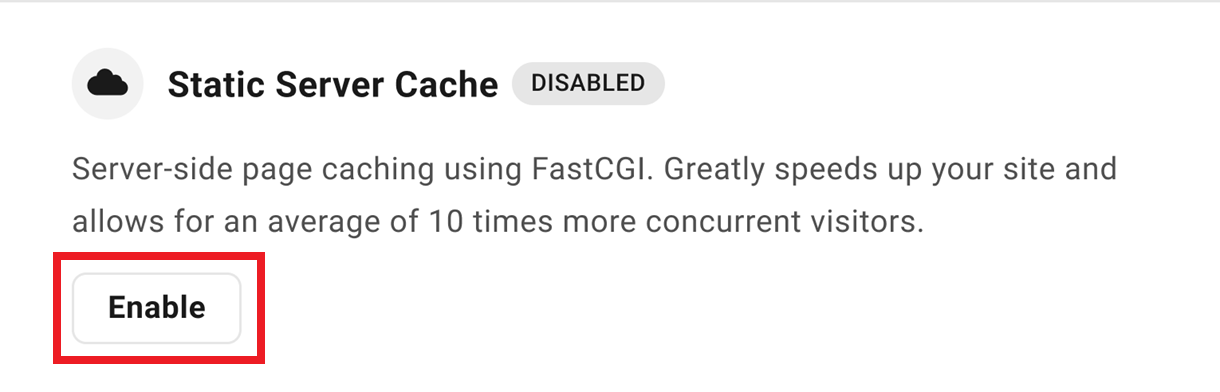
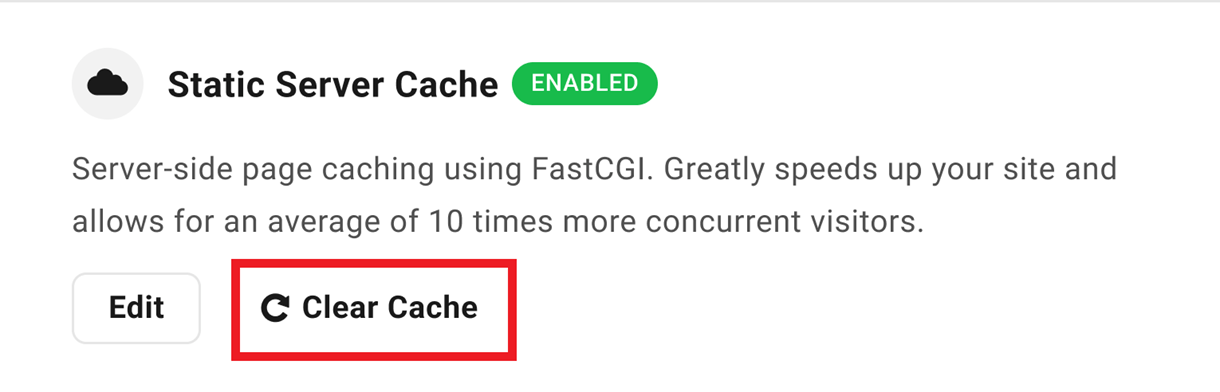
5.2.1 Static Server Cache
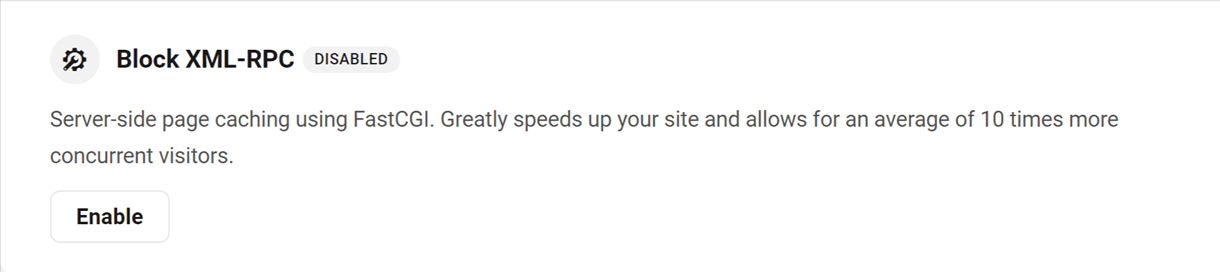
Link to chapter 2This is page caching at the server level using FastCGI. Much faster than any PHP plugin, Static Server Cache greatly speeds up your site and allows for an average of 10 times more concurrent visitors.
Click Enable to enable the Static Server Cache.
In the modal that opens up, click Enable Static Server Cache toggle to reveal additional options that you can configure. Your configuration here will be saved even if you temporarily disable the cache for any reason.
- Enable / Disable Static Server Cache – Toggle the cache on or off while keeping other options saved.
- Allow Caching Query String (Params) – Enter any query strings (e.g., ref, utm_source, utm_medium, utm_campaign, etc), one per line, that you want to be cached.
- Exclude Urls From Caching – Enter any site URLs or URL strings that you don’t want cached. E.g., if you add /blog it will also exclude /blog/samplepost or parentpage/blog/ from the cache. See also Static server cache exclusions on a multisite network.
- Cache Lifetime – Select the expiry time for the cache. Cache will regenerate automatically each time it clears.
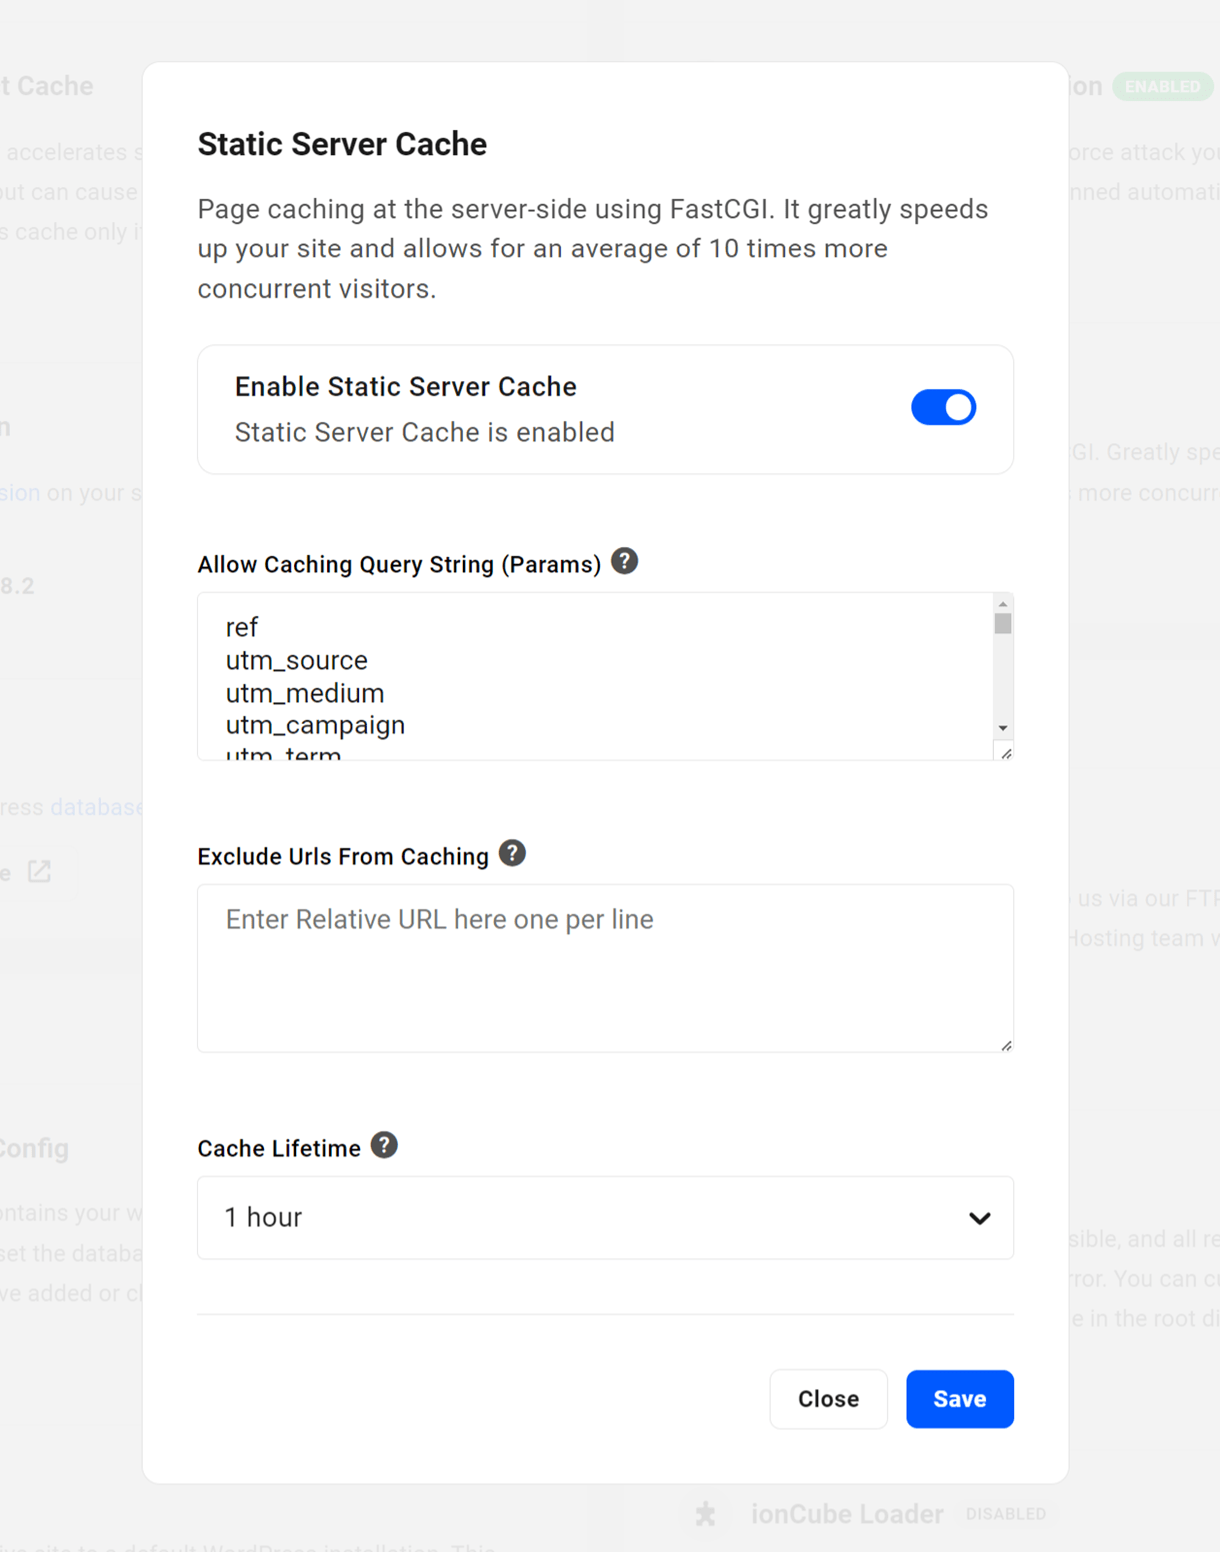
When it’s enabled, simply click the Clear Cache button if you need to clear the Static Server Cache, then click the Continue button in the modal to confirm. Note that this cache also clears itself automatically every hour.
Want to learn more about what WPMU DEV’s Static Server Cache can do for you site performance? Check out our blog post on How to Speed up Hosting with Static Server Cache.
Static server cache exclusions on a multisite network
On a subdirectory multisite installation, if you have more than one subsite where each site has a page with the same slug (e.g., about), and you only want to exclude the about page on a specific subsite, you need to include the site directory in the URL (e.g., site1/about/). Otherwise, if you add /about only, all the pages with the slug about on all subsites won’t get cached.
On a subdomain multisite installation, you can’t exclude a specific page on only one subsite that shares the same slug on another subsite. As you can only exclude relative URLs from being cached, anything entered here would affect all subdomain subsites.
Compatibility
If Hummingbird is active on your site, its Page Caching feature is automatically disabled if Static Server Cache is enabled. Static Server Cache will be automatically cleared when you update a post or page.
WooCommerce is supported by default, meaning that any dynamic process in Woo is not cached. So if a user adds items to their cart, etc, that would not be cached by the Static Server Cache, so no worries there.
What does it cache exactly?
The following should give you a good idea about what does and does not get cached when Static Server Cache is enabled.
- GET/HEAD requests are cached (that’s your content; meaning all your posts, pages, etc.).
- POST requests are skipped (for example, forms or any other frontend submission).
- Query strings are skipped.
- wp-admin, xmlrpc, wp-*.php, feed, index.php, sitemap URIs are skipped.
- Cache is skipped if these cookies are found: comment_author, wordpress_, wp-postpass, wordpress_no_cache, wordpress_logged_in, woocommerce_items_in_cart.
- Cache is skipped if these WooCommerce URIs are found: /store, /cart, /my-account, /checkout, /addons.
- The max size of any item is 1Gb.
Are any query strings cached by default?
Newly created sites will have the following query strings cached by default. Note that no query strings are cached by default on existing sites, so you can add any that you may need according to your site’s current configuration.
ref
utm_source
utm_medium
utm_campaign
utm_term
utm_content
utm_expid
fbclid
fb_action_ids
fb_action_types
fb_source
mc_cid
mc_eid
gclid
dclid
_ga
campaignid
adgroupid
_ke
cn-reloaded
age-verified
ao_noptimize
usqp
mkt_tok
epik
ck_subscriber_id
How to see if it’s working
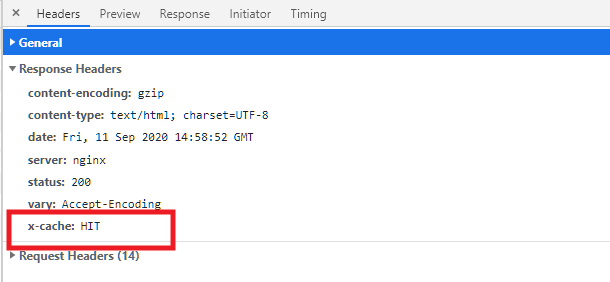
To check any page to see if it’s being cached by our Static Server Cache, pop open your browser’s developer tools, and click on the Network tab. Then reload your page.
Have a look at the Response Headers for the main document type of your page, and look for x-cache where you’ll see the following possible values.
- x-cache: BYPASS – Cache is bypassed for any reason (URL parameter, cookie, WooCommerce, logged in etc.).
- x-cache: MISS – It will be cached on next page load.
- x-cache: HIT – Cache is served.
Note that the Static Server Cache is not enabled on staging sites.
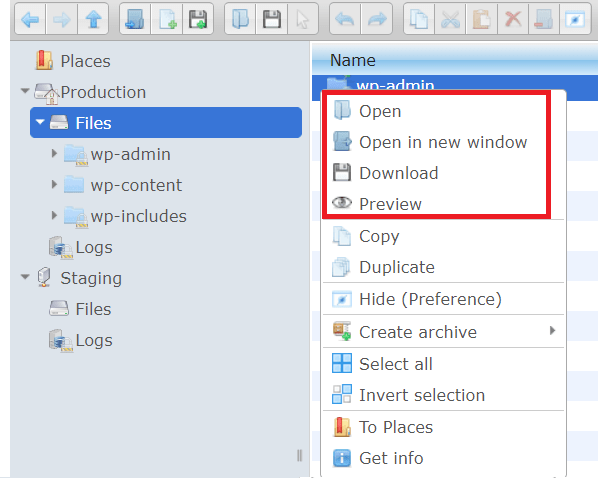
5.2.2 Files
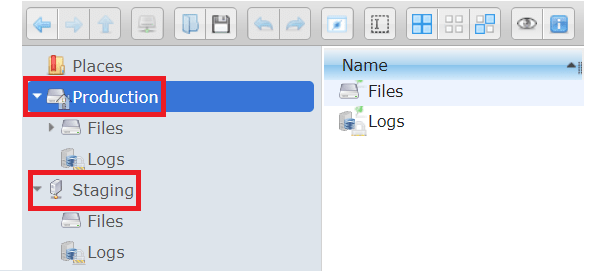
Link to chapter 2WPMU DEV also gives you access to easily edit and manage your website files using a file manager interface in case you don’t want to mess around with SFTP.
From the Tools tab, click the Manage Files link to open the File Manager in a new tab.

To help prevent inadvertent edits or deletions, core WordPress files are locked (read-only) and cannot be edited in the File Manager. If you absolutely do need to edit a core WP file, you will need to use an SFTP connection to do that.
Note also that hidden files & directories (the ones that are preceded by a dot) are visible by default. So if you migrated your site from an Apache/Litespeed server, you may see an old .htaccess file; such a file could also be auto-created by a plugin. That file will of course not do anything as our servers are Nginx, which do not use htaccess.
The left panel allows you to navigate through files and logs from both the production server and the staging server.
The main toolbar at the top of the page offers features such as adding new folders and files, as well as uploading new documents.
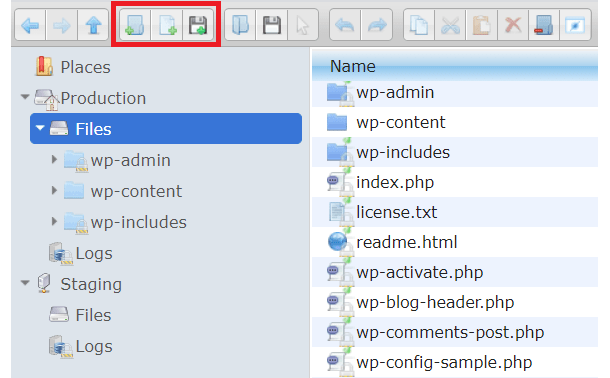
If a tool is grayed out, it is unavailable for the selected location or document. To interact with folders and files without using the toolbar, right click on the location and a pop-up menu will appear. The pop-up menu includes features that are offered on the toolbar like open, download, and preview.
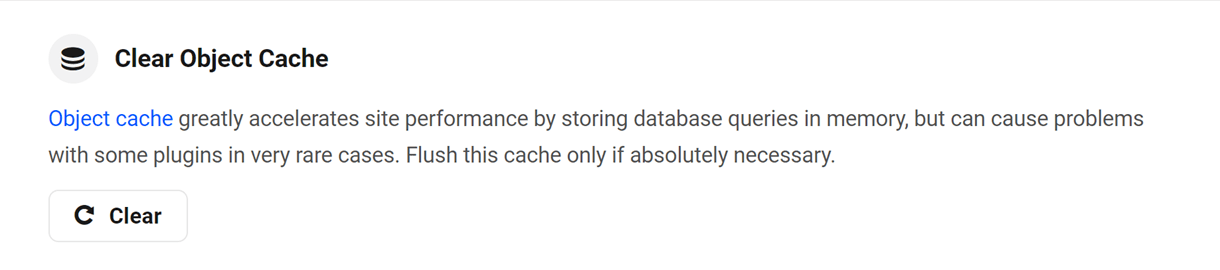
5.2.3 Object Cache
Link to chapter 2We leverage Object Cache at the database level, and this is enabled by default on all sites we host.
Object Cache improves performance by minimizing server load related to queries that are frequently called by WordPress, plugins, and themes. Because of this, you may need to clear Object Cache from your Hosting Hub after using a plugin that interacts directly with the database in ways outside of normal WordPress guidelines or if you make changes directly in your database using phpMyAdmin.
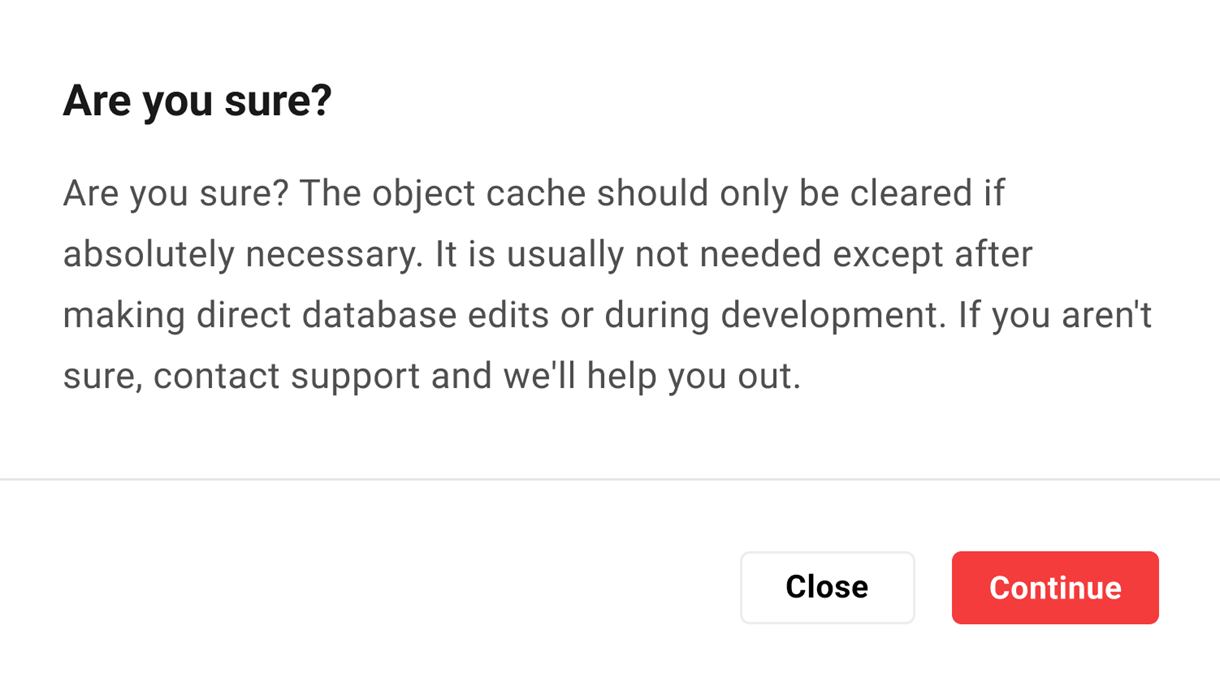
The object cache should only be flushed if absolutely necessary. It is usually not needed except after making direct database edits or during development. If you aren’t sure, contact support, and we’ll help you out.
To clear cache, click Clear in the Object Cache row.
A “Are you sure?” pop-up will verify you would like to clear your cache. Click Continue to flush object cache.
Note that the Object Cache is not enabled on staging sites.
5.2.4 PHP Version
Link to chapter 2It is our policy to only provide support for the latest supported PHP versions. This is both to make sure our sites are secure, and to provide you with the fastest most performant hosting service we can! Currently, we default all newly-created sites to the latest release of PHP 8.2.
Note that some third party plugins may occasionally be out of date and cause issues with the latest version of PHP. In that case you can look for updates, alternatives, or downgrade your PHP version to any version that we currently support.
If you want to test your site’s compatibility with the latest version of PHP before upgrading, we recommend changing the PHP version in your staging environment and testing the functionality there first.
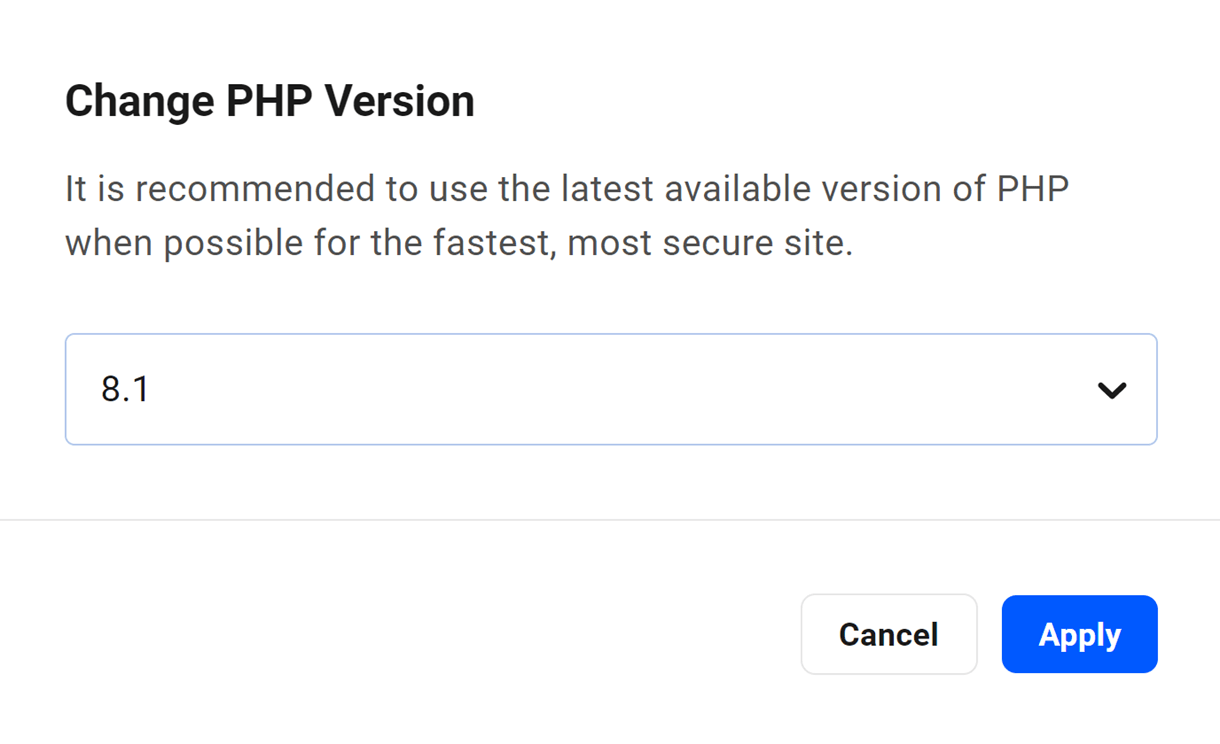
To upgrade or downgrade your PHP version, click Update.
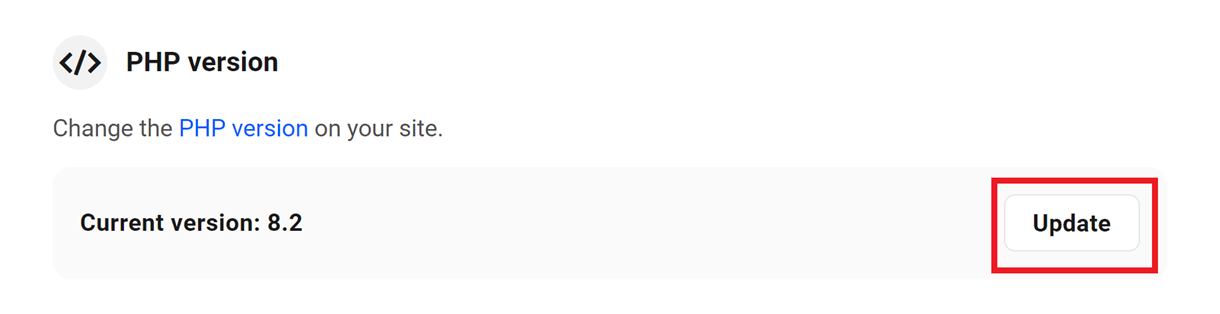
A list of available supported PHP versions will be displayed in the modal. Choose the version you wish to install, and click Apply.
5.2.5 Database
Link to chapter 2WPMU DEV gives you access to easily edit and manage your Database from the phpMyAdmin database manager.
Making changes to a site’s database can break the site. Take care when making changes. Contact support if you have questions. Detailed documentation for phpMyAdmin can be found on the phpMyAdmin site.
From the Tools tab, click the Manage Database link to open phpMyAdmin.

phpMyAdmin includes tools for managing and viewing databases:
- SQL
- Status info
- Export
- Import
- Settings
- Variables
- Charset
- Engines
- Plugins
5.3 Security
Copy chapter anchor to clipboardUnder this tab, you will find hosting tools associated with security.
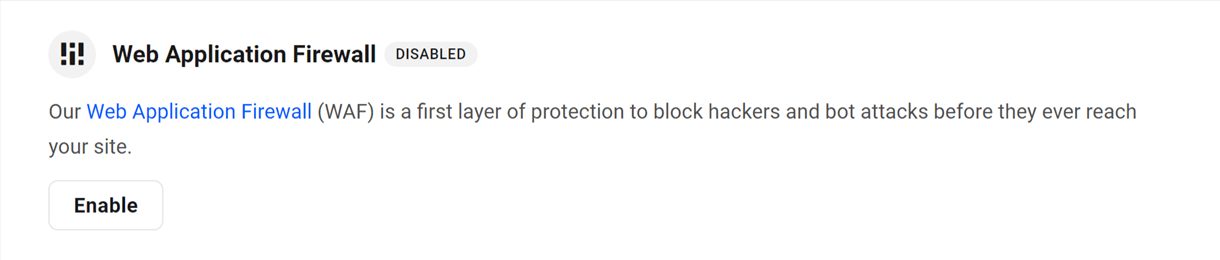
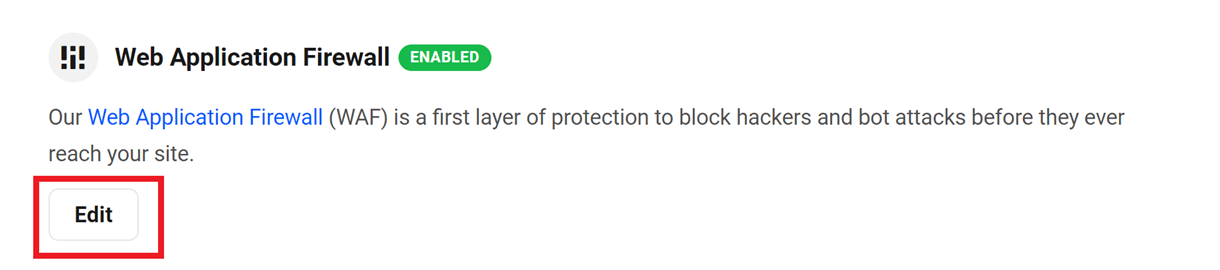
5.3.1 Web Application Firewall (WAF)
Link to chapter 3Our Web Application Firewall (WAF) monitors the IP addresses and user agents attempting to access your site and filters out traffic that is known to be unsafe or that you have identified as unwanted.
It’s a first layer of protection to block hackers and bot attacks before they ever reach your site. The WAF filters requests against our highly optimized managed ruleset covering common attacks (OWASP top ten) and performs virtual patching of WordPress core, plugin, and theme vulnerabilities.
The key distinction between our WAF and typical site security protocols is that a security plugin protects a site at the point of attack, whereas a WAF prevents unwanted traffic from ever reaching its intended target in the first place (learn more about how WAFs work).
Our WAF protects sites from attacks such as cross-site request forgeries, cross-site-scripting (XSS), file inclusions, and SQL injections.
Note that WAF is not available on staging sites.
For additional steps in protecting your site, use Defender, and check out the Ultimate Guide to Security on the blog.
When enabled, the WAF will intercept any files with filenames that contain single quote characters (e.g., file-‘name’.jpg), and will block them from being uploaded to prevent potential security exploits. More information about invalid special characters in WordPress can be found here.
Configuring your WAF
A WAF protects against vulnerabilities and filters out attacks and malicious traffic by requiring all traffic to pass a set of rules before it ever reaches your WordPress site. WPMU DEV has a custom set of WAF rules and allows you to add your own, as follows:
- IP Allowlist
- IP Blocklist
- User Agent Allowlist
- User Agent Blocklist
- URL Allowlist
- URL Blocklist
- Disable Rule IDs
Click Enable to activate the Web Application Firewall feature.
Then click the toggle switch in the popup to access the configuration panel.
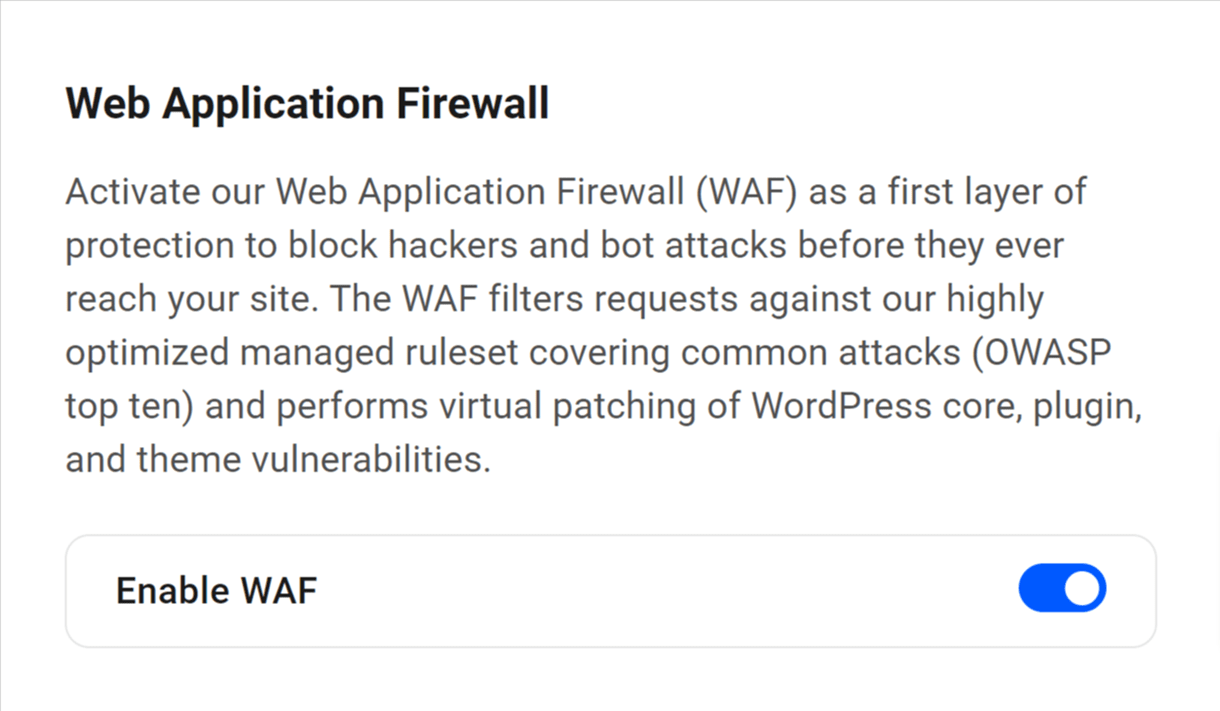
WPMU DEV maintains a set of rules that will identify and block known, unsafe traffic, but admins can allowlist or blocklist IP addresses and user agents as they see fit using this configuration panel.
IP Allowlist/Blocklist
The IP or Internet Protocol address is a unique number that is linked to all online activity for a given user. You can block or grant access to specific machines, locations or users with the IP Allowlist/Blocklist fields.
You can Allowlist or Blocklist an IP address by entering it into the fields provided or by entering an IP range in CIDR notation. This is done by specifying the number of bits used for the network portion of the address in the following format: start of IP address range/number of network bits. For example, entering the range from 192.168.100.0 to 192.168.103.255 should be written as 192.168.100.0/22 and 192.168.100.0 to 192.168.101.255 would be 192.168.100.0/23. More information on this can be found in this DigitalOcean article or on the Petri site.
Enter only one IP address or range per line, and click Save to save.
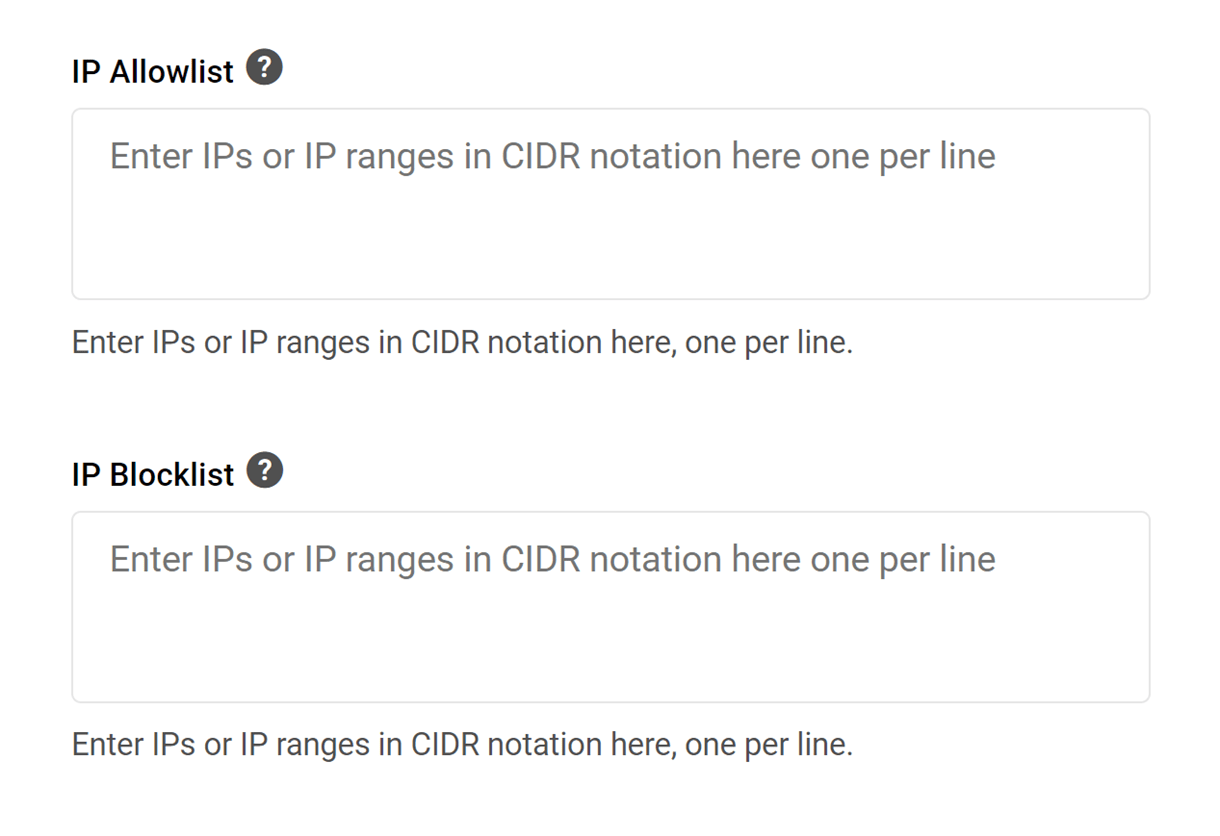
This makes it easy to block attacks quickly before they reach your server or allowlist your own IP or team member’s IP so they can bypass the WAF.
Note that if you need to add a range of IP addresses in either list, it must be added in CIDR Notation. For more info on that, see this Wikipedia article. And here’s a handy CIDR conversion tool to make your job a bit easier.
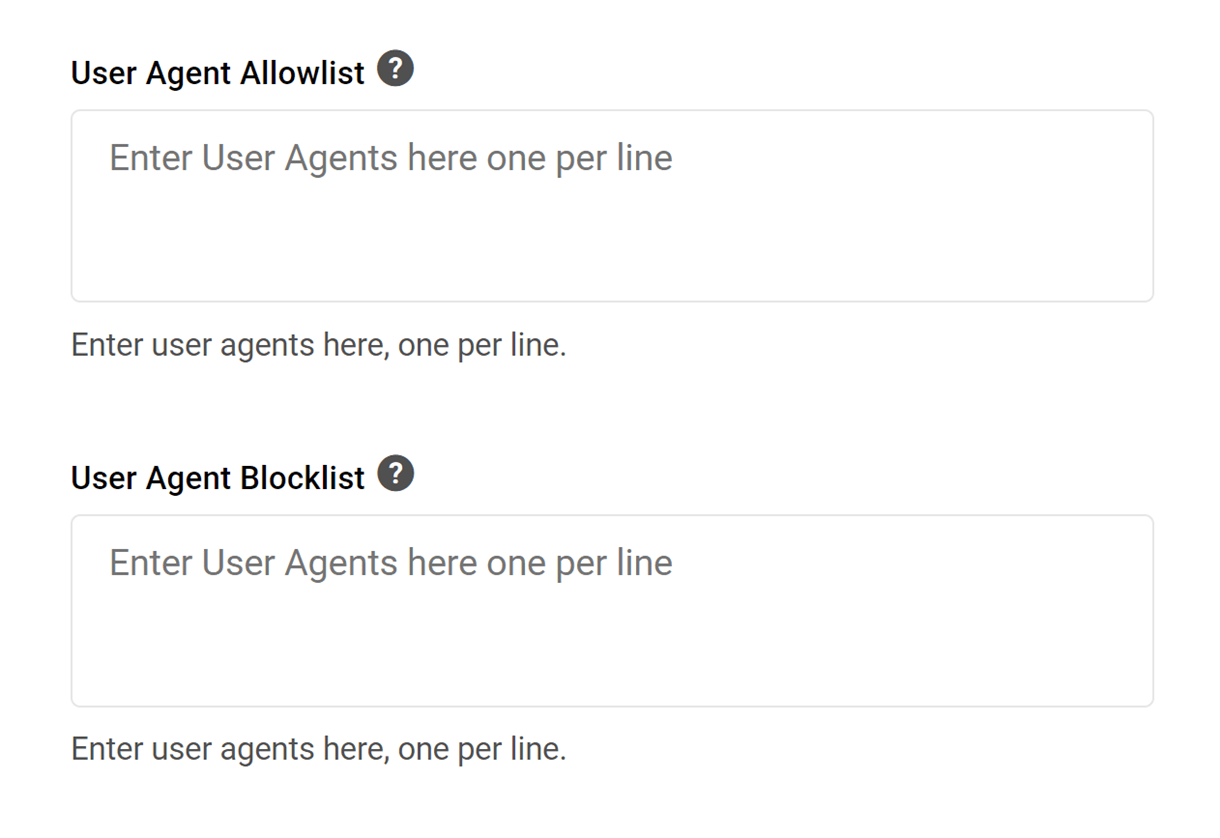
User Agent Allowlist/Blocklist
The user agent is the system information being used to access your site, including:
- The browser application name and version
- The host operating system and language
Often this information can be used to block a botnet that is originating from too many IPs to block but is using the same User Agent for its attack. You can view visitor User Agents in your access log.
Use the Allowlist field if you need to allow a good bot that doesn’t use specific IPs to bypass firewall rules. Remember, User Agents can easily be spoofed by bots, so allowlisting them should be done only when you can’t allowlist by IPs.
You can Allowlist or Blocklist a user agent by entering it into the fields provided. An example of a correctly formatted user agent to enter into the field is Mozilla/5.0 (Linux; Android 9; moto e(6s)) AppleWebKit/537.36 (KHTML, like Gecko) Chrome/77.0.3865.92 Mobile Safari/537.36. Enter only one agent per line, and click Save to save.
Below is a list of bots that are known to be malicious and are blocked by default by our WAF. Note that this list is by no means exhaustive and there may be additional bots identified by our Comodo Ruleset that are not listed here.
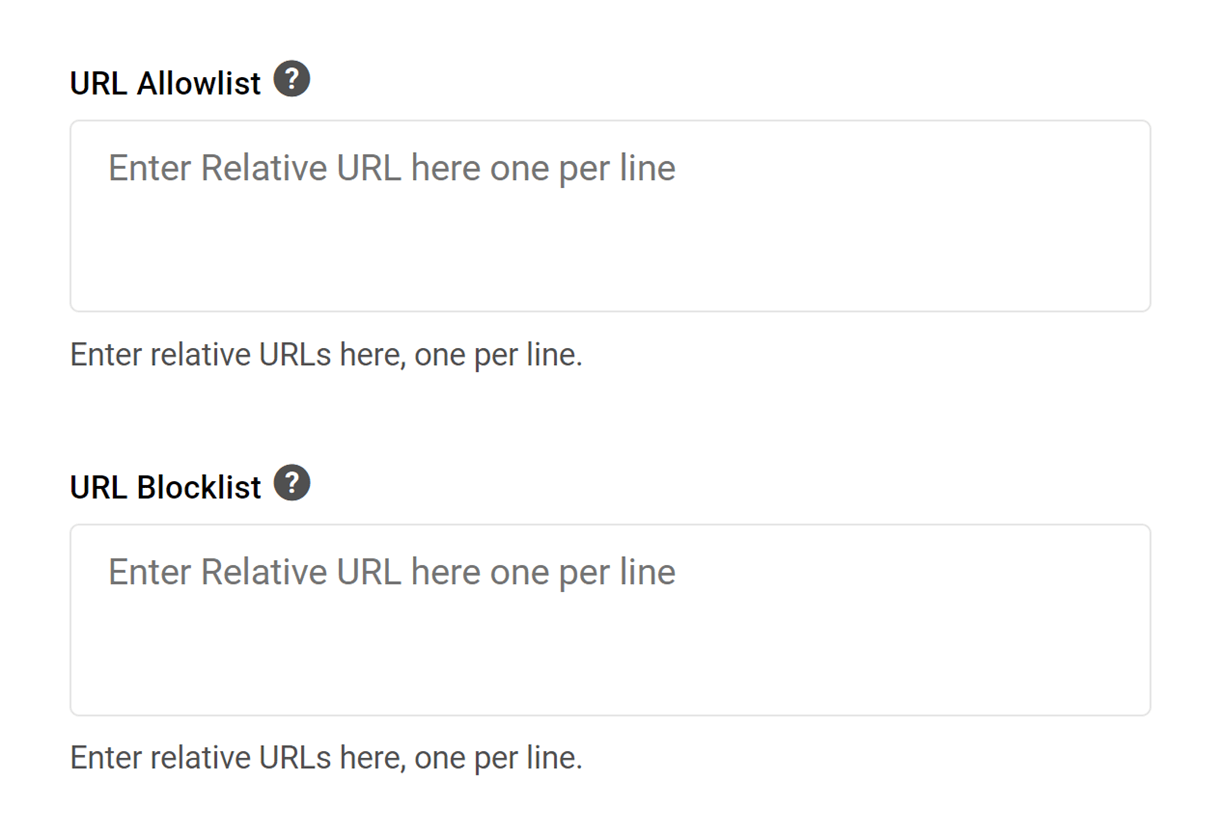
URL Allowlist/Blocklist
In the unlikely event that any site URLs get blocked, possibly due to embedded content, you can add them to the URL Allowlist as relative URLs.
You can also explicitly block any relative URL by adding it to the URL Blocklist.
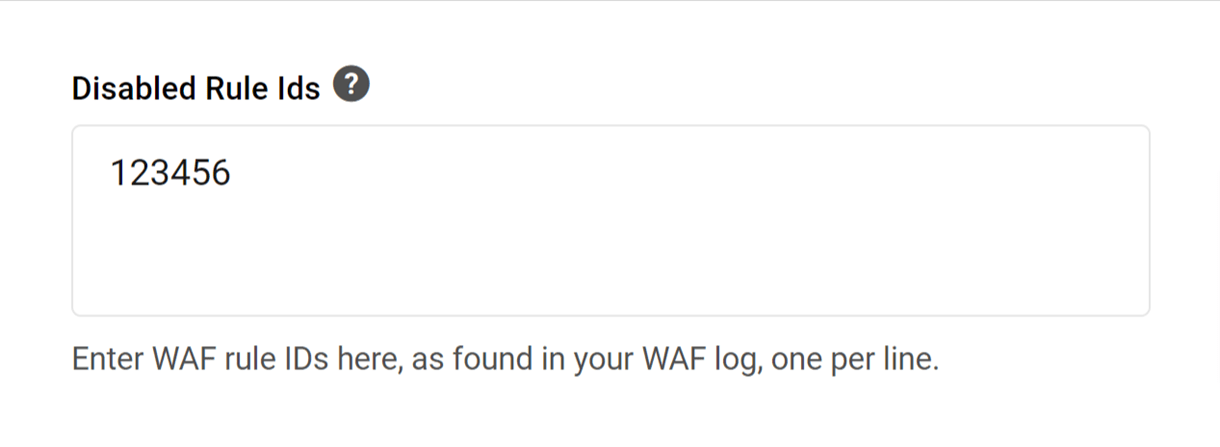
Disabled Rule Ids
You can also disable specific firewall rule IDs that appear in the WAF log under the Logs tab (see below).

Remember, when activating, deactivating or editing rules in the WAF, click the Save button to save your changes.
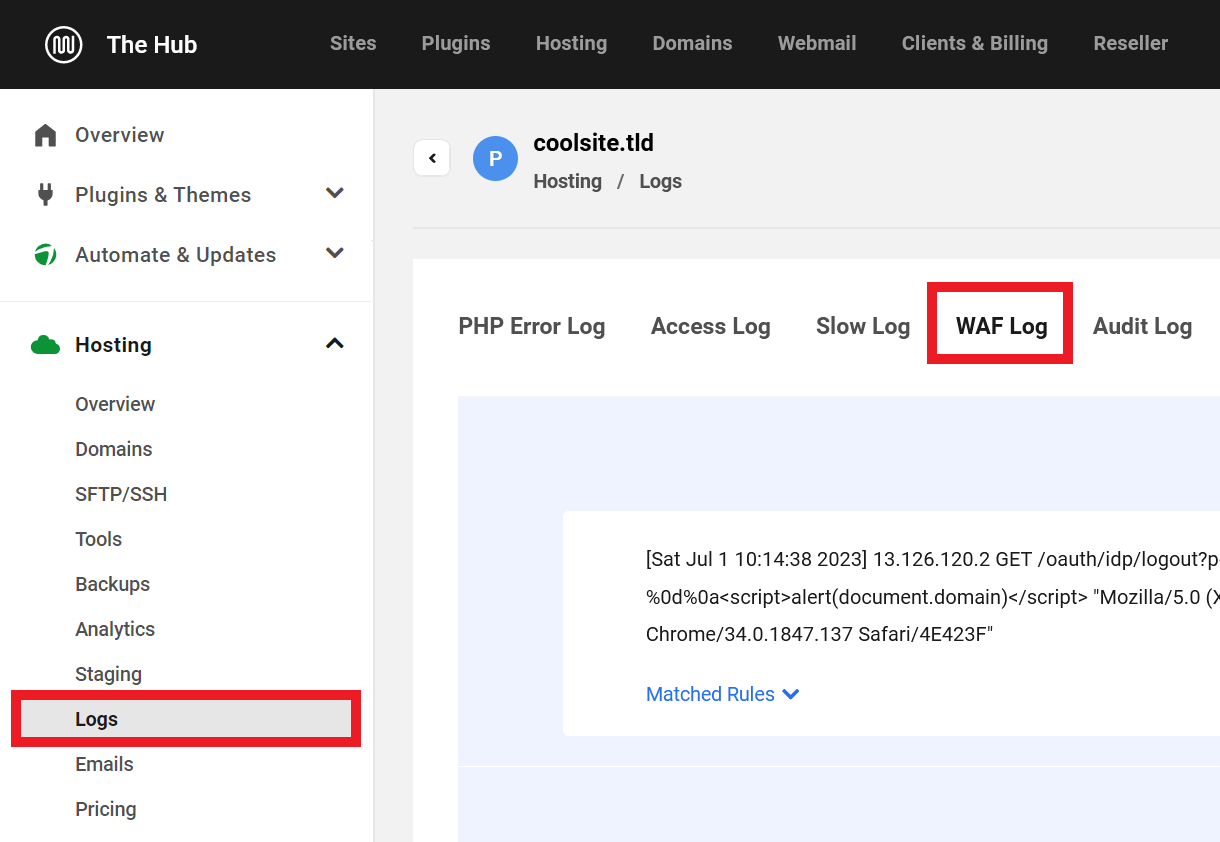
WAF Logs
WAF Logs for a specific site can be found in Hosting under the Logs tab.

Logs can be used to see where attacks are coming from, what requests were blocked, what rules those requests triggered, and changes that can be made to minimize false alarms. For example, if you are performing a valid action on your site and get blocked, you can find information on why in the WAF log and perhaps allowlist the IP or disable a specific firewall rule ID. More information about the WAF Logs can be found in the WAF Log document.
Allowing Legitimate Requests
Occasionally, legitimate requests from plugins or page builders may be blocked by the WAF, which can result in HTTP client errors when interacting with them. To prevent this, the relevant WAF rule(s) can be disabled in the WAF settings.
To disable a problematic WAF rule, you’ll first need to identify the Rule ID. To do so, navigate to the Logs tab in The Hub’s Hosting module, and click WAF Log
Then, identify and make a note of the Rule ID in the most recent related log entry.
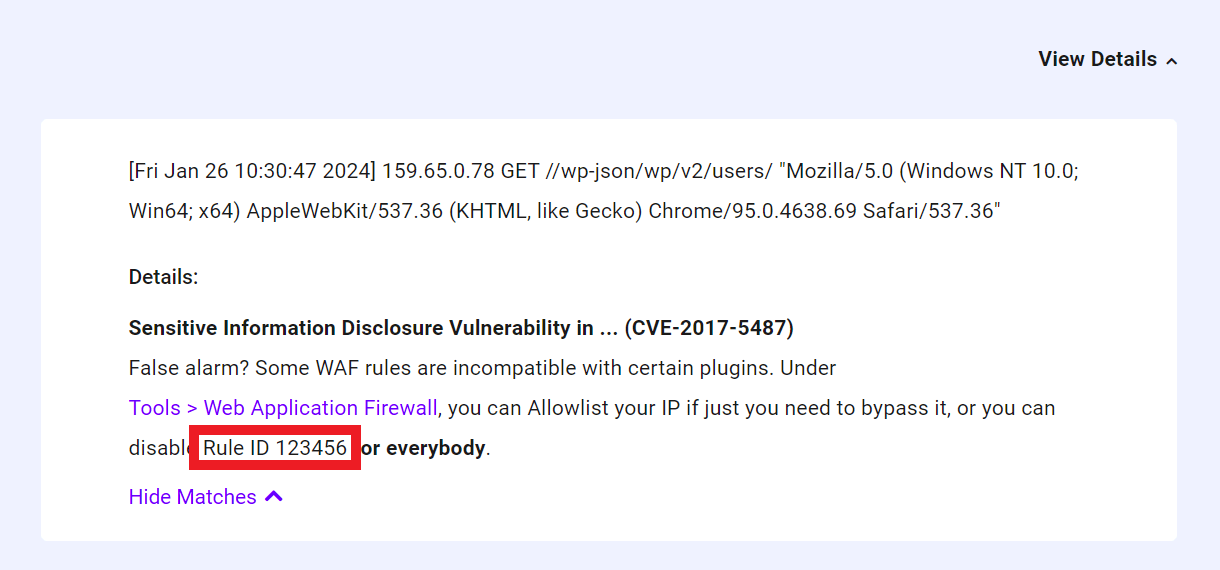
Next, navigate to the Tools tab in the The Hub’s Hosting module, and open the Web Application Firewall settings.
At the bottom of the settings window, enter the Rule ID identified earlier into the Disabled Rule Ids field, and click Save.
Repeat this process as needed for all WAF rules that are blocking legitimate requests, and then verify that the affected plugins work as expected.
Occasionally, the Hub may not be able to accurately detect the Rule ID and will label it “0”. But you can always find the Rule ID by downloading the waf.log file and locating the corresponding entry. See the Download chapter in our Logs document for details.
While not always possible, it is more secure to whitelist relevant user agents, IP addresses, or URLs as a means to allow certain blocked requests than it is to disable WAF rule IDs. Even so, keep in mind that adding any exclusion has the potential to make the WAF less secure.
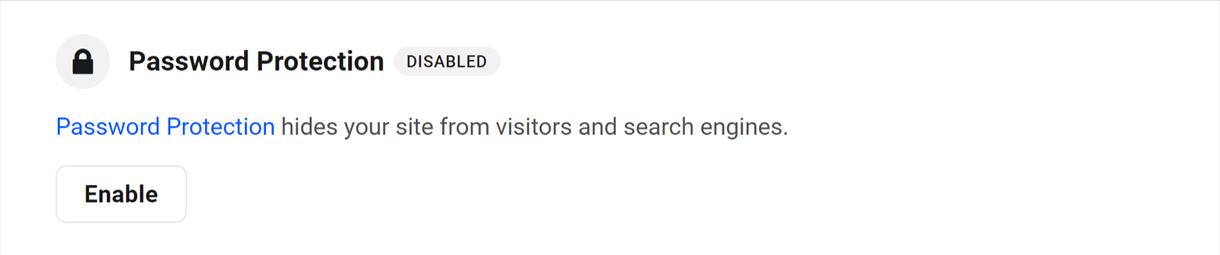
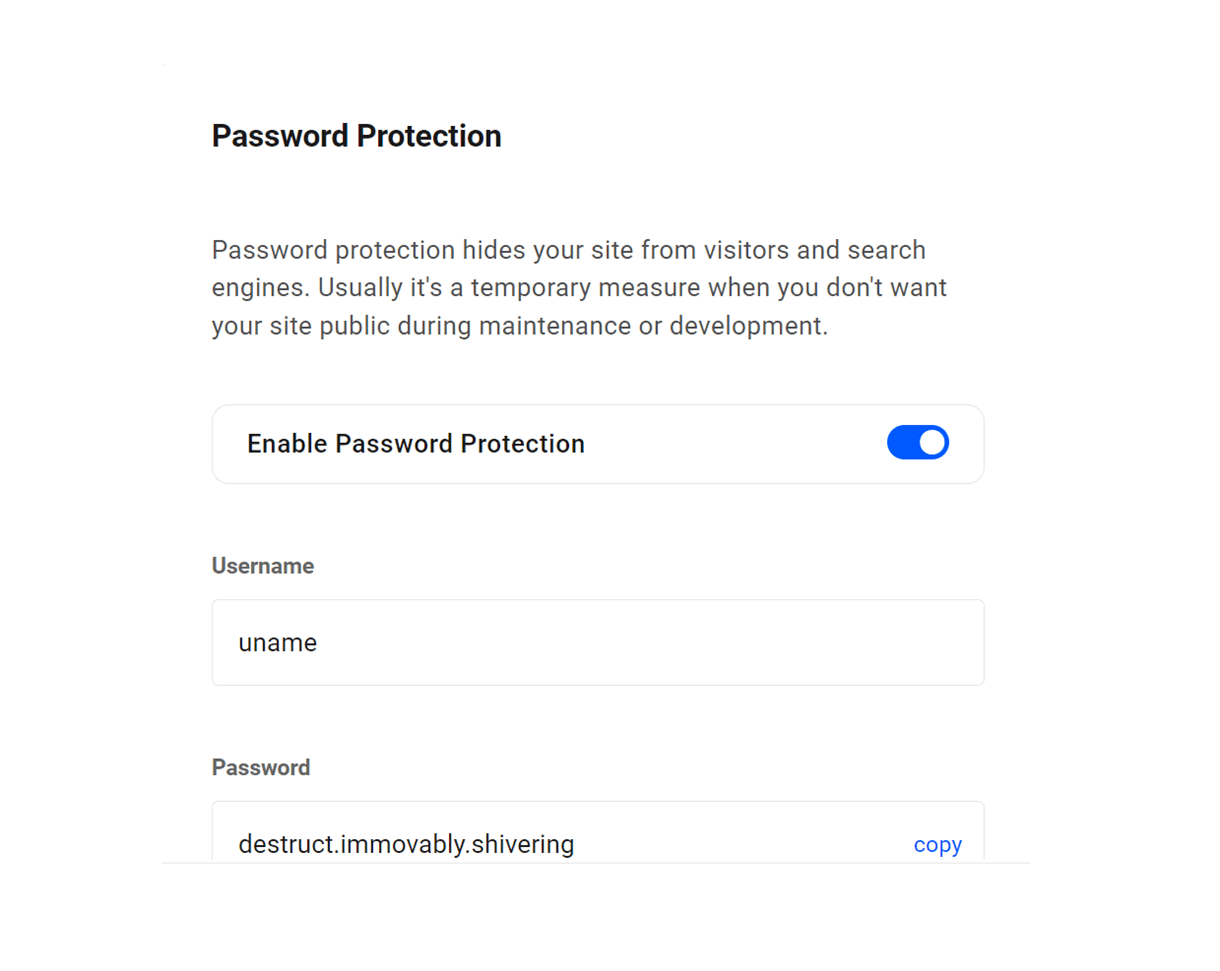
5.3.2 Password Protection
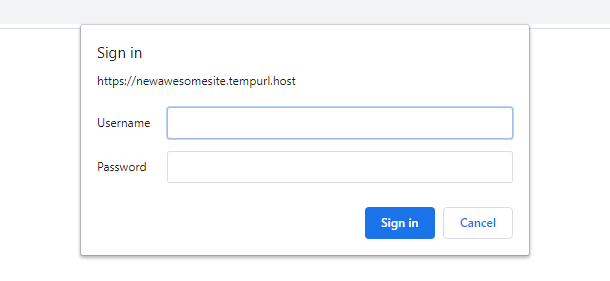
Link to chapter 3You have the option of enabling ‘Password Protection’ on any site. Unlike your WordPress credentials, which control access to a site’s admin areas, Password Protection controls access to an entire site, meaning only those who know the password can work on or view a site. It even hides a site from search engines.
This is useful when developing a new site that you don’t want yet publicly available on the web. You can share the username and password with clients or colleagues, but unauthorized admin users and the general public will not have access.
Password Protection uses Basic HTTP Authentication and does not use any WordPress usernames or login details.
Users who attempt to access any part of your site will see a login modal similar to the one in the image below. Only by entering the correct credentials will the user be allowed to proceed.
Click Enable to activate the Password Protection feature.
Then use the toggle in the modal to turn site protection on or off.
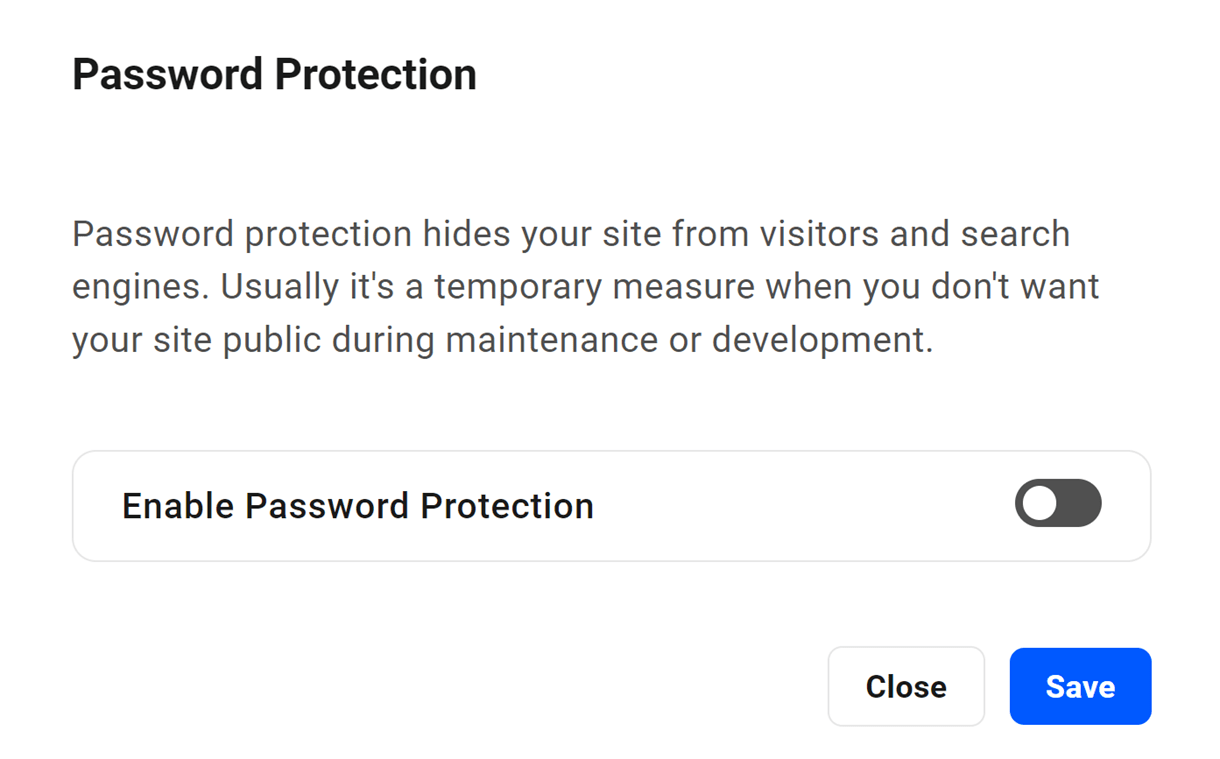
After enabling the feature, enter the username and password you wish to apply to this site. A strong password will be generated, or you can enter a custom password in the field. Click Save to save your changes.
5.3.3 Brute Force Attack Protection
Link to chapter 3All sites hosted by WPMU DEV have measures enabled by default at the server level to help prevent brute force attacks. This is to help ensure your site’s server never goes down due to a bot attack on the most commonly targeted WordPress URIs: /wp-login.php & /xmlrpc.php
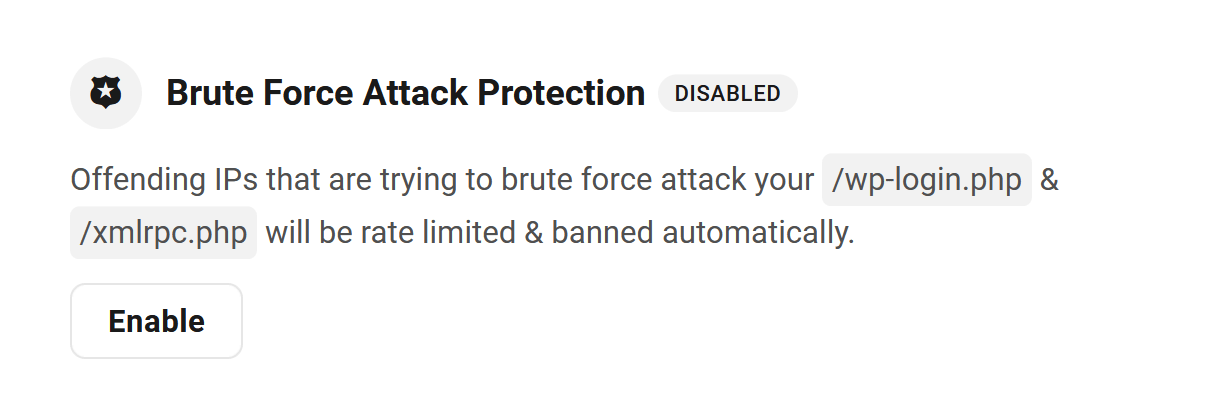
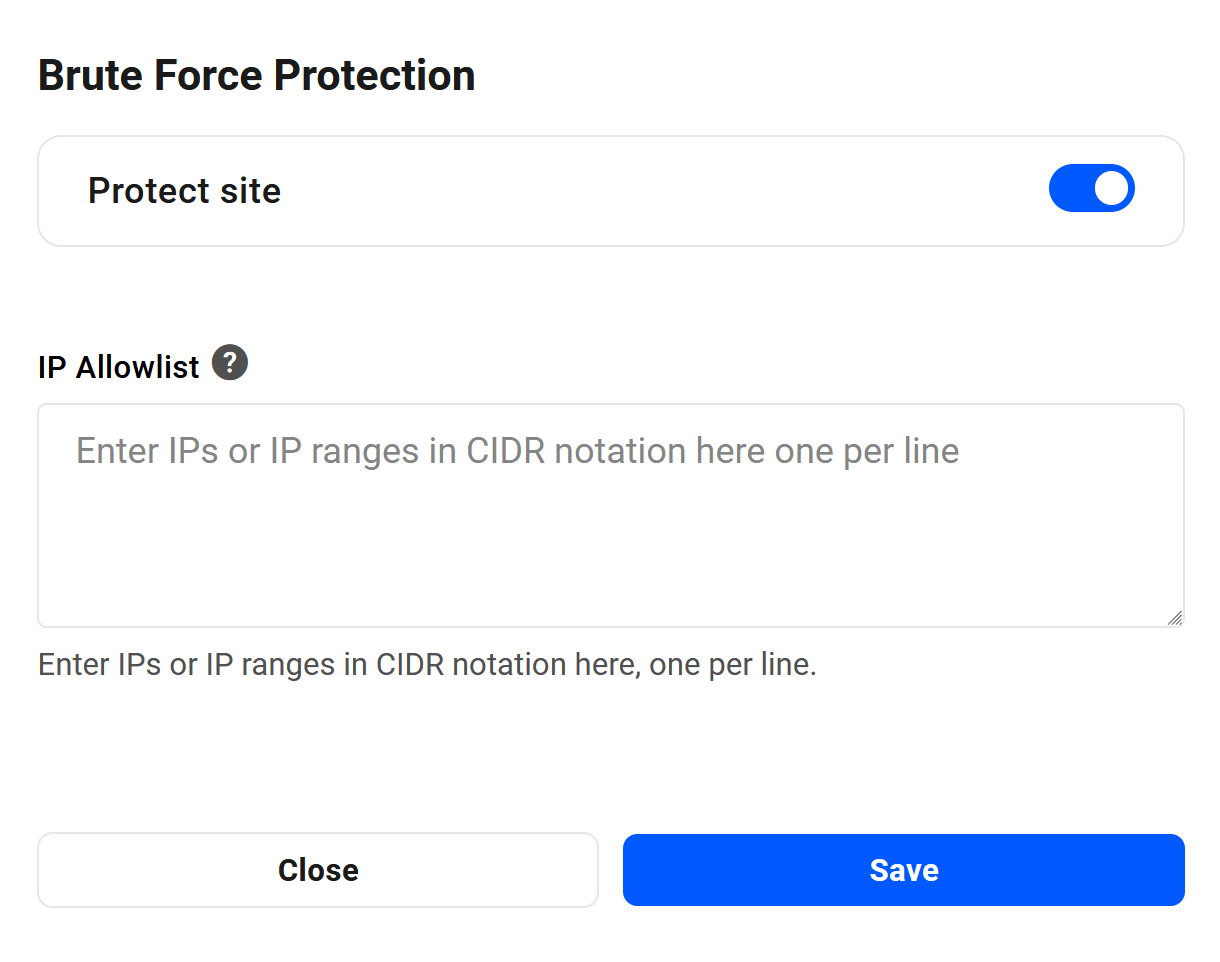
You can disable this protection if you wish, or keep it enabled and add specific IP addresses or ranges (in CIDR notation) to exempt them from this protection. Click Enable to the right of the feature to open the options modal.
How it Works
The /wp-login.php and /xmlrpc.php URIs are continuously monitored on our hosting, and if either of them receives more than 1 request every 2 seconds (30 requests/min) from a single IP address, rate limiting will be applied automatically to block access to any user with that IP, and a 429 error page will be displayed to that user.
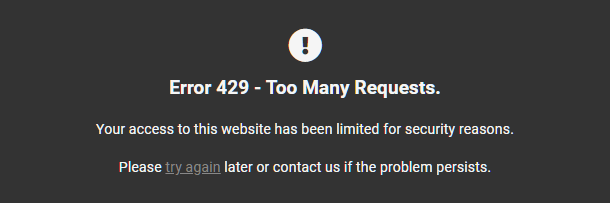
This will throttle the connections a bit and help avoid having the server instantly go down due to an attack. If the connection is throttled 30 times within the last 30 minutes, then the attacking IP will be banned for 1 hour to help even more.
Any such 429 error will be logged by your server and can be viewed in the Access Logs in your Hub.
You can customize and brand the Error 429 page if you wish, just like any other default server error page, by following the directions in our Customizing Error Pages documentation.
Note that only the URIs noted above are monitored, and rate-limited if attacked. For example, if you have modified your wp-login.php slug using the Mask Login feature in Defender, and that custom slug is discovered and attacked by a malicious bot, your custom login would not be protected by these measures. We, therefore, recommend that any such custom login not be too obvious; don’t make it easy for bad actors to guess.
Also note that, while these measures can help mitigate the effects of DoS/DDoS attacks, they should not be considered as full protection for such attacks. You may want to consider using the robust protection options offered by CloudFlare for that.
5.3.4 Block XML-RPC
Link to chapter 3XML-RPC is outdated and has now been replaced by the WordPress REST API. Blocking XML-RPC could help prevent security vulnerabilities and spam attacks.
Click the Enable button to pop open a modal window where you can enable/disable the feature as needed.
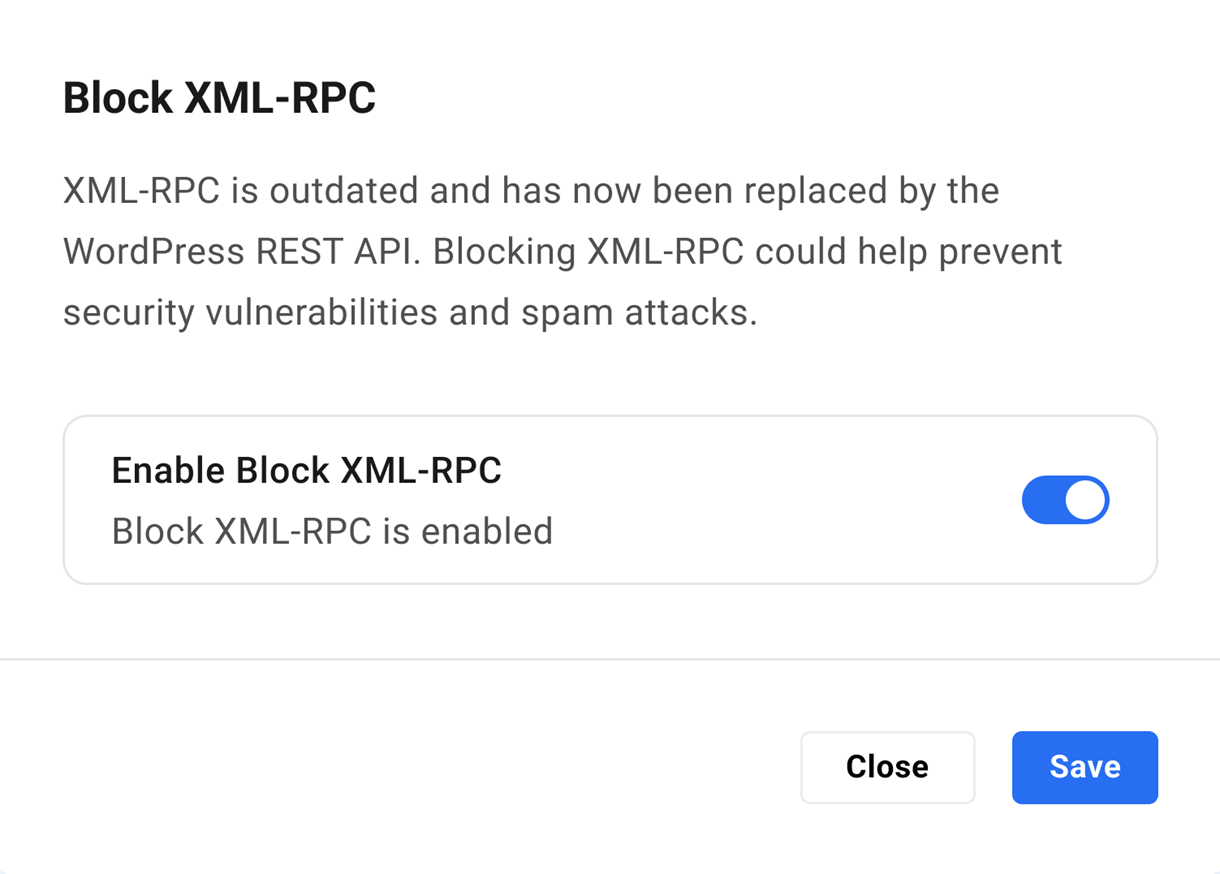
Note that XML-RPC is blocked by default on all newly created hosted sites.
If the Disable XML-RPC security recommendation is active in Defender but the feature is disabled at the server level here, requests will still reach your site and will consume resources. But when you enable Block XML-RPC at the server level, the requests never reach your site at all.
5.4 WP tools
Copy chapter anchor to clipboardUnder this tab, you will find hosting tools associated with WordPress configuration and management.
5.4.1 Reset WP-Config
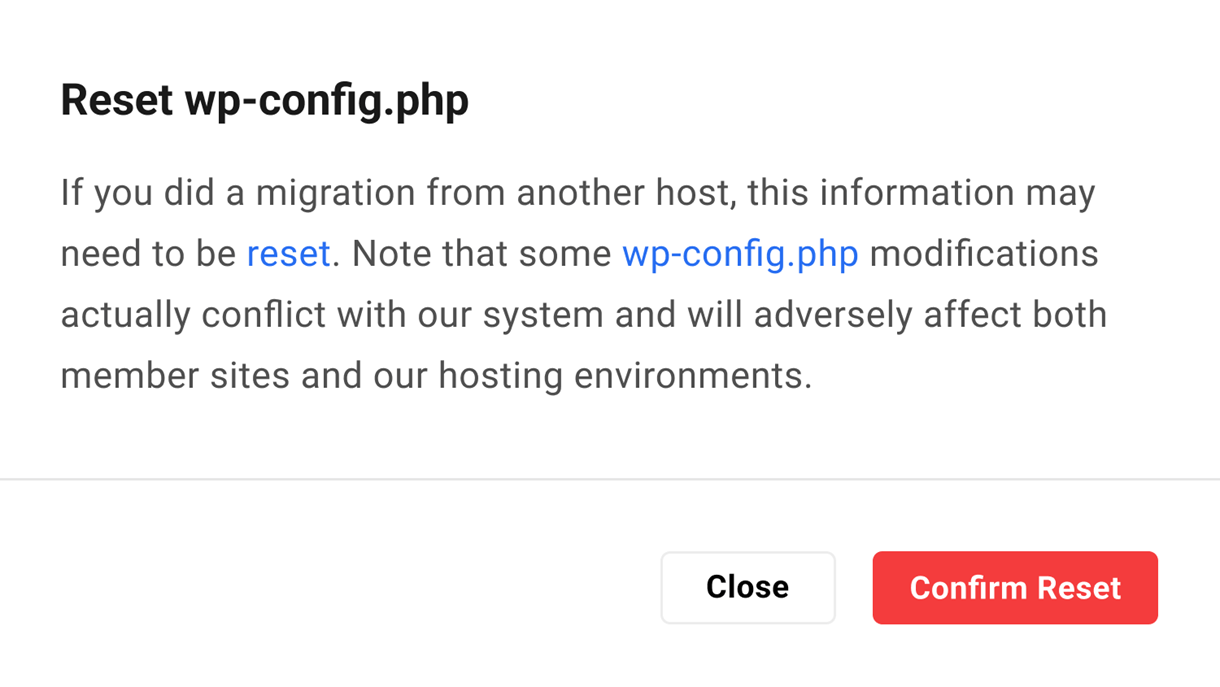
Link to chapter 4The wp-config.php file is located in the root of your WordPress file directory and contains your website’s base configuration details, such as database-connection information. If you migrated a site from another host, this information might need to be reset.
Click Reset WP Config.
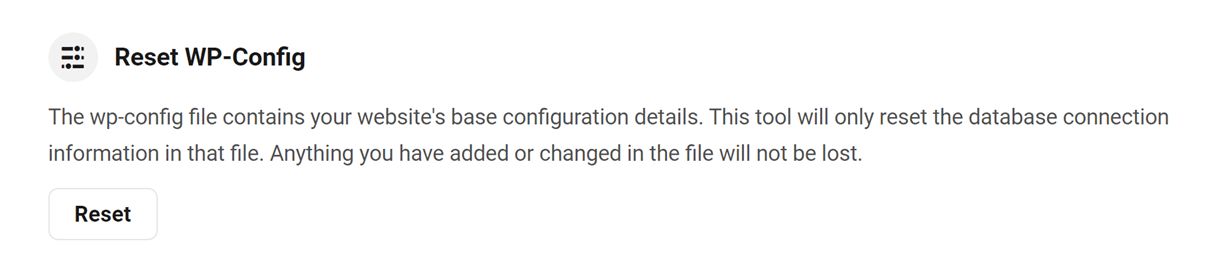
Then click the Confirm Reset button to reset the database connection information.
Note: Resetting the wp-config will only reset the database connection information, such as the database name, username, password, and host. However, if you want to reset the complete wp-config file, delete the wp-config.php file from the file manager or SSH/SFTP and reset it to create a new wp-config file.
Click the Close button to exit without resetting the file.
5.4.2 Reset WP
Link to chapter 4Use this option if you ever need to revert your live site to a fresh WordPress installation. This process will also pre-install SmartCrawl Pro, Forminator Pro, Hummingbird Pro, Smush Pro, and Defender Pro plugins for you.
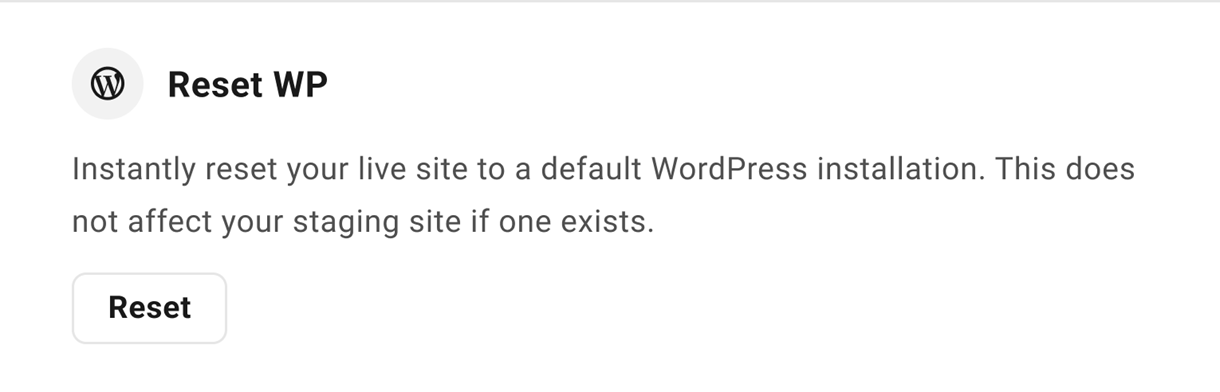
Note that the Reset option does not affect your staging site if you have one set up; there is a separate option for that under the Staging tab.
Click Reset and, if you are absolutely certain you wish to continue, type RESET at the confirmation step. Then click Confirm and Reset to confirm the action.

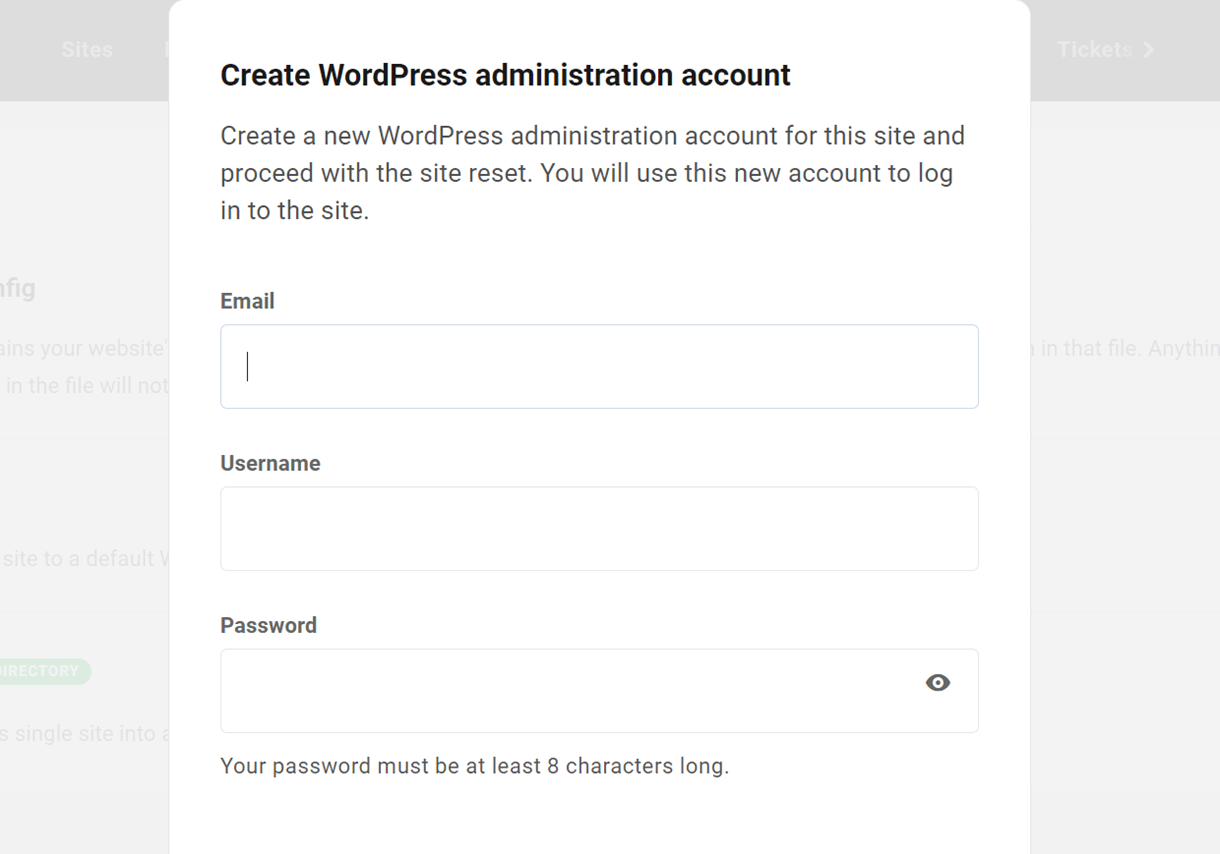
This reset will delete the production database and all files (including non-WordPress files) in the Production directory of your live site before the fresh re-install of WordPress. However, a backup of your live site will be created before the reset, in case you change your mind afterwards and want to restore the site to how it was.
Once you click the Continue button, you’ll be prompted to create a new WordPress administrator account for the fresh install. You can use the same email, username and password as you had for your admin user before, or create a brand-new admin user.
Click the Continue button and you’ll then see a screen indicating the reset is underway. Depending on the size of the site, it can take several minutes for this to complete.
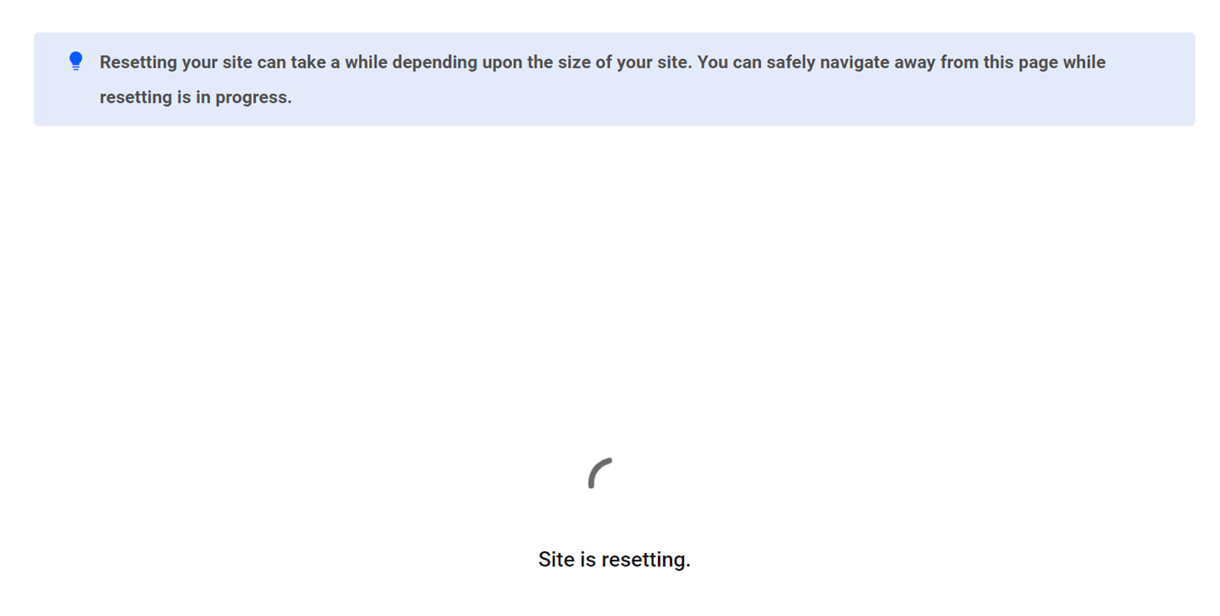
When the reset process is complete, visit your site and you’ll see a brand-new default install of WordPress there for you to build on.
Resetting Multisite
The process for resetting a multisite is exactly the same as for a single site except for one important detail: when you reset a live multisite, it defaults back to a fresh single site install.
This means that if you intend to then push your existing staging multisite to live, you’ll need to first convert the new single site to a multisite. Then you can push your staging multisite to the new fresh live multisite. If you don’t do that, the system won’t be able to update the domain name where it needs to, and you’ll get a database connection error.
Restoring the Site
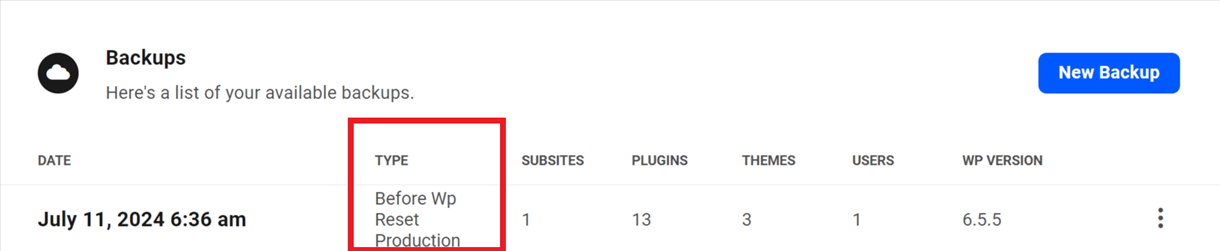
If you made a mistake or changed your mind after resetting WordPress on your live site, you can restore the automatic backup that was made before the site was reset. You’ll see that backup labeled before wp reset production under the Backups tab of your site.
5.4.3 Multisite
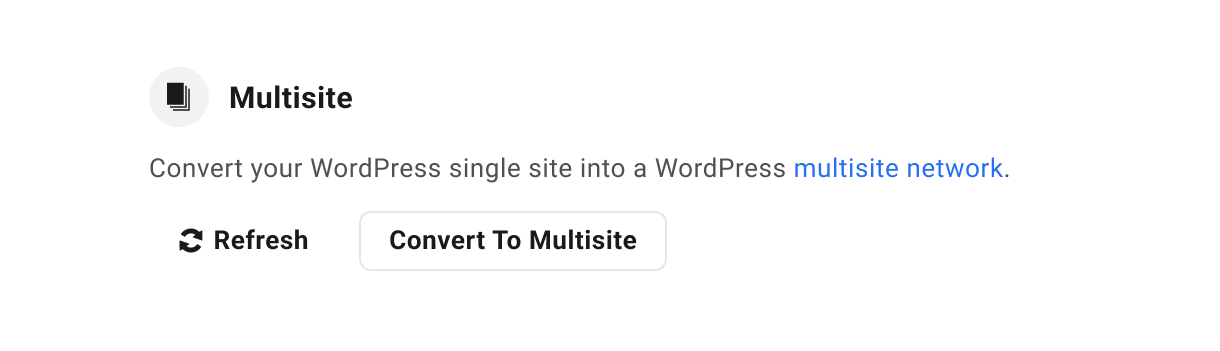
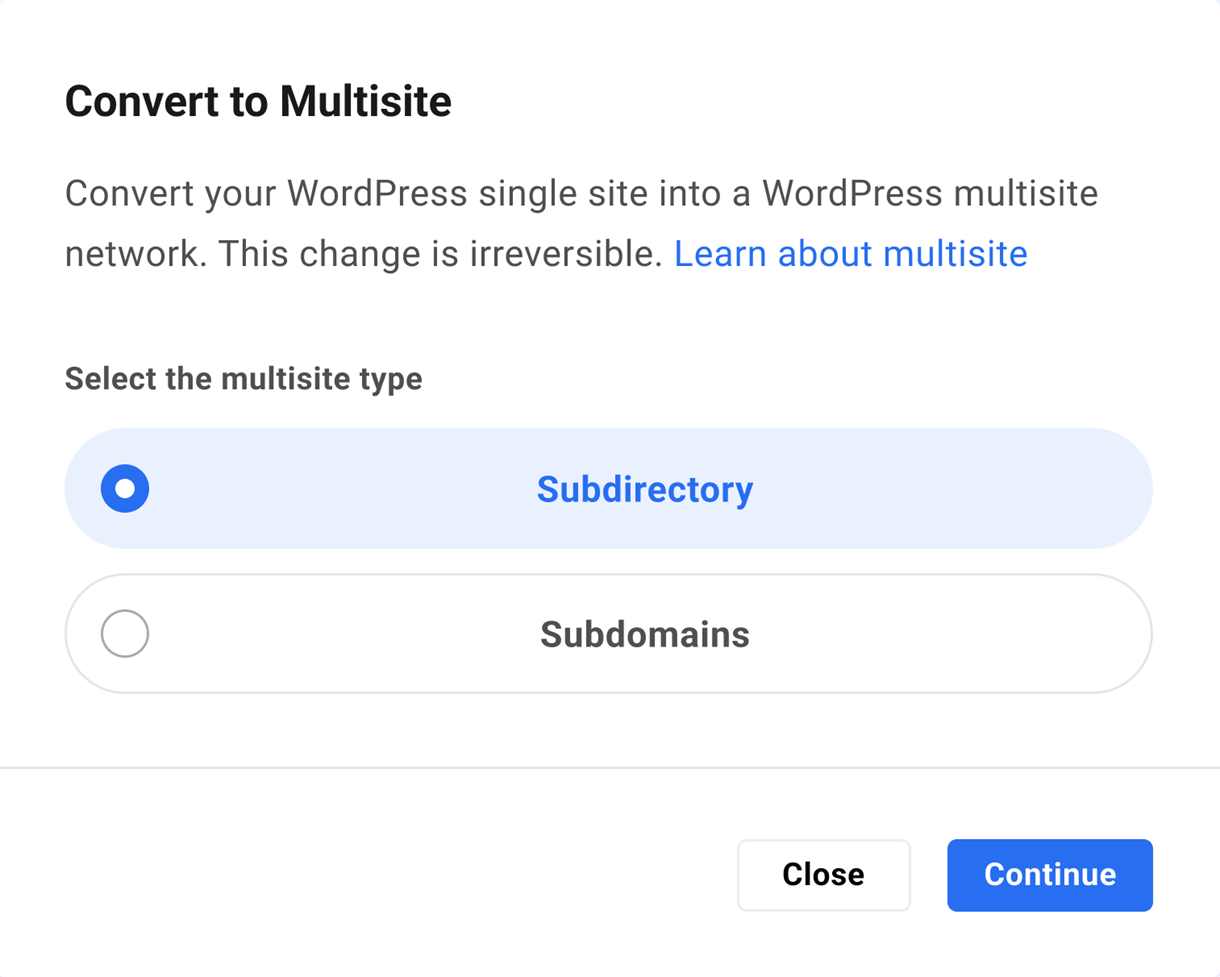
Link to chapter 4To convert your site into a Multisite network, click Convert to Multisite and select the installation type in the configuration modal.
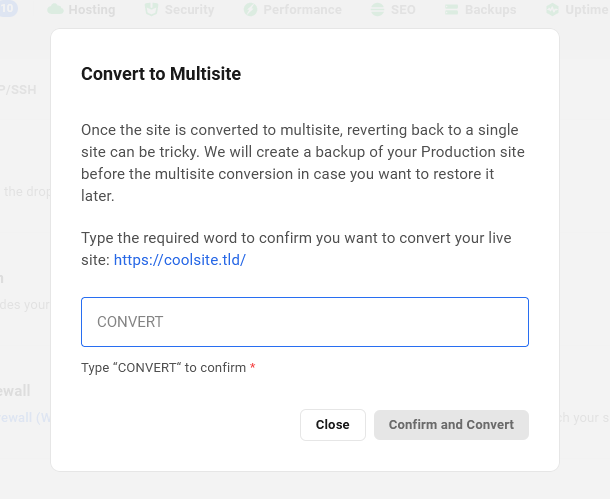
Once you’ve converted a site to a Multisite network, you cannot easily revert the site to a single site. So, before making the change, be sure converting to Multisite is the right move for your site.
If you are uncertain which Multisite installation– Subdirectory and Subdomain– is right for you, see our WordPress Multisite documentation for guidance.
If you are performing a Multisite conversion, ensure the conversion is carried out through the Hub. If you perform the conversion manually, remember to re-sync with the Hub by clicking Refresh in the Multisite option in Hosting -> Tools.
Looking for help mapping custom domain names for subsites on a Multisite network? Check out our domain mapping guide on the WPMU DEV blog. Or see our simple Multisite Domain Mapping guide if your site is hosted by WPMU DEV.
When you’re ready, choose the Multisite installation you prefer and click Continue.
If you are absolutely certain you wish to continue, type CONVERT at the confirmation step. Then click Confirm and Convert to begin the conversion.
The time it takes to convert depends largely on the size of the site, but it could range from just a few seconds to several minutes. A success notification will appear in The Hub when the conversion is complete.

For more information about Multisite networks, see our Multisite documentation and check out our Ultimate Guide to Multisite on the blog.
If you have chosen to go with a subdomain multisite, you will need to either generate a free Wildcard SSL certificate in your Hub or provide a custom wildcard certificate. This will ensure that you can serve your domain over HTTPS, which we require. This is covered in detail in our wildcard certificates documentation.
If you change your mind after converting your site to multisite, you can restore the automatic backup that was made before the site was converted. You’ll see that backup labeled pre convert to multisite under the Backups tab of your site.

It should be noted that wildcard certificates are not exclusively for subdomain multisites. You can also have a wildcard SSL certificate for a subdirectory multisite, meaning that you can map subdomains to subsites in it, making your multisitse seem as if it is subdomain-based rather than subdirectory-based. In this case, you could even have both subdirectory-based and subdomain-based subsites in the same multisite. See our Wildcard Certificates documentation for more information on this.
5.5 Site management
Copy chapter anchor to clipboardUnder this tab, you will find hosting tools associated with site management.
5.5.1 HTTP/3 (with QUIC)
Link to chapter 5If you want to use the upgraded HTTP/3 protocol for your site, you can enable it here.
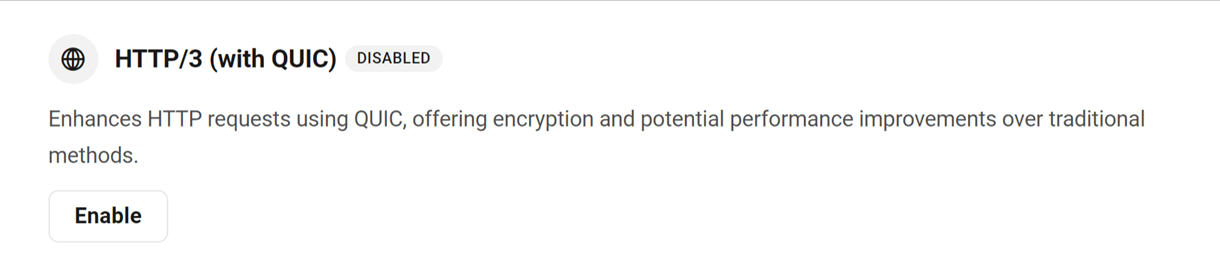
Click Enable to pop open a modal window where you can enable or disable the feature as needed.
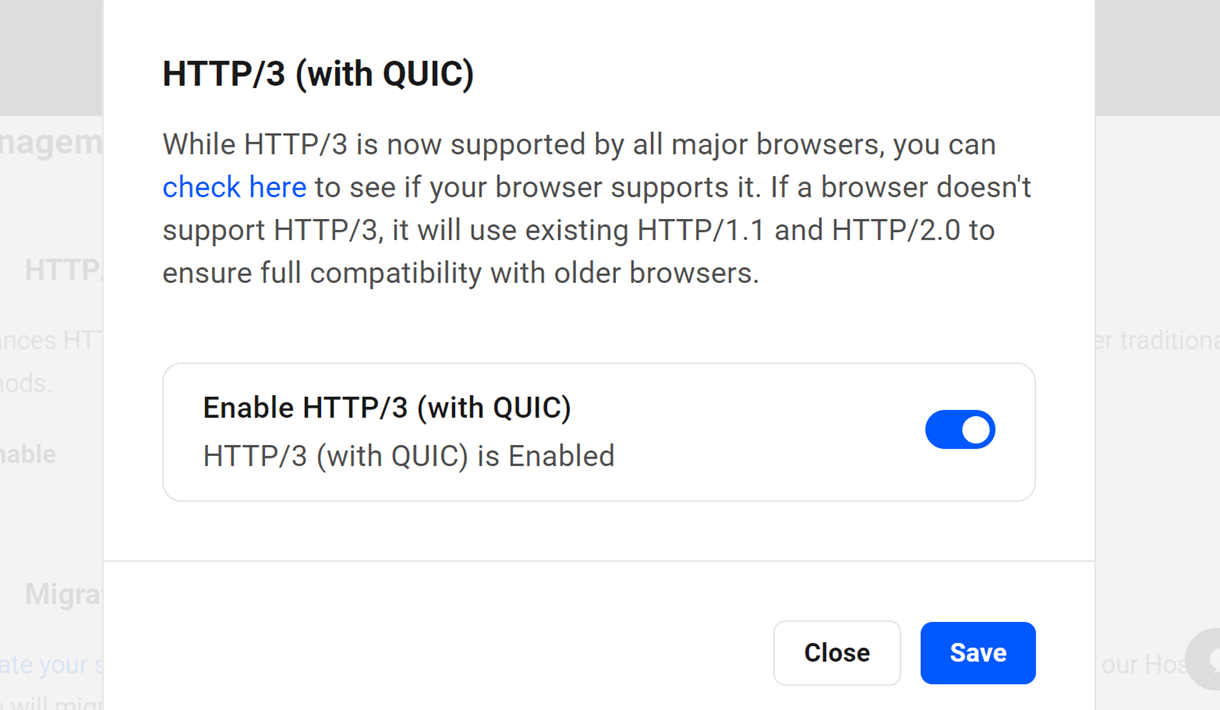
It’s important to note that all major browsers now support HTTP/3. For more information on which browsers and versions support it, please refer to https://caniuse.com/http3.
If you have enabled this option but your browser does not support HTTP/3, the website will default to using the old protocol, HTTP/2.
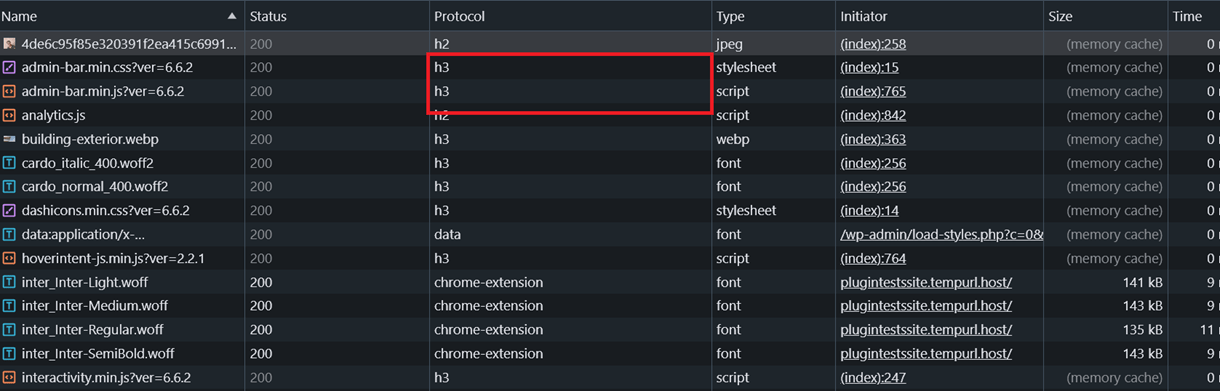
To verify whether HTTP/3 is active after enabling it, you can visit the Network tab in your browser and inspect the protocol column. Some files will begin to utilize the h3 protocol. Alternatively, you can also verify it on this website.
HTTP/3 is the latest upgraded version of the HTTP protocol and offers better performance, speed, security, and reliability. See this article to learn more about HTTP3 and why you should consider using it.
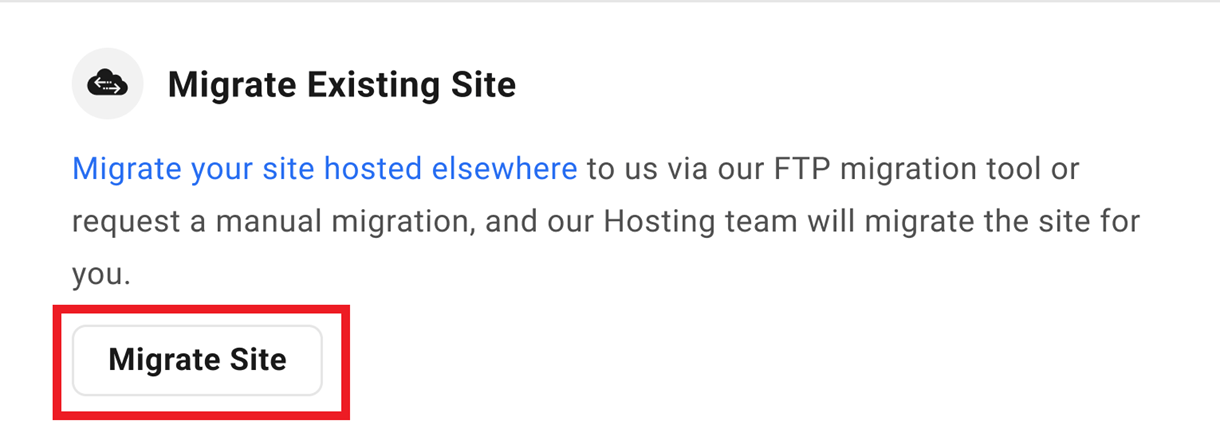
5.5.2 Migrate Existing Site
Link to chapter 5Use this option to migrate a 3rd-party hosted site into your existing WPMU DEV hosted site.
Sites can be migrated to WPMU DEV hosting using our migration tool or by requesting a manual migration by our hosting support team.
We recommend using the migration tool because it simplifies and accelerates the process and automatically resolves issues that occasionally interfere with a smooth migration.
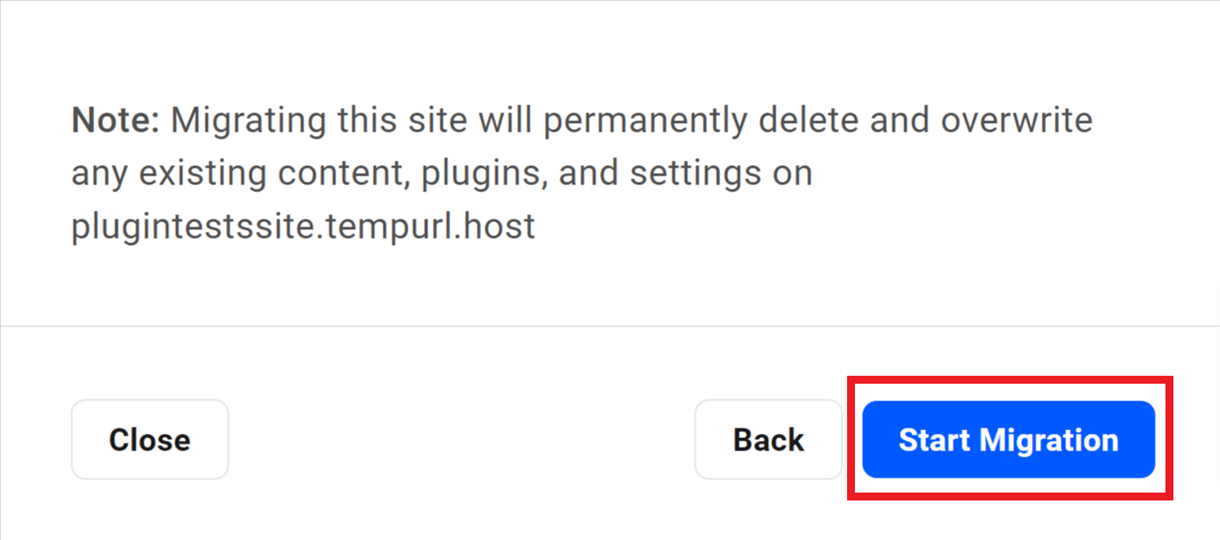
Migration will overwrite everything on your WPMU DEV hosted site and replace it with exact duplicate of your 3rd-party source site. Please be sure this is what you want before proceeding.
Migration Tool Method (Recommended)
The WPMU DEV migration tool is a server-to-server via FTP process that is much more robust than any PHP-driven (i.e., plugin) migration.
The migration tool is also far less susceptible to timeout issues than PHP. Additionally, it handles all file transfers and redefines URLs in one smooth process that doesn’t involve programs or utilities that many users seldom use. As long as the source server isn’t afflicted with FTP issues, it would take the Mario Andretti of web admins to perform a faster, safer migration.
To migrate a site to your WPMU DEV hosted site, click Migrate Site.
The dropdown menu on the next screen will reveal a list of all the sites currently connected to The Hub. If the site you wish to migrate does not appear in the list, then it is not connected, and you should click the Please add it to your Hub first link, and follow the instructions provided. Once the site is connected, select it from the dropdown menu and click the Next button to proceed.
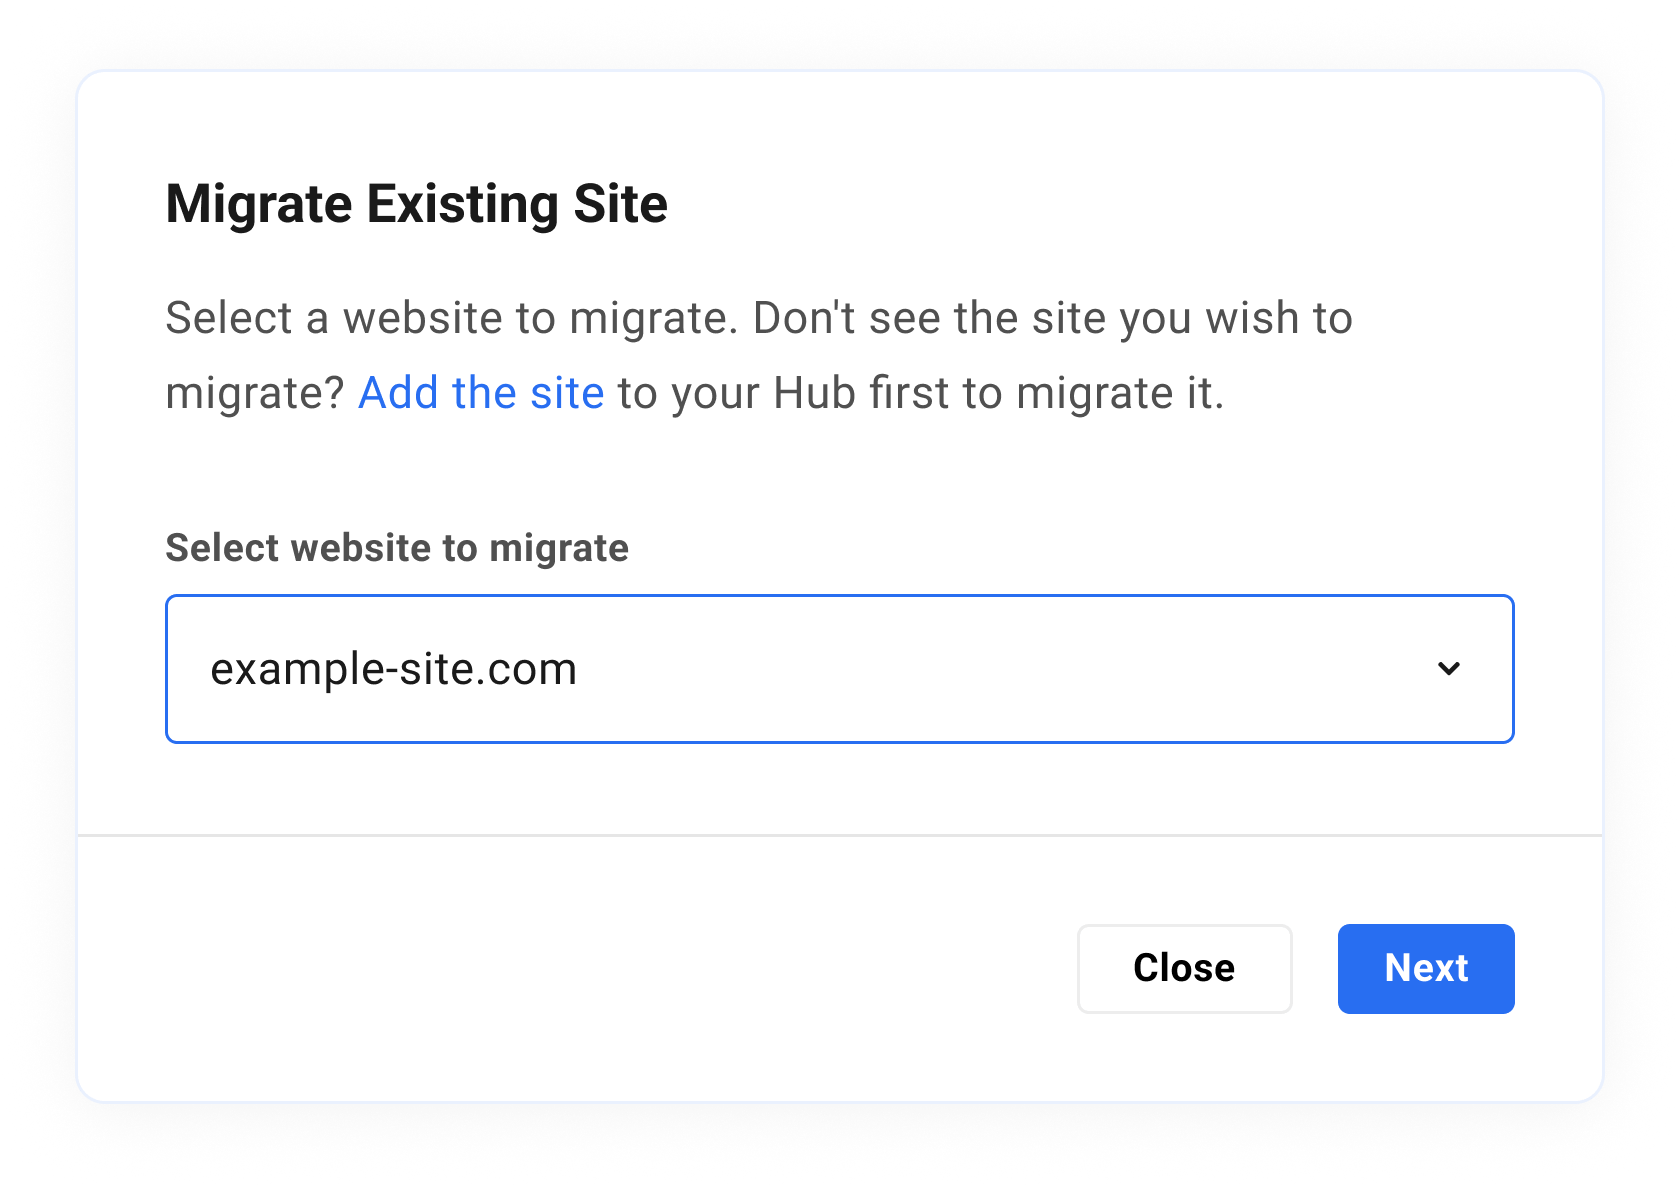
You’ll then be prompted to select the migration method you want to use. To use the migration tool, you’ll want to select the (S)FTP migration option and click Next to proceed.
On the next step, you’ll be prompted to enter the (S)FTP credentials for the site you wish to migrate.
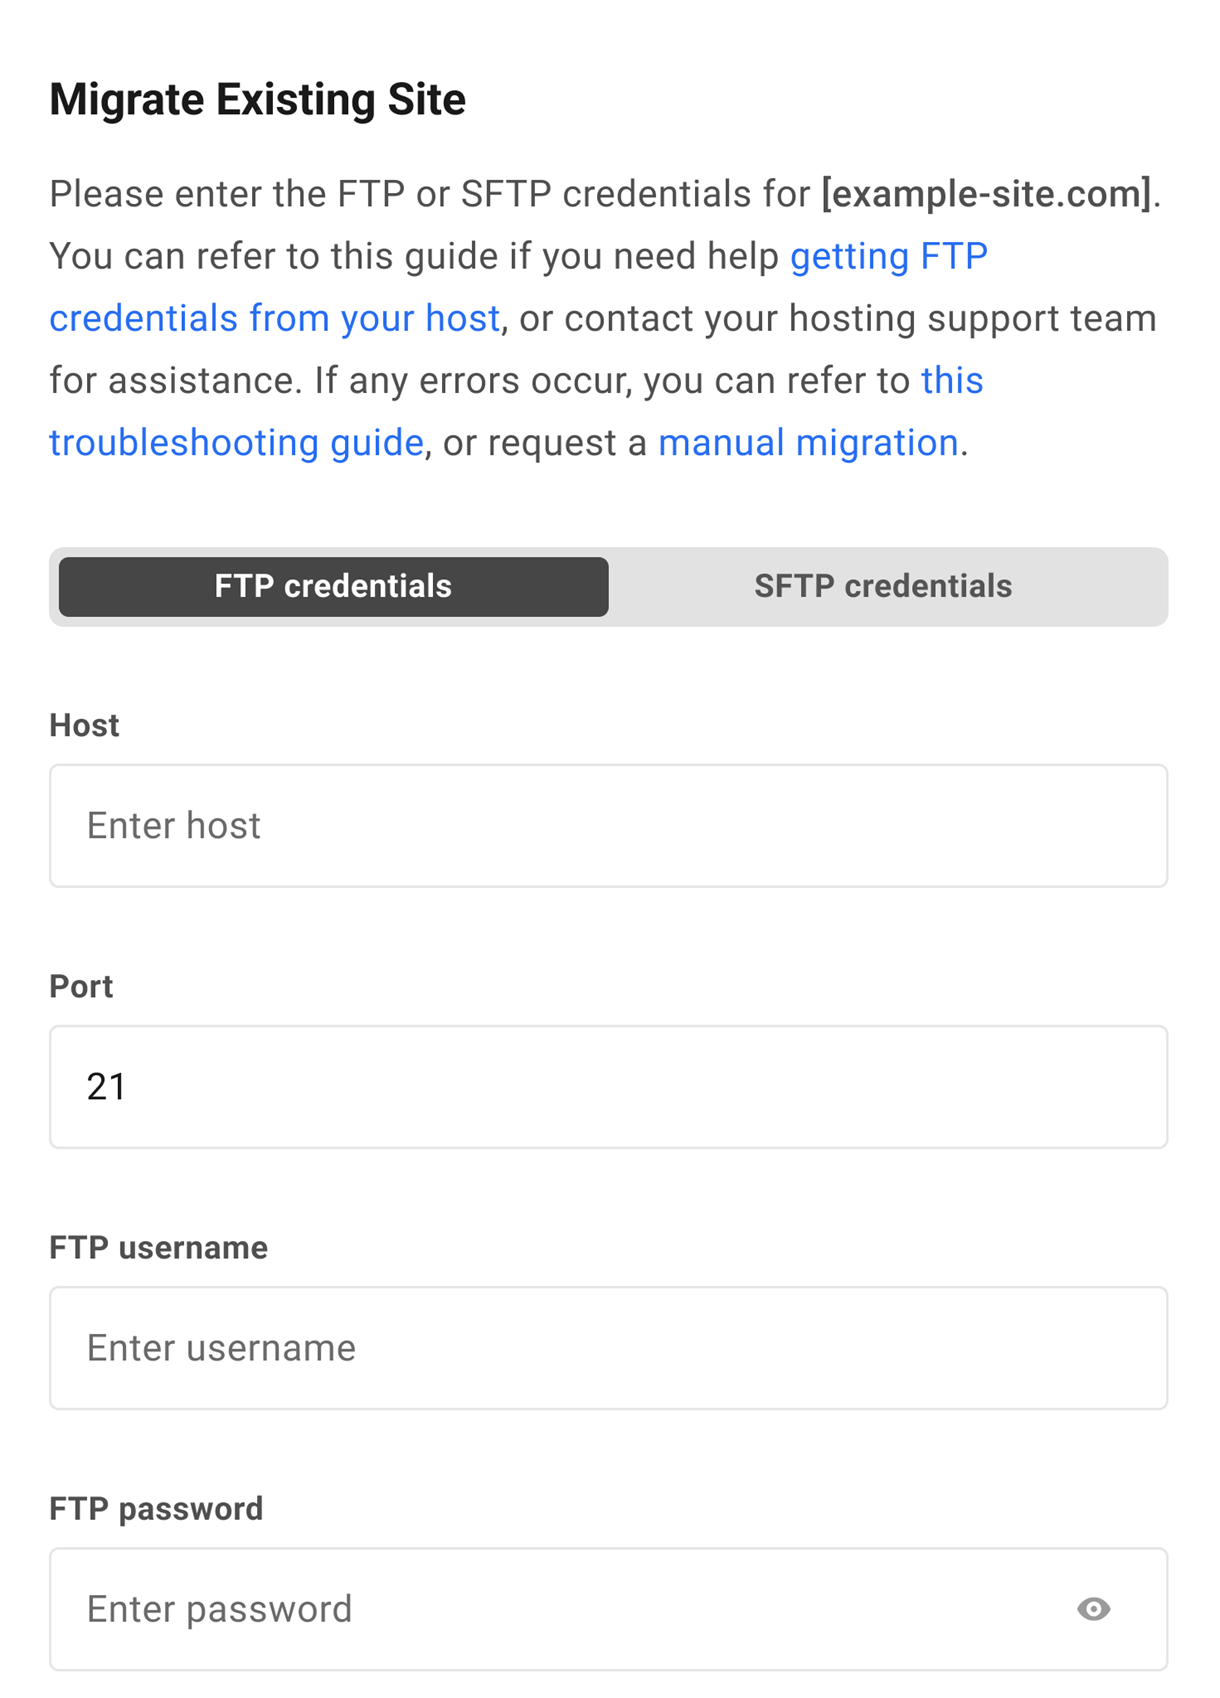
If you don’t know the (S)FTP credentials for your source site, you should find them in that site’s dashboard or control panel at your current host. If they do not exist, create them, paste them into the fields provided.
- Host – The (S)FTP hostname you use to access your site’s file system.
- Port – The port used by your host’s connection protocol.
- FTP Username – The username of a user that can access your site’s WordPress root.
- FTP Password – The password for the above user.
- WordPress install path – Once the WPMU DEV servers access your site, they will attempt to locate your site’s files, and most of the time, they have no problem doing so. Occasionally, however, the path to those files contains an unknown directory that our servers cannot resolve, and the migration may fail. If you know the FTP path to your site files, you can insert it here. Please refer to the Getting FTP Credentials From Your Host chapter in our Getting Started doc for guidance on locating the install path at your host if needed.
- Source Site hosting provider – The name of your current hosting provider (e.g., Bluehost).
Once you’ve entered all the required information, click Start Migration.
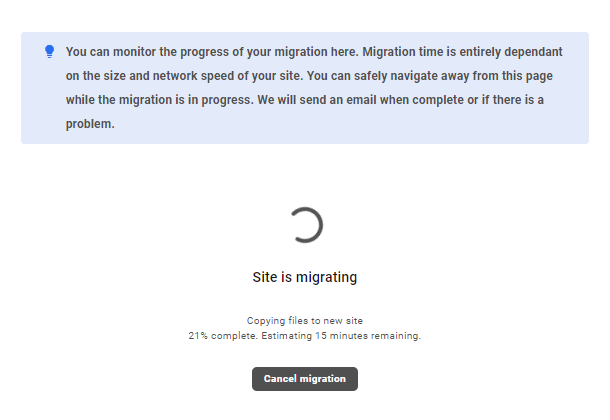
You’ll then see a progress screen like the image below where you can monitor the migration process and see an estimate of the time remaining. Note that the time it will take to complete the migration is wholly dependent on the size of your site and the speed of your existing host.
You can navigate away from this screen while the migration is in progress, and we’ll send you an email when it’s complete. If needed, you can cancel the migration by clicking the Cancel migration button.
Following a successful migration, your content is viewable at both the original URL and your WPMU DEV site, unless the original site has been disabled in some way.
We encourage you to visit your WPMU DEV site to verify that the migration was successful. You can do so by clicking the WP Admin option next to the temporary domain in The Hub site manager.
If you are satisfied with the migration, then it’s time to add your permanent domain name and edit your DNS records. See our WPMU DEV DNS Records documentation for guidance.
If an error occurs during site migration, look to our migration troubleshooting guide below for common errors and how they can be addressed. If the issue persists, contact our support team for help.
Manual Migration by WPMU DEV Staff
As a WPMU DEV member, you can also request that we manually migrate your site in case the above option doesn’t work for you.
Worried about downtime?
See our post on How To Manually Migrate WordPress Sites Quickly With No Hosting Downtime to learn how our expert hosting support team can help eliminate that.
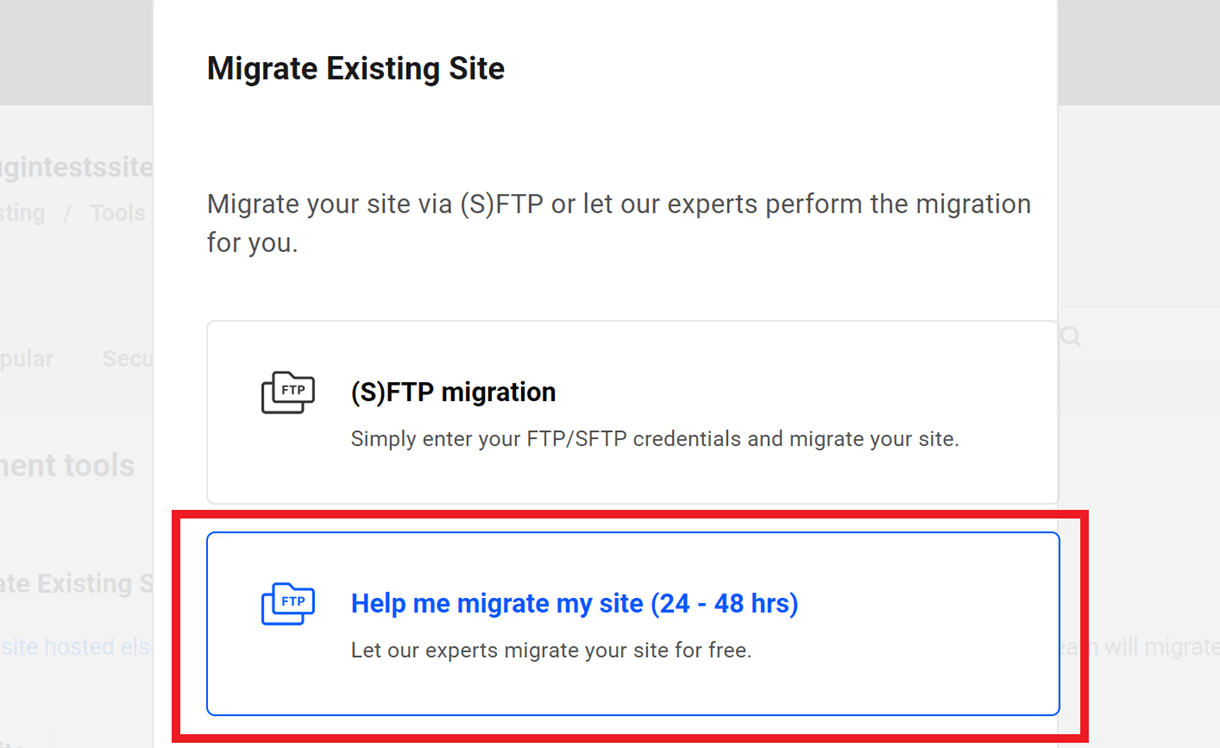
Click the Migrate Site button in the Migrate Existing Site row.
A modal window will pop open where you’ll be prompted to select the site you wish to migrate. The dropdown will reveal a list of all the sites currently connected to The Hub. If the site you wish to migrate does not appear in the list, then it is not connected, and you should click the Please add it to your Hub first link, and follow the instructions provided.
Once the site is selected, click Next to proceed.
You’ll then be prompted to select the migration method you want to use. To request a manual migration by our hosting support team, you’ll want to select the Help me migrate my site option and click Next to proceed.
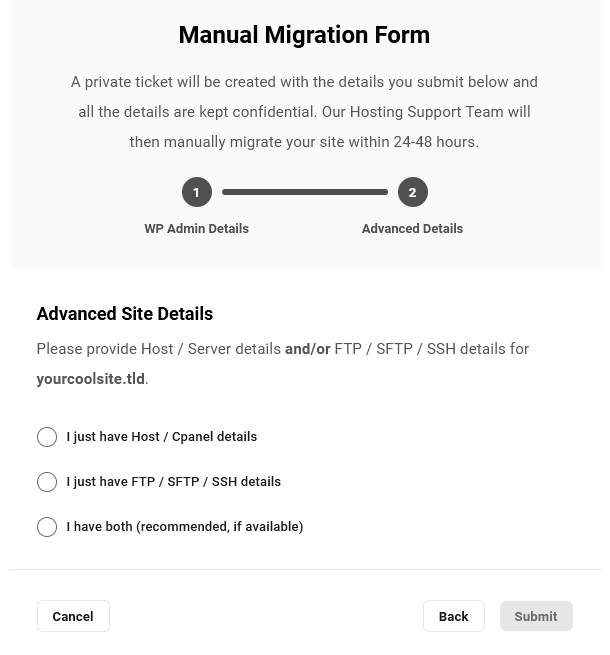
You’ll be prompted to provide access credentials for the site you wish to migrate.
WordPress Details
Enter the required information so the hosting support team can access your source site, then click the Next button:
- Admin URL – Enter the URL to the admin area of your site, without the protocol (http/https).
- Admin username – The username of an administrator user on that site.
- Admin password – The password for the above user.

On the next screen, you’ll be prompted to provide either login credentials to your Hosting control panel and/or (S)FTP/SSH details. The hosting support team needs at least one of these to migrate your site, but if you can provide both, that would be ideal. Select the appropriate option and enter the required information.
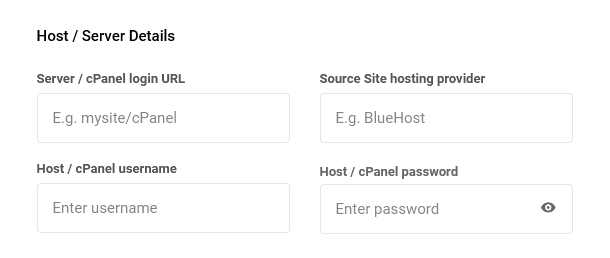
Host / Server Details
- Server / cPanel login URL – The URL needed to access the control panel for your site at your 3rd-party host.
- Source Site hosting provider – The name of your current hosting provider.
- Host / cPanel username – The username you use to login to your site’s control panel.
- Host / cPanel password – The password for the above user.
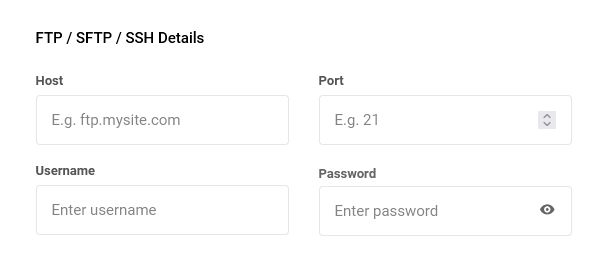
FTP / SFTP / SSH Details
- Host – The hostname you use to access your site’s file system, for ex: ftp.mysite.com
- Port – The port used by your host’s connection protocol.
- Username – The username of a user that can access the root of the WordPress install.
- Password – The password for the above user.
Optionally provide any other information that may be needed to access the file system of the site you want to migrate. For example, if you have multiple sites installed in the same directory, provide the server path here so our team knows which one to migrate.
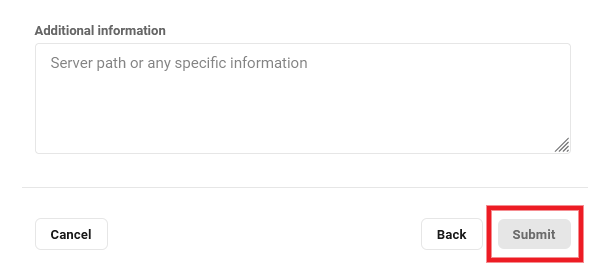
Once you have provided all the required and any optional information in the form, click the Submit button to submit your request.
A confirmation notice will appear on screen to inform you that your request has been successfully submitted.
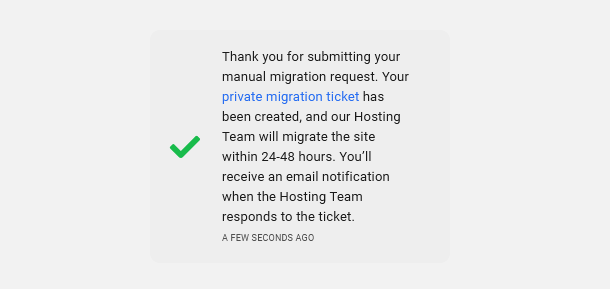
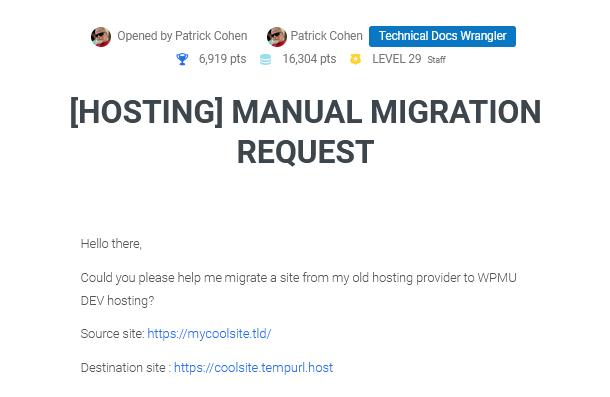
The notice contains a link to the private support ticket that is automatically created for you in the Hosting Support forum. All the information that you provided in the form is available only to the hosting support team in a private task linked to that ticket.
If the notice closes before you have a chance to click on the ticket link, you’ll find it listed in the My Tickets section of the Support area in your Hub.

The hosting support team will be notified of your request and will proceed with the manual migration of your site within 24-48 hours. As soon as they reply on your ticket, with confirmation that the migration has been completed or if they require more information, you’ll receive an email notification of their reply.
That email will contain a link back to your ticket where you can reply if needed. Please do not reply directly in the email itself.
Supported Migrations & Conversions
It’s important to note that some types of migrations are out-of-scope and cannot be handled by our support or hosting staff. Following are the types of manual migrations/conversions that we can and cannot do for you.
- Supported migrations
- Yes – If Single site -> Single site
- Yes – If Multisite -> Multisite
- Supported conversions
- Yes – If Single site -> Multisite
- Yes – If Subsite -> Single site (you should expect to need to perform some cleanup in the converted site, and there may be configuration issues for some plugins due to conversion)
- Depends – If Multisite -> Single site (supported only if there’s just a main site, without subsites)
- Depends – If Subdomain -> Subdirectory (supported only if there’s just a main site, without subsites)
- Depends – If Subdirectory -> Subdomain (supported only if there’s just a main site, without subsites)
- Not supported – Out of scope
- No – If Single -> Subsite (3rd party developer required for this type of migration)
- No – If Subsite -> Subsite (3rd party developer required for this type of migration)
Troubleshooting
Site migration via (S)FTP may fail for a variety of reasons, including incorrect login details, exceeding max retries, a throttled connection, and more.
See the below troubleshooting tips for help if you encounter an error while migrating an existing site, and contact our support team if the issue persists.
No Route to Host
Example error message: Fatal error: max-retries exceeded (No route to host) for ftp://[email protected]:22. Please check the entered details and try again.

This error may occur when the entered hostname is incorrect, or lies behind a proxy service, such as Cloudflare. In this case, enter the server’s IPv4 address.
Login Authentication Failed
Example error message: Login failed: 530 Login authentication failed for ftp://[email protected]:21. Please check the entered login details and try again.

This error may occur if the entered username and/or password are incorrect. In this case, either verify that the entered credentials are correct or reset your password.
Login Incorrect
Example error message: Login failed: Login incorrect for sftp://[email protected]:22. Please check the entered login details and try again.

This error may occur if the entered username and/or password are incorrect. In this case, either verify that the entered credentials are correct or reset your password.
No Address Associated with Hostname
Example error message: open: ftp.example.com: No address associated with hostname.

This error may occur when the FTP host is unable to resolve the hostname’s IP address. In this case, enter the server’s IPv4 address.
Too Many Connections
Example error message: Fatal error: max-retries exceeded (421 Too many connections (8) from this IP) for ftp://[email protected]:21. Please check the entered details and try again.
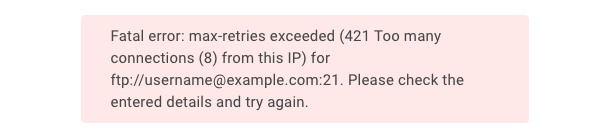
This error may occur if the source host is limiting the number of connections for file transfer. In this case, either transfer files on at a time, or contact the source host to request that our IP addresses be whitelisted.
Connection Throttled
Example error message: Your host appears to be throttling connections. Please try starting the migration again in a few minutes once our IP is unblocked, and we will attempt using a slower compatibility mode.
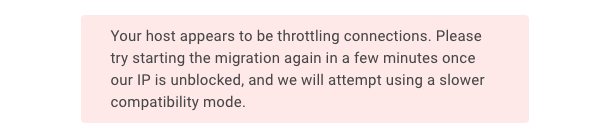
This error may occur due to our migration tool fetching multiple files at once, causing some source hosts to block the connection. If this occurs, try again in a few minutes, and our migration tool will automatically fetch files one at a time to prevent a subsequent block.
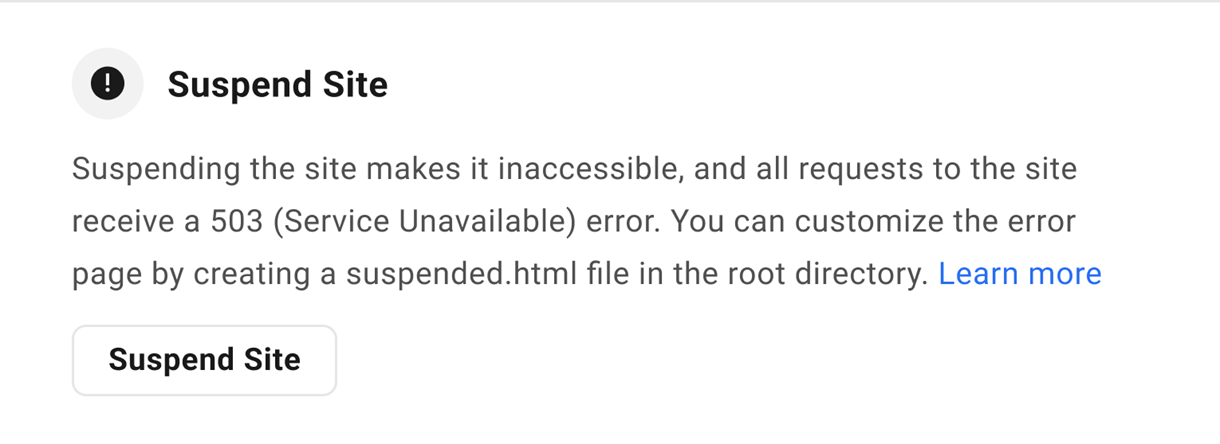
5.5.3 Suspend Site
Link to chapter 5This option enables you to suspend access to a WPMU DEV hosted site for any reason you deem necessary. For example, you can temporarily suspend a client’s site if they don’t pay you for services you’ve provided.
Check out our Suspend Client Sites With WPMU DEV Hosting post on the blog.
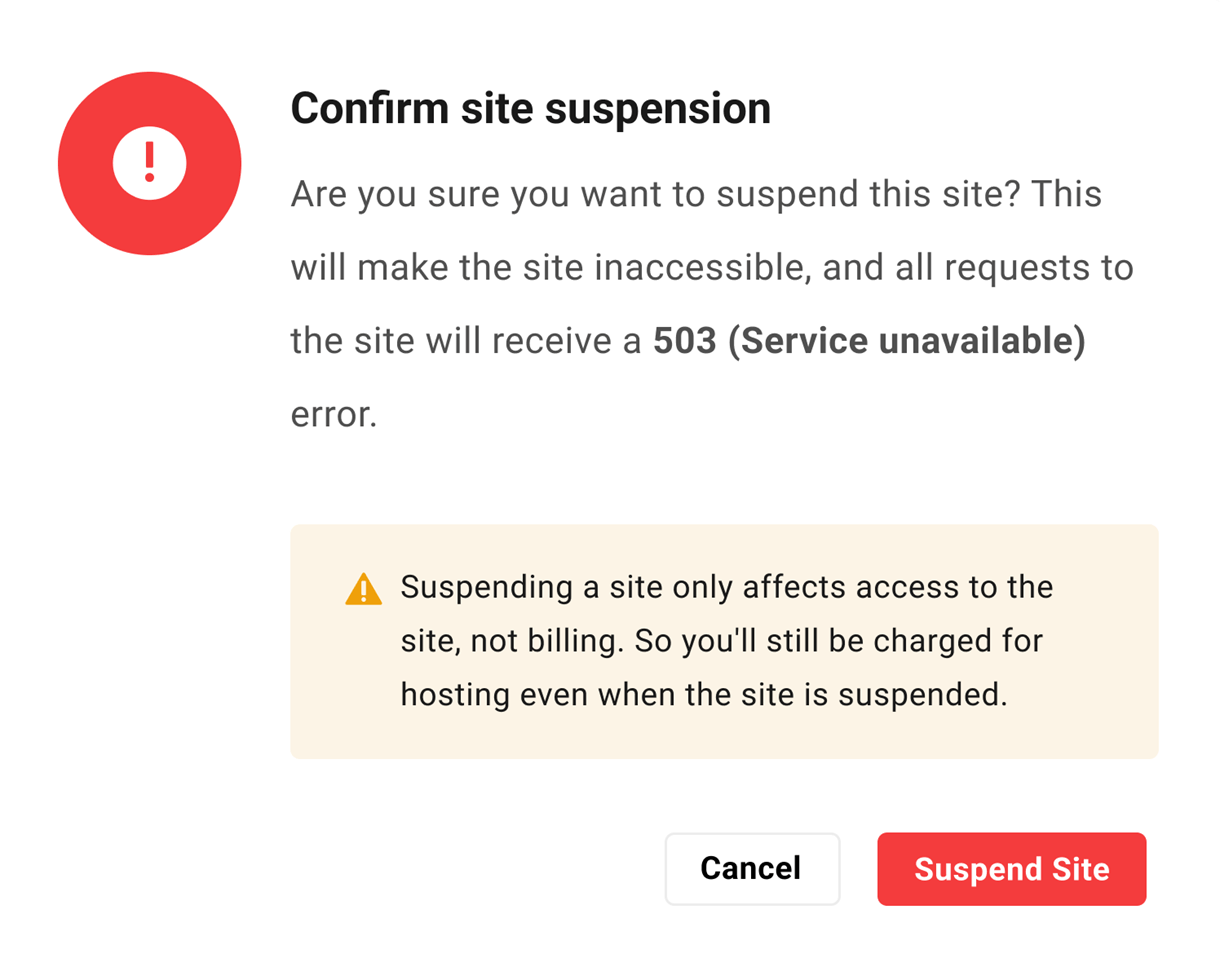
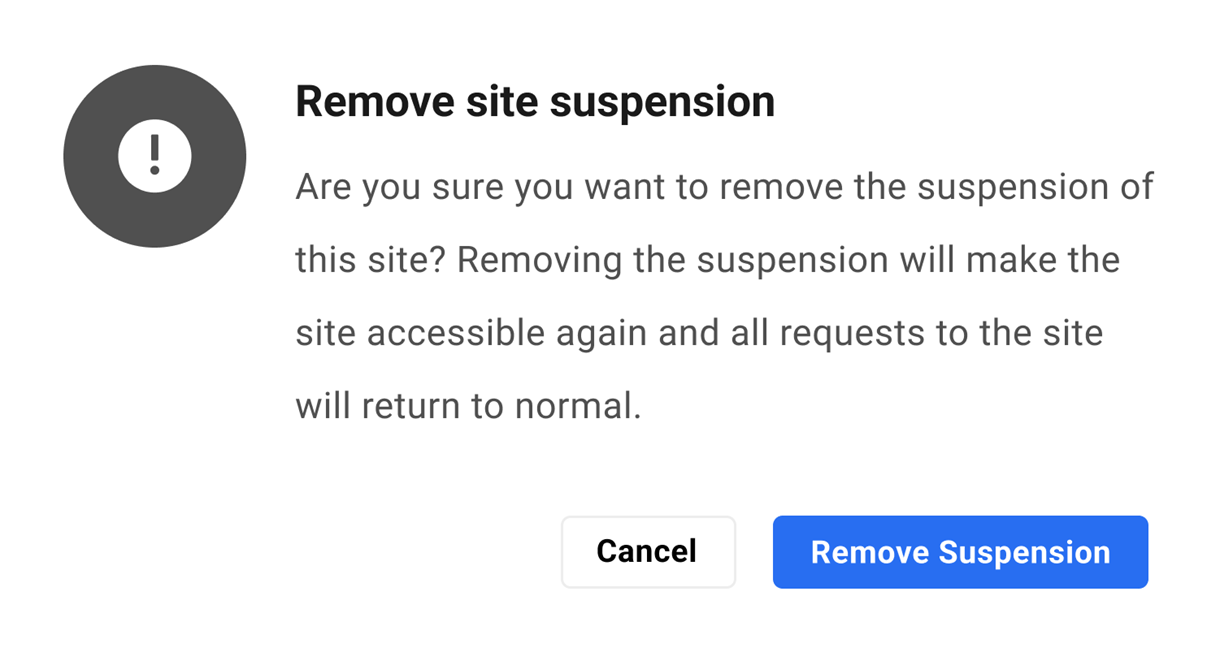
To suspend the site, click the Suspend Site button. Note that you can suspend or unsuspend a site from the Site Options menu as well.
When suspending or unsuspending a site, you’ll be prompted to confirm the action.
Once enabled, a Suspended tag would appear next to the site in your My Sites list, and at the top of all screens when navigating that site’s features in your Hub.
Note that this tag is visible to you, as well as your team members and the client attached to the site (if any) when they’re logged into the Hub.

Any users trying to access the site would see a This site has been suspended message, and a 503 Service Unavailable error would be returned for all browser requests.
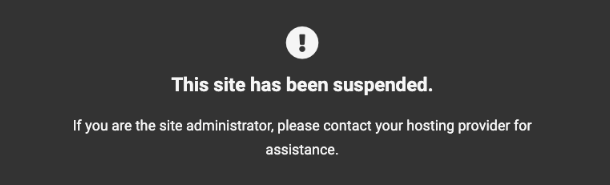
You can customize the error screen to better suit your business and brand by creating and customizing a suspended.html file in the site root. See Customizing Error Pages for details.
Additional Notes
- This option is only accessible by you as the Hub owner. Team members and clients do not see this feature.
- Suspending a site does not affect billing for that site. You would still be billed for hosting costs even if the site is suspended.
- Once a site has been suspended, the staging site (if one exists) would also be suspended, even if the staging site is created after the feature is enabled.
- Restoring a backup on a suspended site will work just fine, but the site will still be suspended.
- Uptime or any 3rd-party monitoring tool will see the site as being down.
- Email accounts or forwarding addresses for a suspended site will continue to work.
- Backups, including hourly backups if that is enabled, will also continue to function normally for a suspended site.
- Suspending a site does not affect access to any Hub features. So if you do suspend a client site, you might want to also consider assigning that client a different Client Role with more restricted access to Hub features. For example, the default View All & Access Billing role, or a custom role with no access to SFTP/SSH, Backups & Files/Database managers, would help prevent a non-paying client from grabbing the files and a database dump to move their site away from you.
5.5.4 ionCube Loader
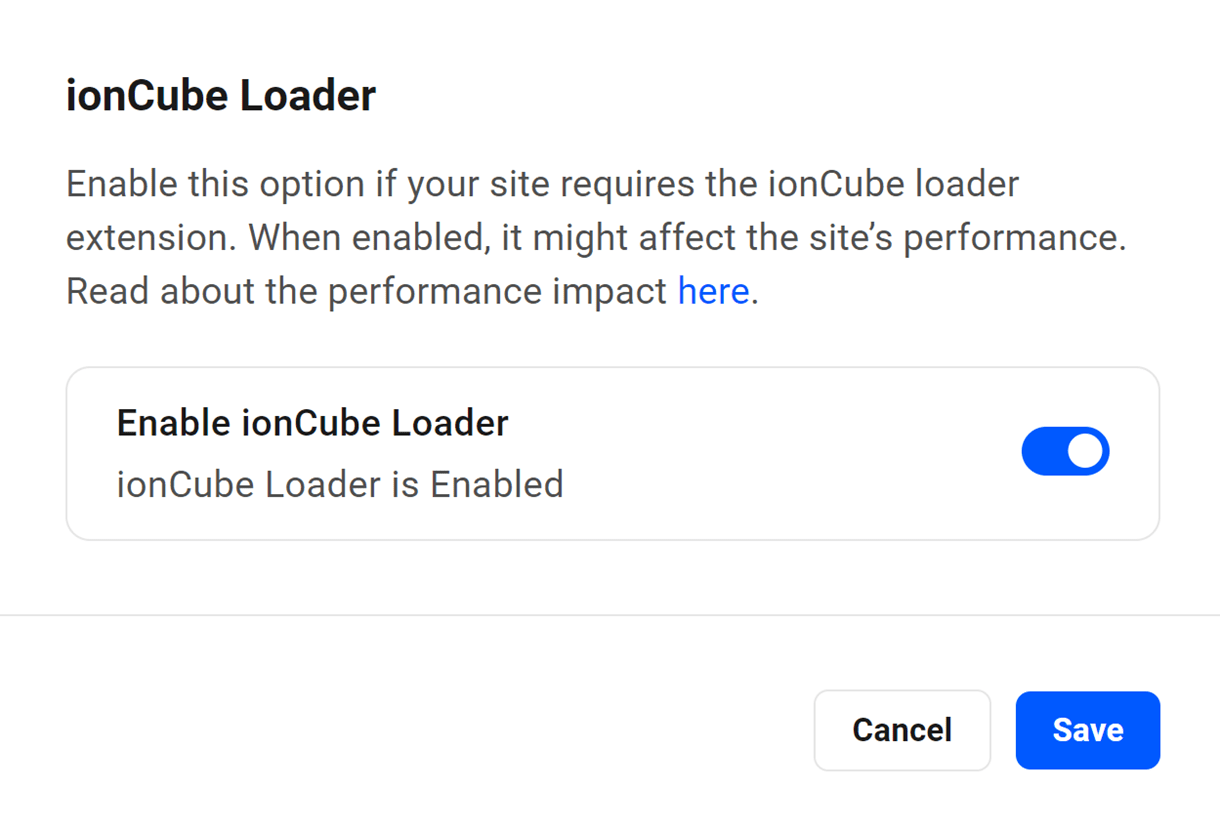
Link to chapter 5If your site requires the ionCube Loader extension, you can enable it with this option.
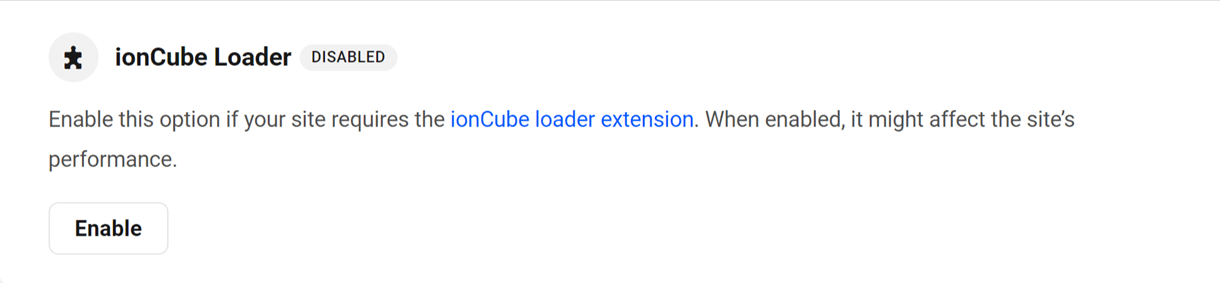
Click Enable to pop open a modal window where you can enable or disable the extension as needed.
This option will enable/disable the extension on your staging site as well if you have one created.
Performance Impact
The performance of your site may be affected when this feature is enabled. However, you can limit its impact by having the ionCube loader only load its files where needed.
To do that, you can add the ioncube.loader.encoded_paths directive in a .user.ini file, specifying the full path to the plugin that requires it; for example:
ioncube.loader.encoded_paths = "/var/web/site/public_html/wp-content/plugins/some_plugin/"
5.6 Monitoring tools
Copy chapter anchor to clipboardUnder this tab, you will find the hosting tools associated with site monitoring.
5.6.1 New Relic Monitoring
Link to chapter 6This option enables you to easily integrate the performance monitoring features available from New Relic so you can view real-time data to help you when debugging issues on your site.
Click Enable to enable the New Relic Monitoring feature.

Begin by logging into your account at New Relic, or create a free account there now if you don’t already have one.
Learn more about new relic’s guided installation and configuring data sources during signup.
The only thing you need from your New Relic account for this integration is your License Key.
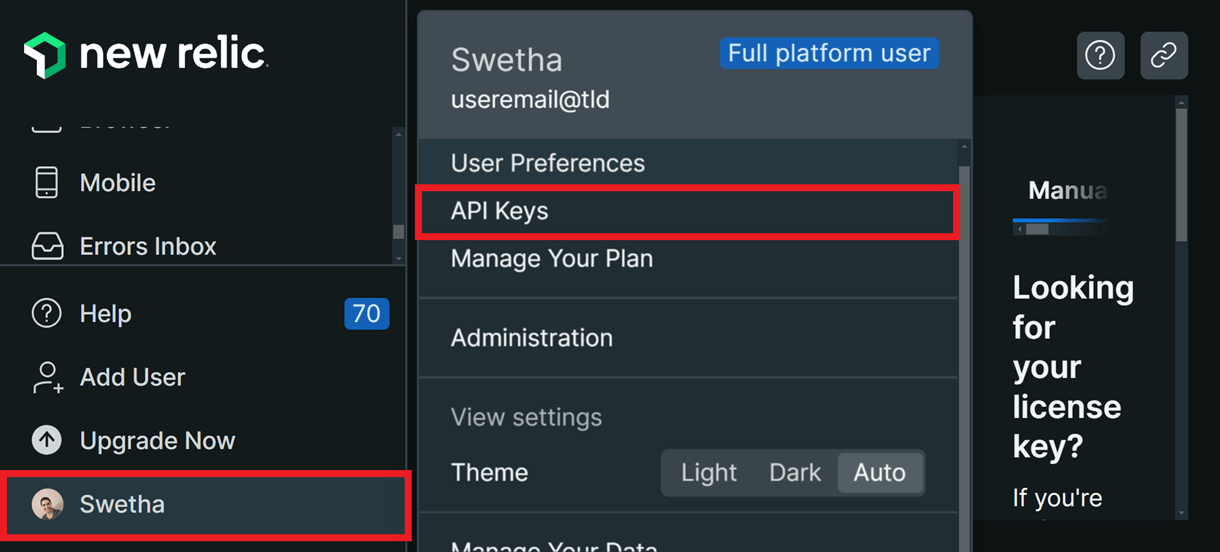
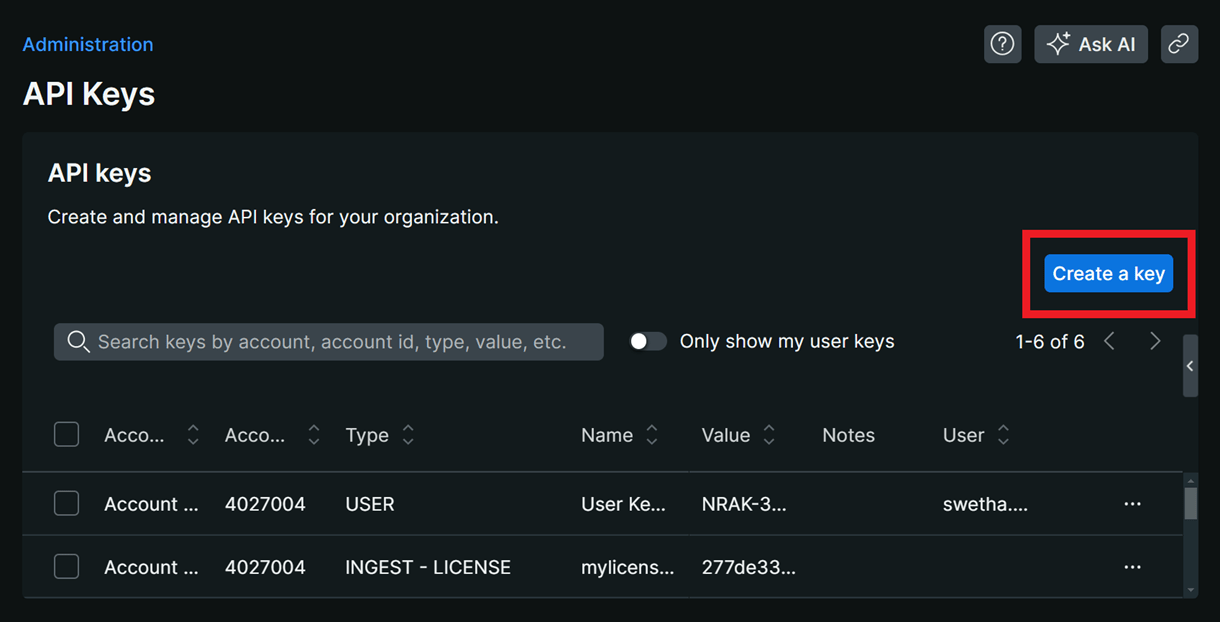
You can create the API keys by logging in to your New Relic account and clicking the API Keys option in your New Relic account profile menu.
In the API keys screen, click Create a Key.
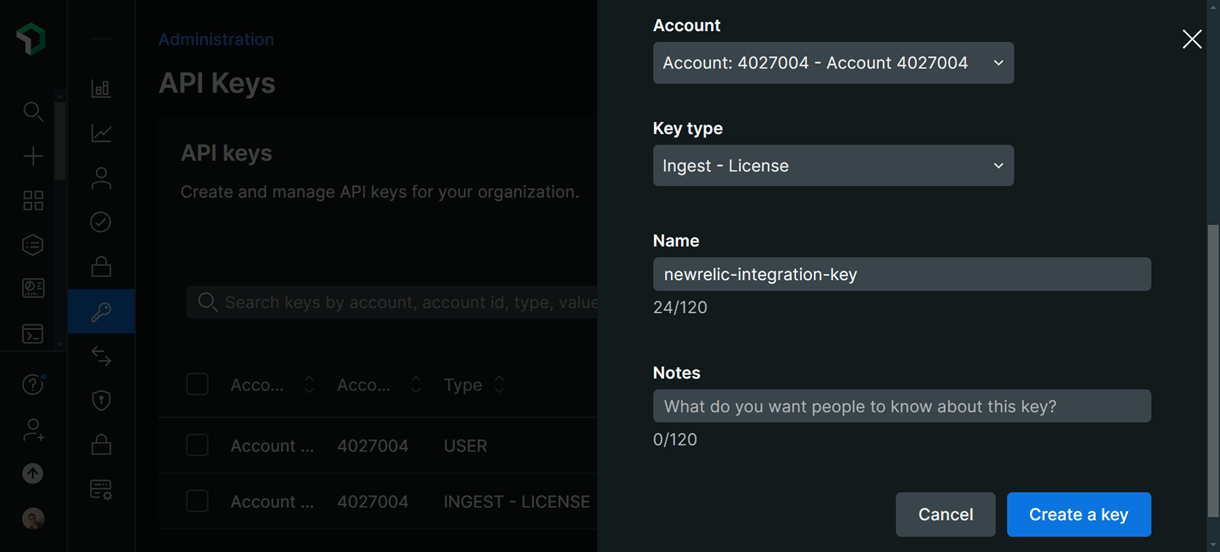
In the modal that pops up, select your New Relic account. In the key type drop-down, select the Ingest – License key type, enter an identifier for the key, add any additional notes if you want to, and click Create a Key.
After successful key creation, the generated API key will be displayed on the screen. Click the Copy Key button to copy the generated key.
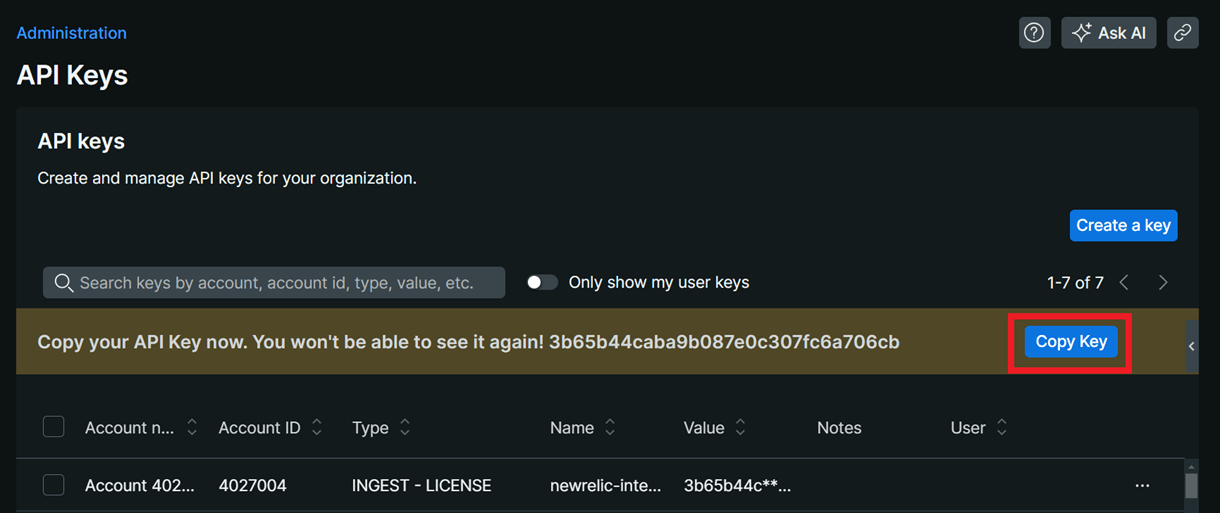
Note that the API key will be displayed only once. Make sure to copy the generated key and store it in a safe location outside of New Relic.
New Relic will soon remove the Copy Key option. We strongly recommend you securely copy and save your current API keys (both user and license keys) in a safe location outside New Relic.
Now, back on the Tools screen of your site in your Hub, click the Off link next to New Relic Monitoring. That will pop open a modal window where you’ll be prompted to enter the License Key you just copied.
Then enter any name you like in the App Name field. This is the name for the app that will be automatically created in your New Relic account once you enable this integration.

Once both your License Key and App Name have been entered, enable the integration by clicking the Enable / Disable New Relic toggle at the top of the modal. Then click Save at the bottom.
To disable New Relic Monitoring on your site, simply click the Enable / Disable New Relic toggle again. Your license key will still be saved there if you simply disable the tool. However, you can delete that data before saving if you wish.
This feature will have a slight impact on site performance while it is active. So it is recommended to only enable it when you are actively debugging issues on your site.
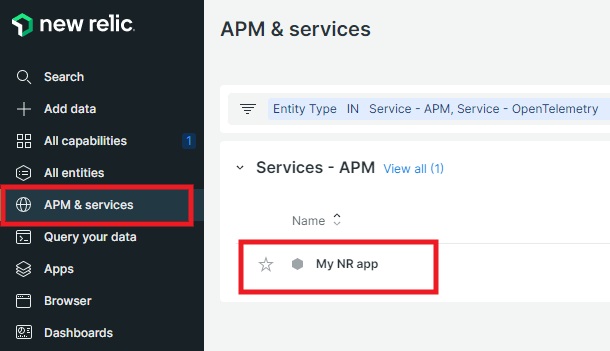
To view any site performance data recorded during any time period this monitoring feature was active, click the APM & services item in the sidebar menu. Then click on the name of the app you entered earlier in your Hub.
You’ll find tons of useful data displayed that you can filter for any time or date range you need. You can even backtrack several months to view any data that was recorded during time periods this integration was active for your site.

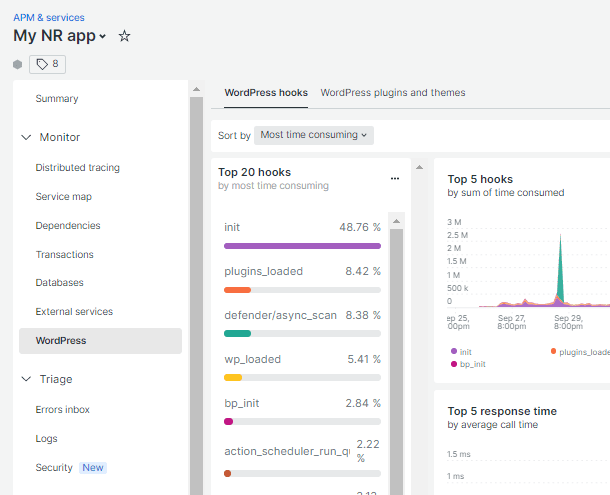
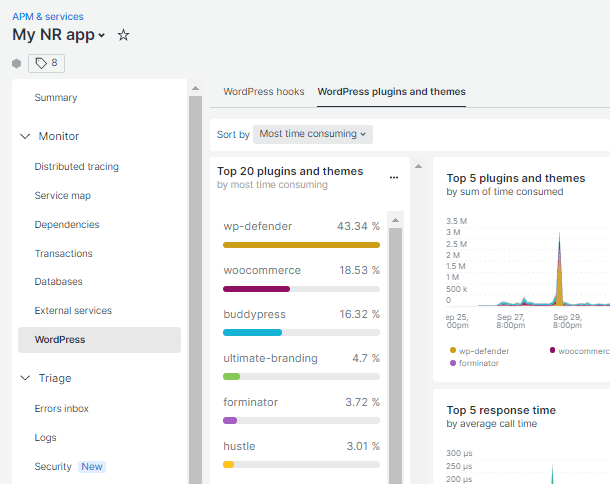
Some of the most useful data can be found on the WordPress Hooks and WordPress Plugins and Themes screens which can be accessed by clicking on the WordPress item in the left-hand menu.
The data on those screens will help you glean valuable insight into the most sluggish processes, plugins & themes on your site.
There are way too many additional settings and configuration options at New Relic to get into here, but you’ll find they have useful and extensive documentation here that you can explore to familiarize yourself with how things work there.
Remember to disable New Relic Monitoring once you’re finished debugging things on your site.
Get the lowdown on the performance monitoring features you need in our Easily Connect New Relic (for Free!) with WPMU DEV Hosted WordPress Sites post on the blog.
5.7 Get Support
Copy chapter anchor to clipboardIf you still have questions or need assistance after reading this document, please don’t hesitate to contact our support superheroes using the available options under the Support tab in your Hub or via the Support tab in your WPMU DEV Dashboard.
