3. Domains
This document details the features available under the Domains tab of your WPMU DEV hosted sites. It is not to be confused with the Domains manager, accessed from the Domains menu item in the Hub main navigation.
This guide includes instructions regarding:
- Locating domain information
- Adding domains to WPMU DEV hosting
- Setting a primary domain
- Locating and editing DNS records at several popular registrars
Use the index on the left to quickly locate usage guidance on specific features.
If you haven’t set up your WPMU DEV hosting account yet, visit WPMU DEV Hosting and explore the features of our best-in-class WordPress managed hosting and see pricing packages.
Note that you can add only one domain to a site on the Quantum plan (including both www and non-www versions). See Quantum Plan Restrictions for details.
3.1 Domains Overview
Copy chapter anchor to clipboardThe Domain manager for any hosted site can be accessed from that site’s dashboard, by clicking the Domains option under Hosting in the sidebar menu.
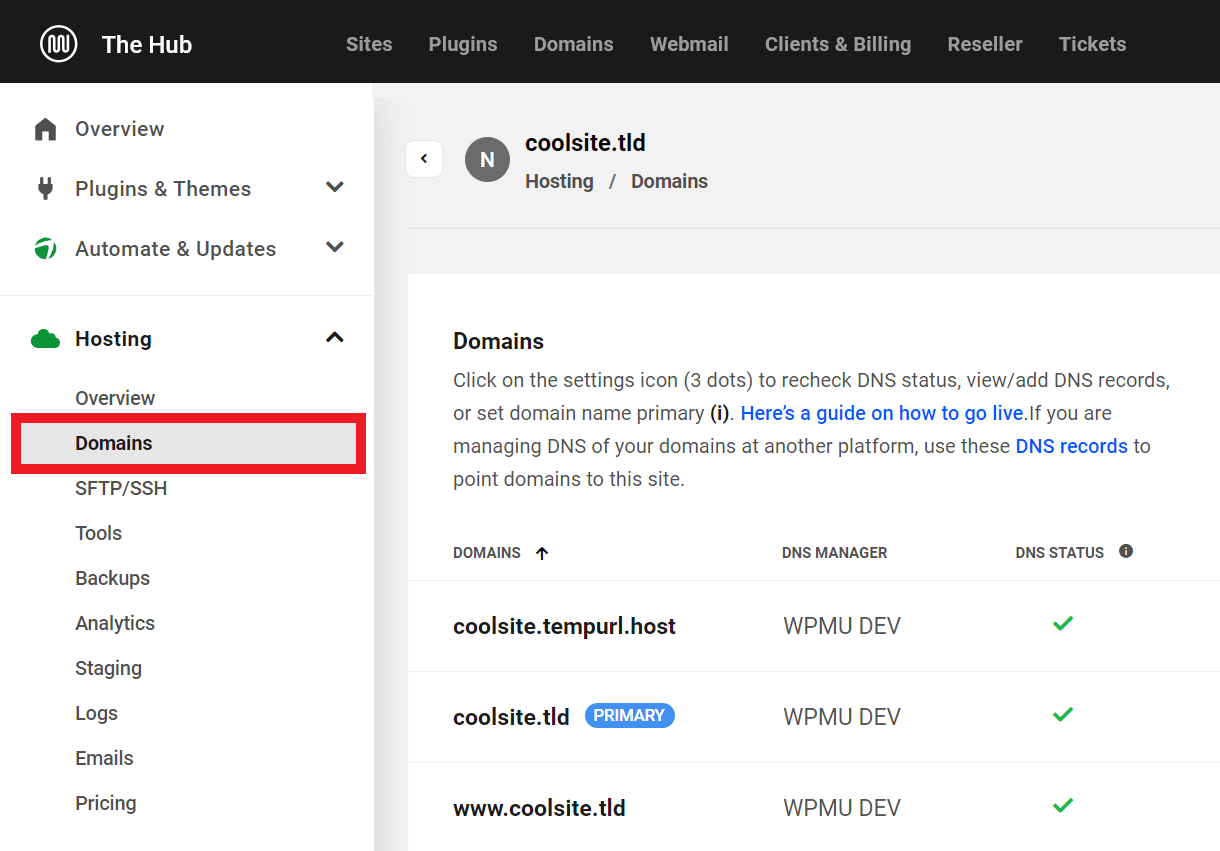
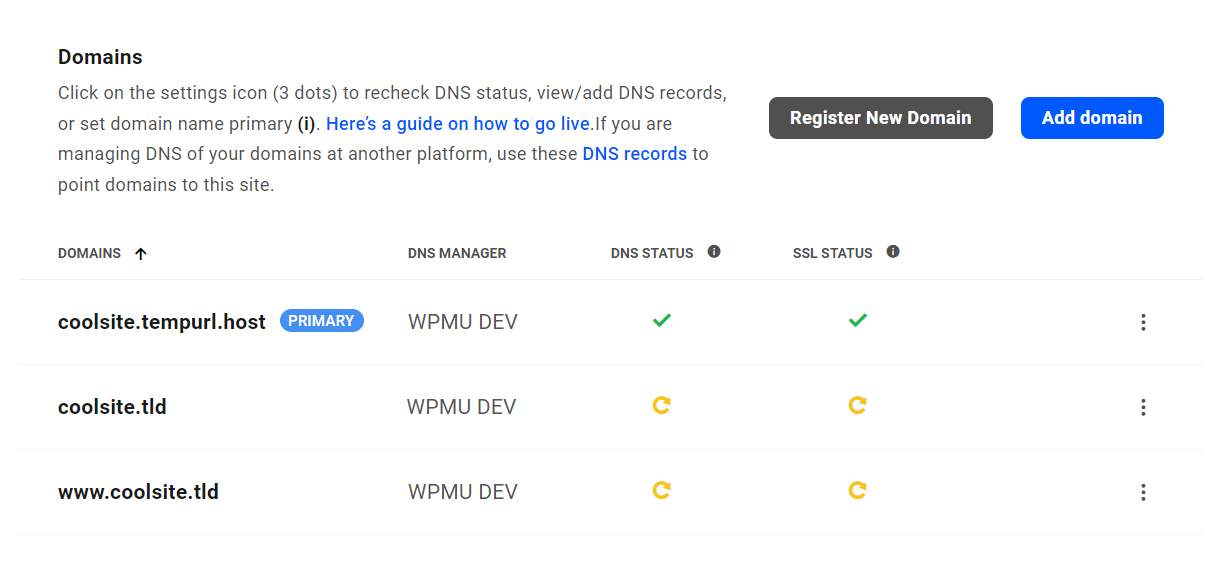
The domains associated with the current site are displayed at the top of the domain manager. If you have not yet added a custom domain, the temporary domain you created may be the only domain listed. If in doubt, temporary domains are those with the suffix .tempurl.host, as in yoursitename.tempurl.host.
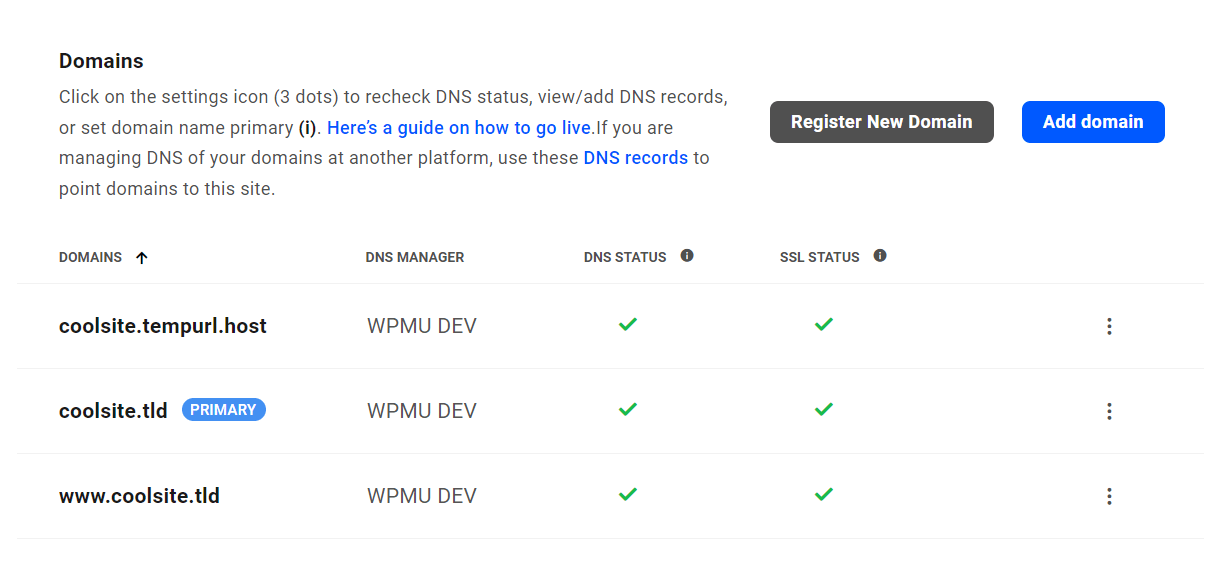
Next to each domain in the list, you will find:
- Primary – This label appears next to whichever domain is set to the Primary Domain for the site. This is the main URL site visitors will use to access your site.
- DNS Manager – This indicates where DNS records for the domain are managed: WPMU DEV, Cloudflare or Other.
- DNS Status – A green checkmark indicates that the DNS has been verified.
- SSL Status – WPMU DEV automatically installs an SSL certificate once the DNS has been verified. A green checkmark indicates that the SSL has been verified as well. For more information, check out our SSL Guide.
To set a new primary domain, first, add the domain as covered in the Adding domains section of this guide. Then click the three-dot icon to the right of the domain you want, and click the Set as primary option. Before the new primary domain is set, you will need to confirm the change in the confirmation modal.
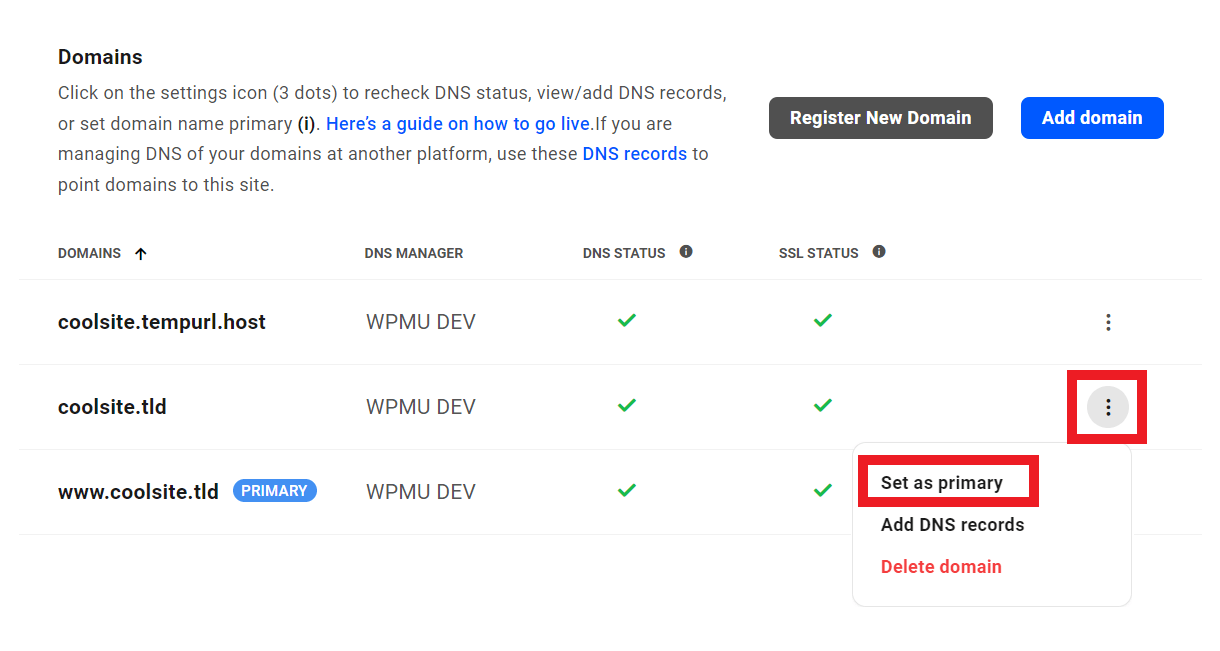
Click the Delete domain option in that menu to remove a domain from a site.

The delete option is not available for the current primary domain or the .tempurl.host domain. All sites must have a primary domain at all times, and the .tempurl.host domain cannot be deleted because it serves as the internal ID for that site. To delete a domain that is currently set as primary, first choose a new primary domain and then delete the old one.
Click the information icons for quick tips and links to more information.

3.1.1 DNS Records
Link to chapter 1A DNS record is a database record used to map a URL to an IP address and serves to tell the entire internet universe– individual users, search engines, bots, and email providers– where to find your site. If WPMU DEV is your host, then those records must be updated to point to our hosting.
DNS records, typically, are maintained by the provider from which you purchased the domain, and must be edited on that provider’s website. However, you can edit the nameservers at your domain registrar to point them to another provider or DNS manager if you wish.
We strongly recommend managing the DNS records of any domain added to a WPMU DEV hosted site in the DNS Manager of your Hub. See 6 VERY Good Reasons to Manage Your DNS with WPMU DEV for more information.
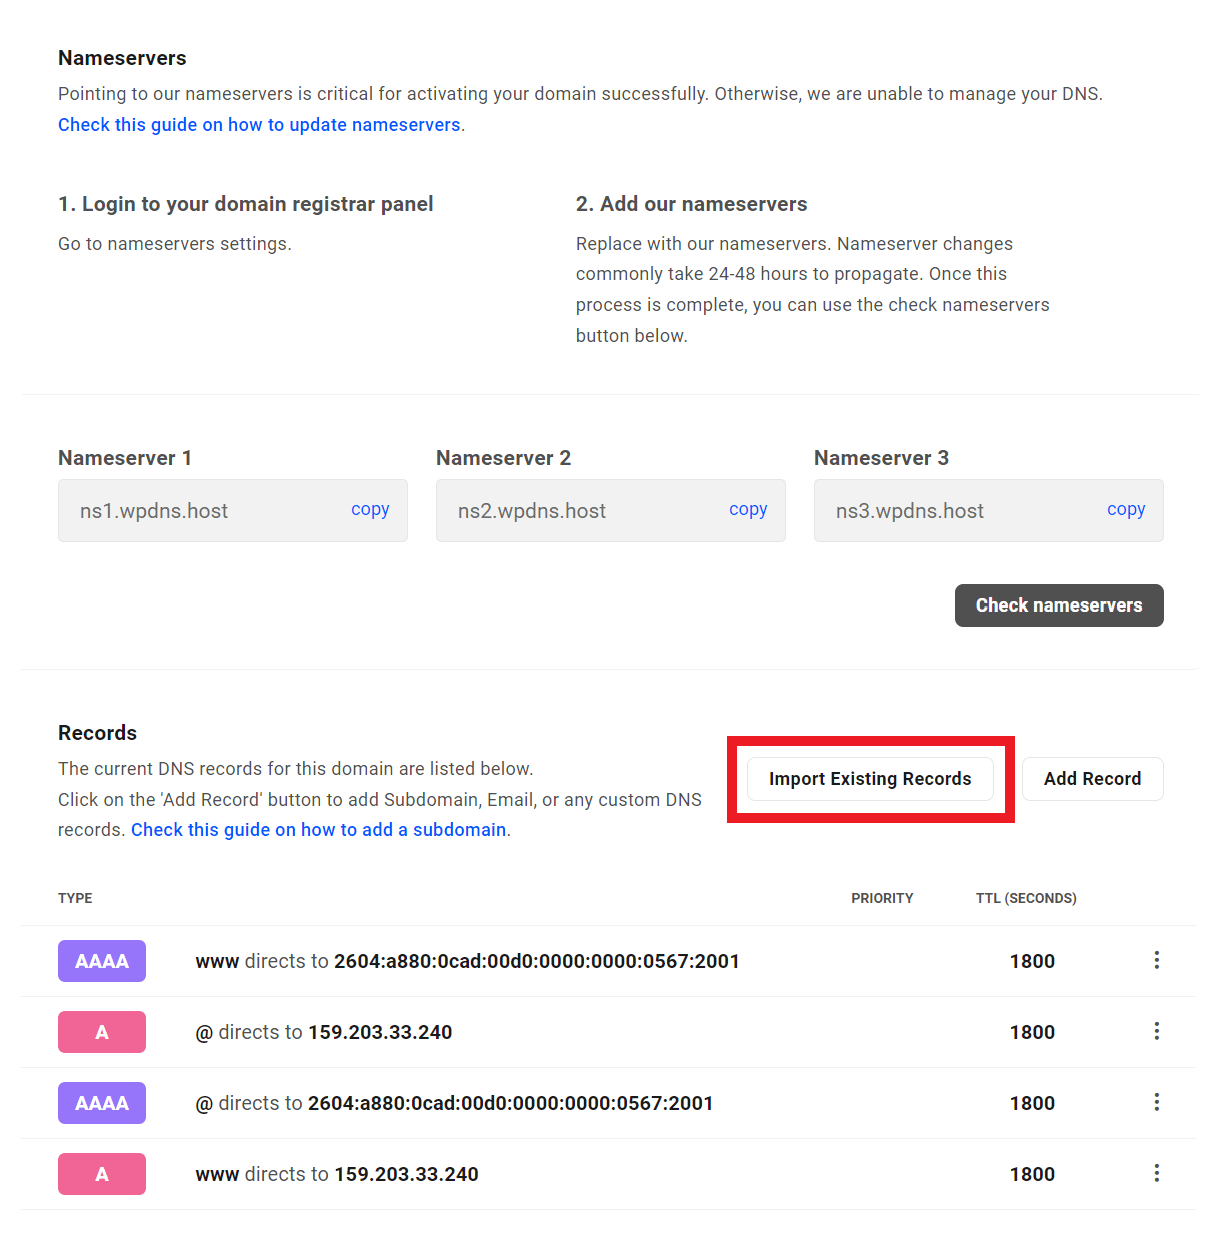
The DNS records for each WPMU DEV hosted site can be found by clicking the DNS records link in the description at the top of the screen.
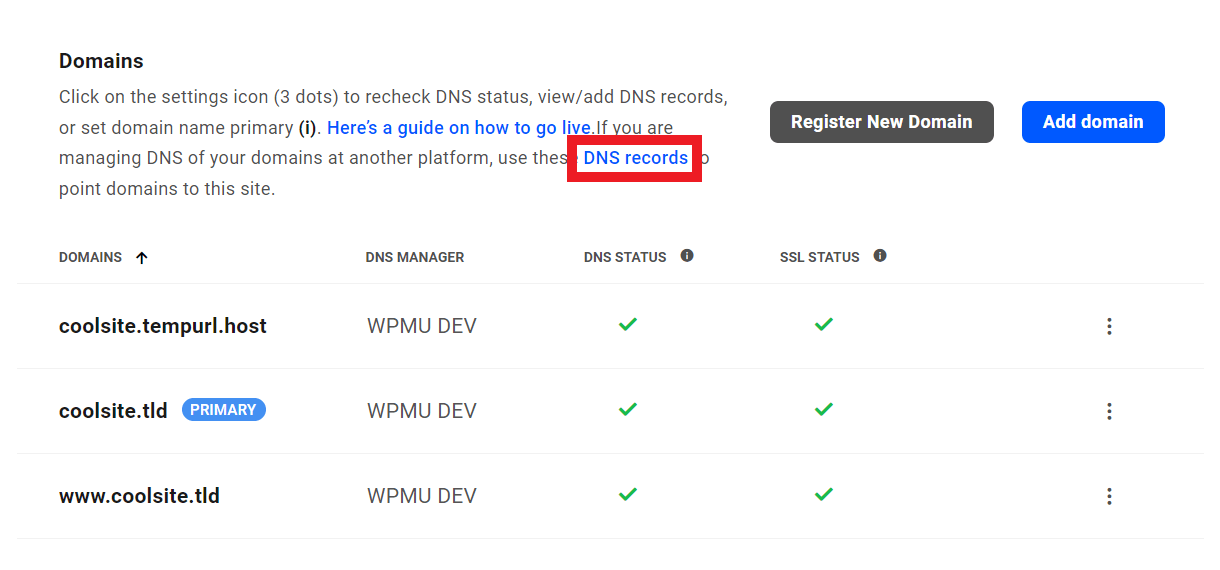
That will pop open a modal window where you can copy the records for your site, and replace the existing ones at your domain registrar.
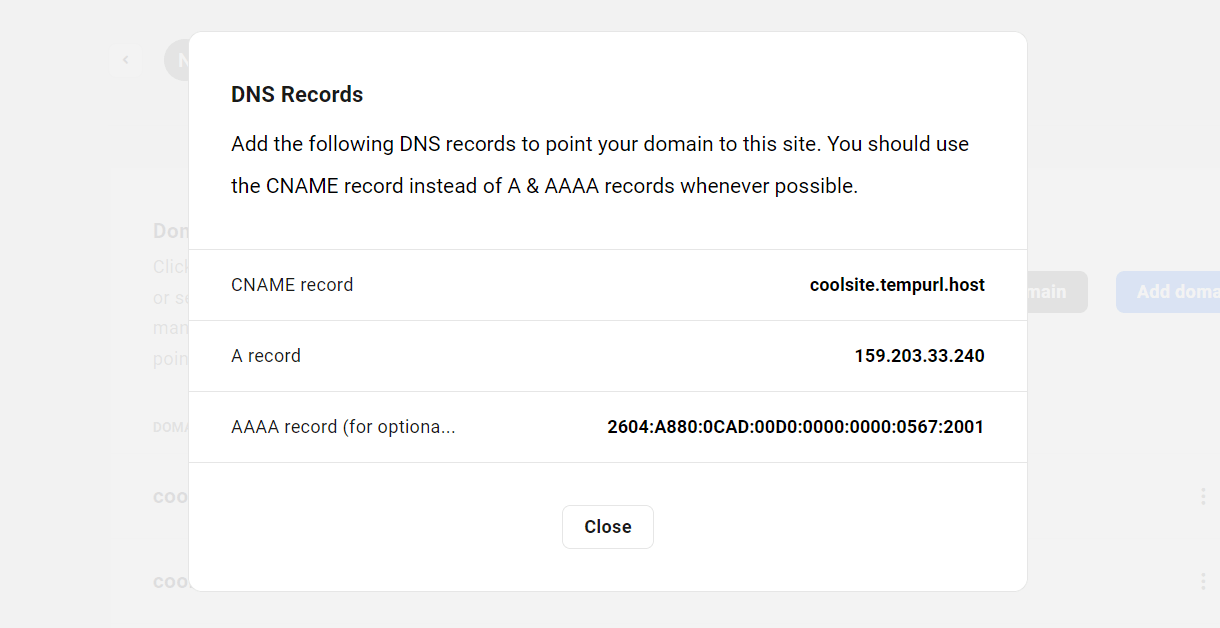
The records you will be working with include:
- CNAME – A Canonical Name or CNAME record is a type of DNS record that maps an alias name to a true or canonical domain name. CNAME records are typically used to map a subdomain such as www or mail to the domain hosting that subdomain’s content. For example, a CNAME record can map the web address www.example.com to the actual website for the domain example.com.
- A record – An A record maps a domain name to the IP address (Version 4) of the server hosting the website.
- AAAA record – A records are used for conversion of domain names to corresponding IP addresses. IP Version 6 Address records (AAAA) (also a quad-A record) specifies IPv6 address for the given host. So it works the same way as the A record and the difference is the type of IP address. This record should be used in addition to the A record, wherever possible, as it represents the best practice and might even lead to performance improvements.
We recommend using the CNAME record if possible, as the CNAME would not need to be edited if your site’s IP address changes for any reason (during a site migration for example).
A CNAME record for your domain would look something like this at your registrar:
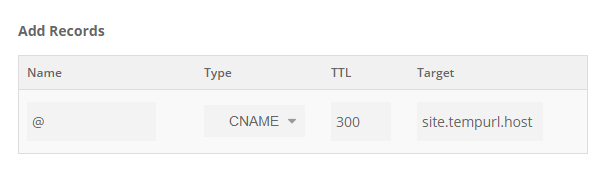
However, many registrars do not support using a CNAME for apex/top-level domains (like example.com), so you’d need to contact your registrar for support if you wish to use the CNAME.
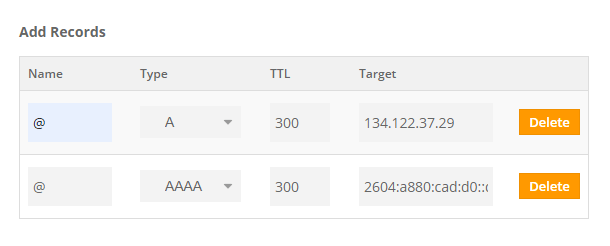
The alternative is to simply use the standard A & AAAA records instead. Those entries would look something like this at your registrar:
Editing DNS records is not difficult, but it must be done correctly or browsers may not be able to find your site. To help you configure your DNS records, we’ve created setup guides for some of the most popular domain registrars. See the Registrar guides chapter in our Hub > Domains document for help if needed when you’re ready to update your DNS records.
3.2 Adding Domains
Copy chapter anchor to clipboardIf you haven’t created your temporary WPMU DEV site you should do so before proceeding. See Creating a New Site if you need help doing so.
Adding a site to WPMU DEV usually is a four-part process:
- Create a temporary site
- Add a permanent domain
- Edit DNS Records
- Set the primary domain
If you are moving an existing site to our hosting, go ahead and create a temporary domain, then see our guide to migrating an existing site, which guides you through using the Migration Tool, by far the easiest way to add a site.
3.2.1 Add a Permanent Domain
Link to chapter 2From the Domains tab for your temporary site, click the Add Domain button.
In the Add a Domain popup, enter the domain name you would like to point to your site, omitting the http:// or https://. You must own the domain or have access to its DNS records to add it.

Notice the option to Also add www version of the domain. While www is no longer needed to access http and https domains, some users continue to use it. If no www version of a site exists, it is possible that these old-schoolers won’t be able to find the site.
Note also the option to Add DNS records. We strongly recommend managing the DNS of your domain with us, so this option is checked by default. However, if you prefer to manage the DNS at your domain registrar, you’ll want to uncheck this option and manually add the required records there. See the Registrar guides chapter in our Hub > Domains document for help with that if needed.
If you have followed our recommendation and selected the Add DNS records option to manage the domain’s DNS with us, you’ll then get a prompt to finish the setup by pointing your domain to our nameservers.

Clicking the Next button will redirect you to the DNS management screen for your domain in the Hub > Domains section. You’ll see that all the DNS records for your WPMU DEV hosted site have already been added.
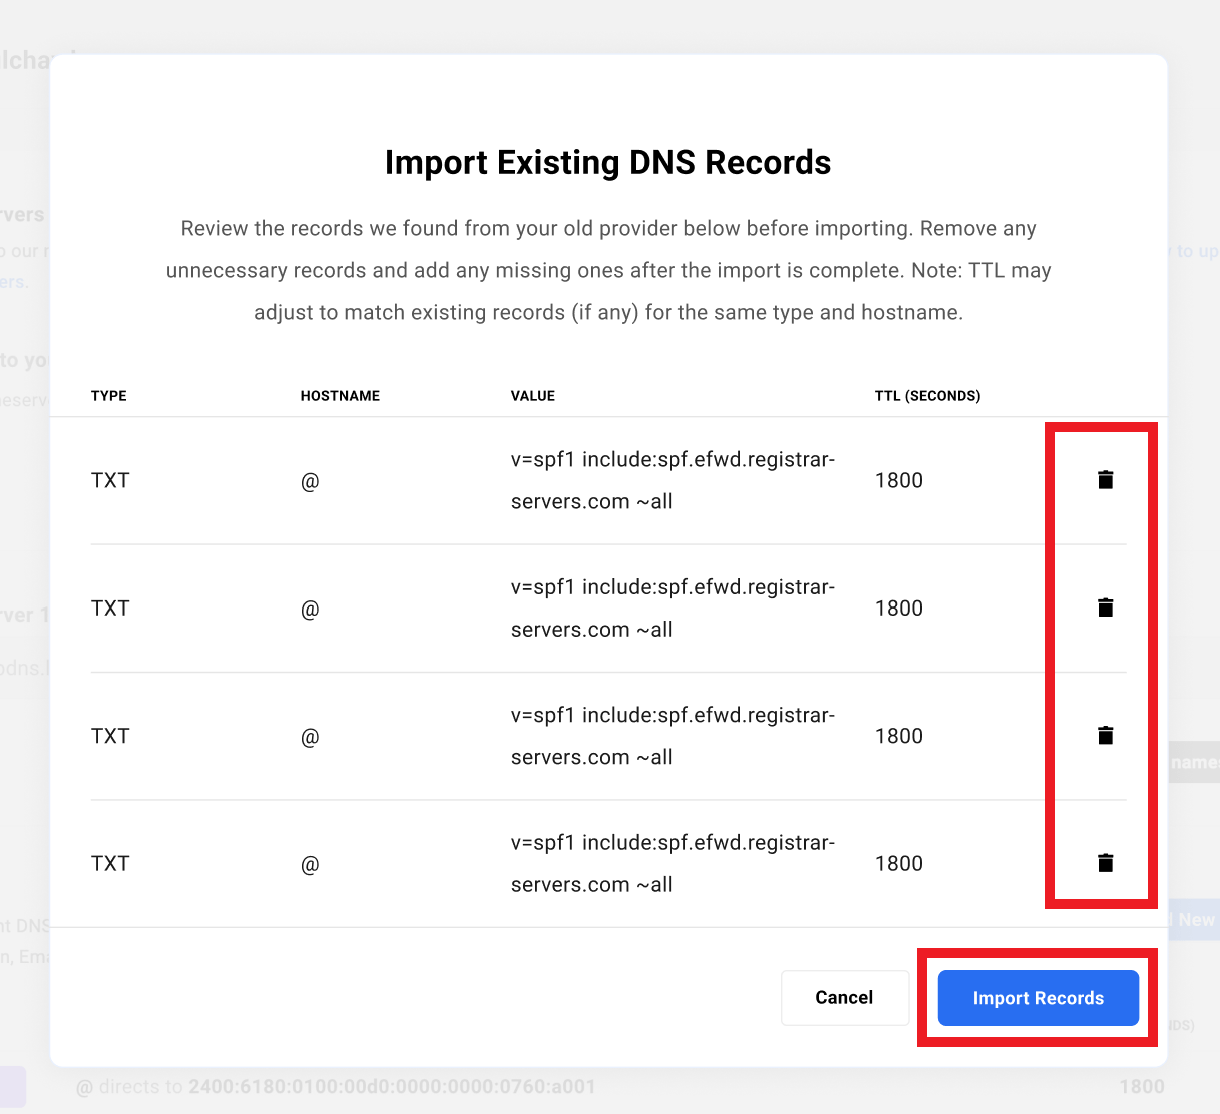
Your next step will be to click the button to Import Existing Records (note that this button only appears here when adding a new domain to the Domains list of a hosted site and selecting the option to Add DNS records as noted above).
Clicking that button will pop open a modal window where you can click the trash icon to remove any records you do not wish to keep. Then click the Import Records button to finish.
If you need to add records manually afterwards, please see the Add or Edit DNS Records chapter in the Hub > Domains document for guidance if needed.
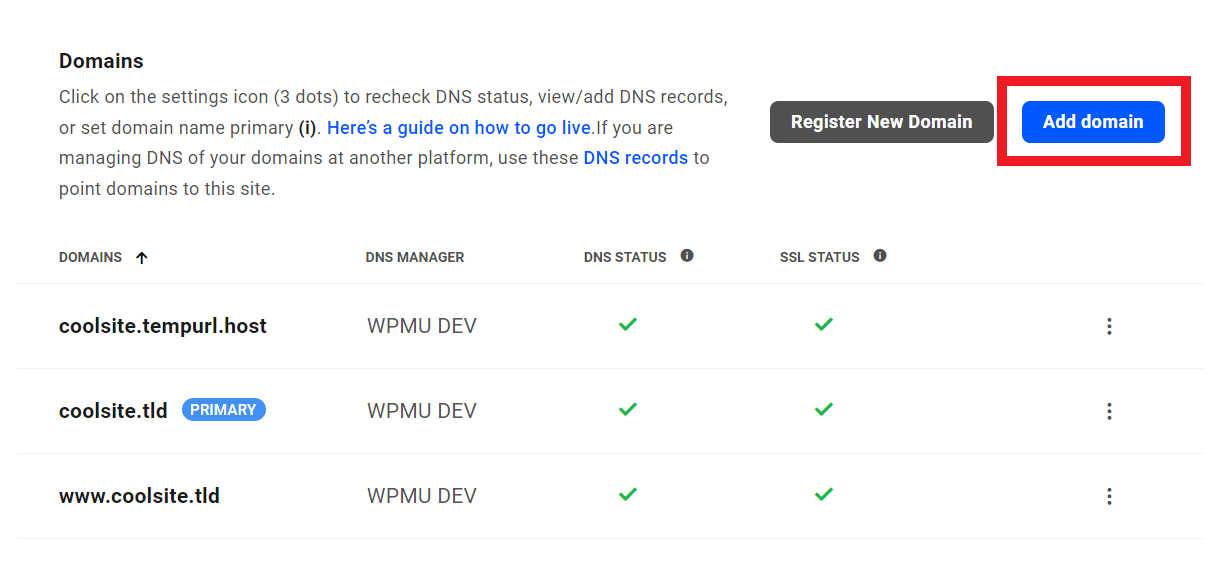
Now when you view the Domains list of your site, the new domain will appear along with any other domains associated with the site.
Once a domain has been added, the DNS Status and SSL Status will update nearly immediately if you are managing your DNS here in your Hub, and you had checked the option to Add DNS records for this domain as noted above.
If you are managing the DNS at your domain’s registrar, our servers will automatically try to locate the domain’s DNS, and then to create and add its security certification (SSL). These efforts will fail, however, until the DNS records at the registrar have been updated to point to WPMU DEV servers.
The image above shows a custom domain that has been added but for which the DNS records have yet to be properly updated.
3.2.2 Set primary domain
Link to chapter 2Once you add your permanent domain name, update your DNS records. After the DNS Status and SSL certificate have successfully propagated, you should set the permanent domain as the site’s Primary domain. Note that both DNS and SSL are needed before you are able to set your permanent domain as primary
Remember to be patient with DNS propagation. This usually takes at least several minutes, but can take hours and, in rare cases, a day or more.
Once your DNS and SSL statuses have propagated, indicated by green checks, you can set the desired domain as Primary by clicking the Set as primary option from the dropdown under the three-dot icon next to the domain.
This will trigger a confirmation modal.
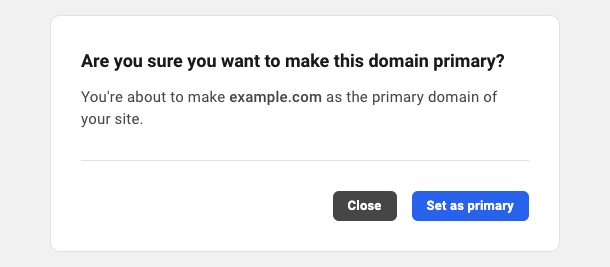
Click Set as primary to finalize the change.
Internationalized Domain Names (IDN)
Note that internationalized domain names are not supported by our email service. So if you need email accounts for your hosted site, please ensure you do not set an IDN as the primary domain. See our Emails documentation for details.
3.2.3 Multisite Domain Mapping
Link to chapter 2When you want to map custom domains to subsites in a WPMU DEV hosted multisite, there are just a few simple steps that must be taken for each such domain, but they must be done in order. Follow this guide to get things set up without error on your site.
Before proceeding with the steps below:
- Have you enabled multisite on your site? If not, go to the Tools tab for that site in your Hub and enable it now.
- If your multisite is subdomain-based, have you enabled the required wildcard certificate on it, and ensured that a wildcard (*) record exists? If not, see our Wildcard SSL Certificates guide for instructions on how to do that now.
Step 1 – Edit the Domain’s DNS
The first thing you need to do is edit the DNS of the domain you want to map so it points to your multisite. See the DNS Records chapter above for guidance with this step.
Note that you have 2 options for managing DNS: you can either edit the records directly at your domain registrar, or change the nameservers at your registrar to WPMU DEV nameservers and edit the domain’s DNS right here in your Hub.
See the Registrar guides chapter in our Hub > Domains document for help with either of those options.
If you use the WP-Ultimo plugin for domain mapping subsites, you do NOT need to continue with the steps below. All you need to do is edit the domain’s DNS as in this step. Then enable the integration with WPMU DEV Hosting under WP-Ultimo > Settings > Integrations in your network admin, add your custom domain and set it as the primary for that subsite under WP-Ultimo > Domains. The plugin will then add the domain to your Hub automatically via its API.

Step 2 – Add the Domain to Your Hub
Once the DNS has been edited as above, add the custom domain under the Domains tab of your multisite, in exactly the same way as you added your main domain. See the Add a Permanent Domain chapter above for guidance with this step if needed.
Important: do NOT set any of these added domains as the Primary in your Hub. The Primary should be the domain you use for the main site of your multisite.
Wait until both the DNS and SSL icons for the added domain have changed to green checkmarks in your Hub. Once they have, your domain is ready to map to your subsite.
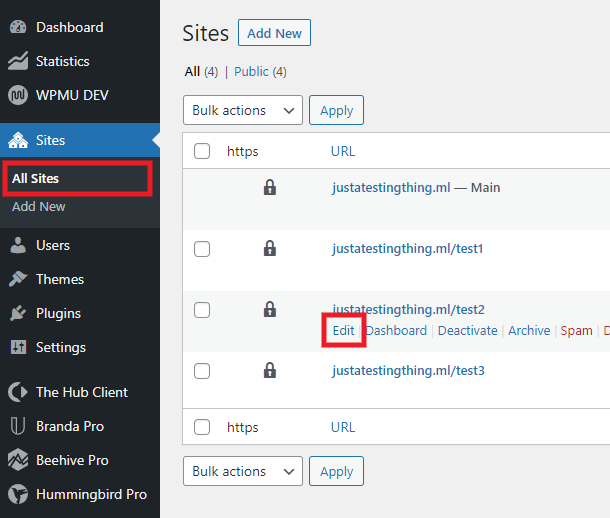
Step 3 – Map the Domain in Your Network Admin
Now go to the network admin of your multisite and click on Sites > All Sites in the admin menu. Hover your mouse over the subsite you want to domain-map and click the Edit action link.
On the next screen, replace the Site Address (URL) shown there with your custom domain. Note that the domain must be entered with the https:// and must include a trailing slash.
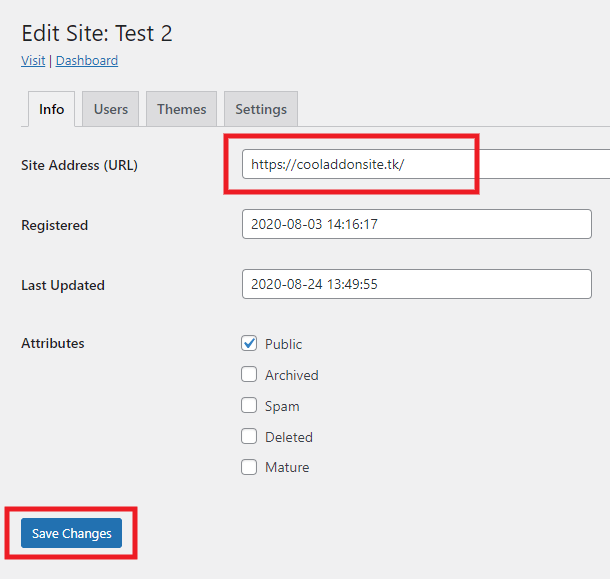
Once you’ve added the domain, click the Save button, and you’re done. Your subsite will now load at your custom domain instead of its original un-mapped URL.
3.3 Get Support
Copy chapter anchor to clipboardIf you still have questions or need assistance after reading this document, please don’t hesitate to contact our support superheroes using the available options under the Support tab in your Hub or via the Support tab in your WPMU DEV Dashboard.
