2. Overview
This guide explains the features available in the Overview tab of the WPMU DEV hosting dashboard.
If you haven’t set up your WPMU DEV hosting account yet, visit the hosting page, and explore the features of our best-in-class WordPress managed hosting, various hosting plans, and pricing packages.
Use the index on the left to quickly locate usage guidance on specific features.
Note that several features detailed in this document are not available for sites on the Quantum plan. See Quantum Plan Restrictions for details.
2.1 Getting Started
Copy chapter anchor to clipboardThe Hosting Dashboard for any hosted site can be accessed from that site’s dashboard by clicking the Hosting > Overview link in the sidebar menu.
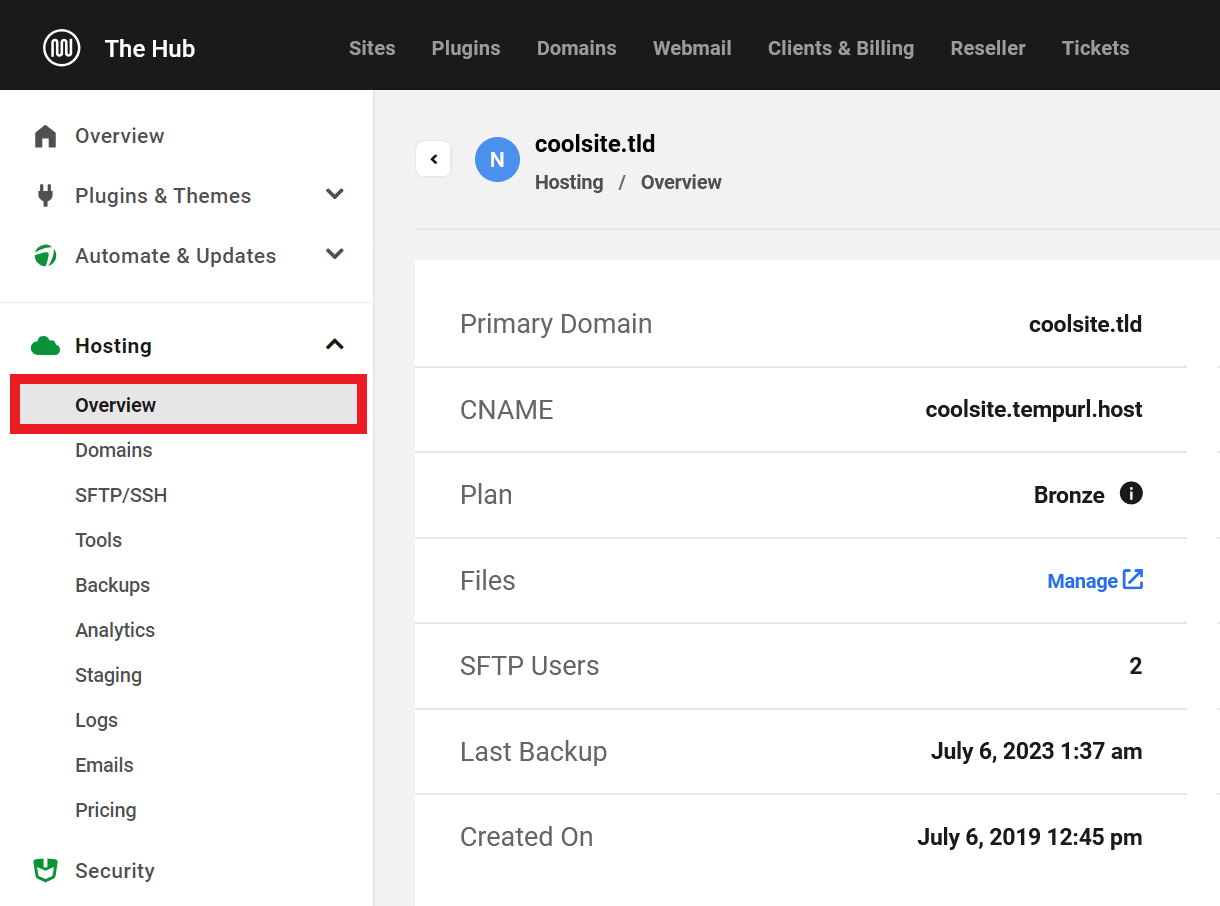
Use the sidebar menu to navigate to specific hosting features of your site. You may also find just what you need on the overview screen itself.
2.2 Domains
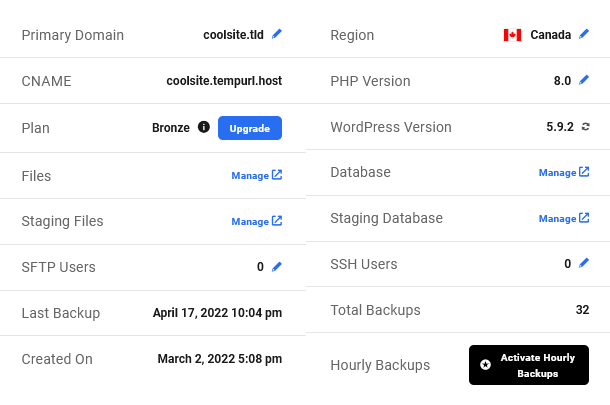
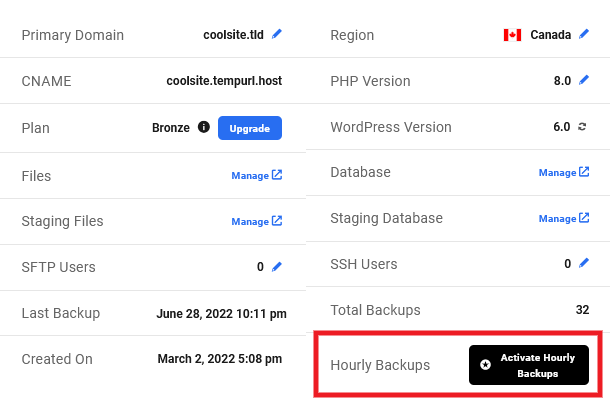
Copy chapter anchor to clipboardYour Primary domain is the main domain name for your site. Keep in mind that it is possible to have multiple domains associated with a single site, but only one can be set as the Primary; all other domains associated with the site will resolve to the Primary domain.
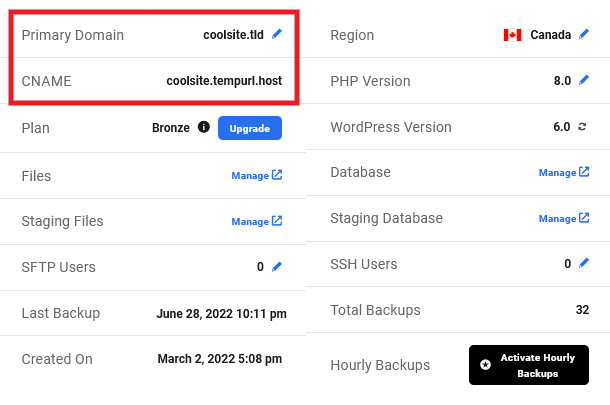
For example, when you first create your website– before you add a permanent domain– your site will have a temporary domain with the suffix .tempurl.host, as in sitename.tempurl.host. When you add a permanent domain, you will need to select it as the primary domain, but the temporary domain will continue to be associated with the site.
Click the pencil icon to jump to the domain editor and set a new primary domain name. Learn more about adding your custom domain in the Adding Domains guide.
The CNAME is associated with your site, and while a site will work with A records or AAAA records, we recommend using the CNAME whenever possible.
Learn more about CNAME and other DNS records in the DNS Records guide.
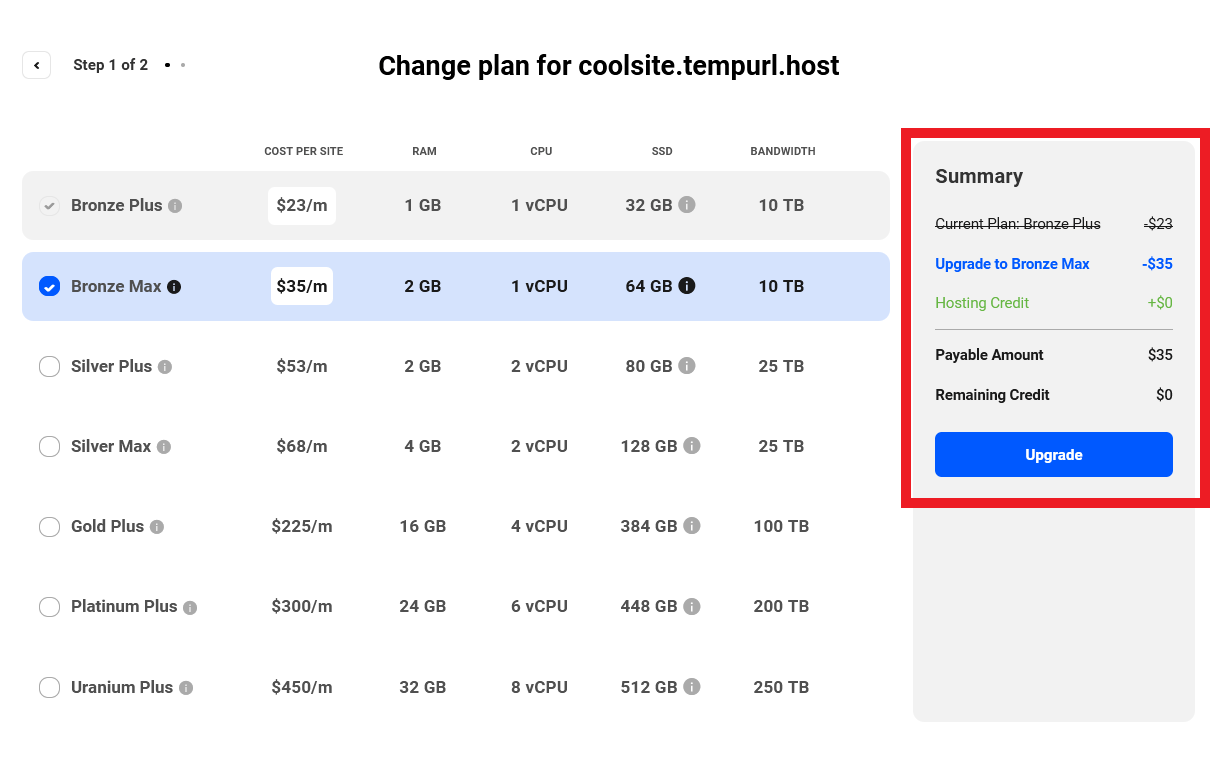
2.3 Plan
Copy chapter anchor to clipboardYour current hosting plan is shown here.
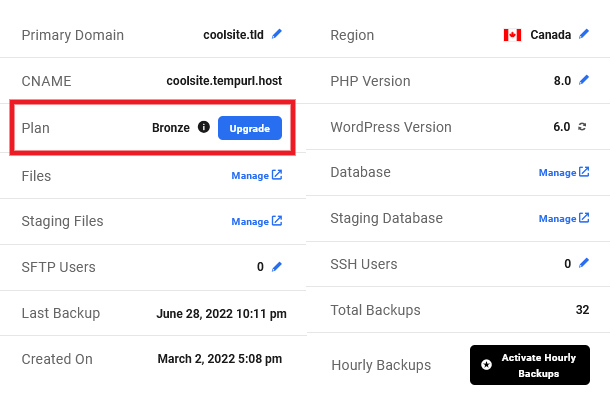
Click the Upgrade button to see your plan options and change your plan.

Plan information includes:
- Monthly per-site cost
- Dedicated memory included with each plan
- Number of vCPUs included
- Storage included with each plan
- Estimated monthly bandwidth capacity per plan
Summary
The summary calculates the cost for each plan based on any available hosting credit applied. To change your plan, select a new plan option and then click Upgrade to complete your payment.
Upgrading or Downgrading Your Hosting Plan
Hosting plans can be upgraded at any time. If you are uncertain about whether you need to change your hosting plan, more information can be found in the Plans & Usage Limits document.
Note that, due to differences in server architecture, you cannot switch an existing site from a Regular plan to a High Frequency plan, and vice versa. In other words, if your site is currently on a Regular hosting plan, you can only select from among the other Regular plans. The same applies to the more performant High Frequency plans.
Similarly, if your site is currently hosted on a monthly plan, it cannot be upgraded to a yearly hosting plan or have its billing changed to a yearly plan via the Hub. However, you can reach out to our support team, who can assist you with manually upgrading your hosting from a monthly to a yearly plan.
If you do wish to make such a change, you would need to use one of the options as seen in Downgrading Limitations.
2.4 Region
Copy chapter anchor to clipboard
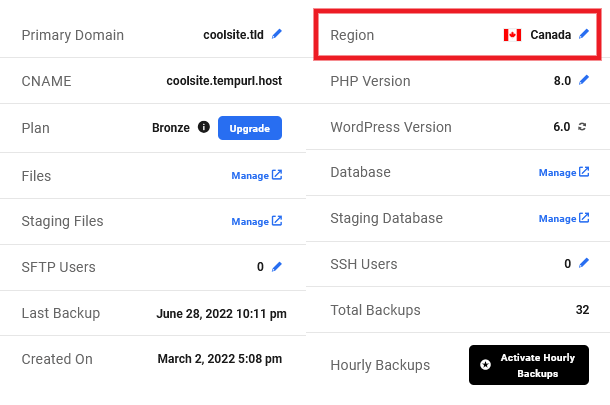
The Region field shows the region you choose to store your content. It is best to choose a region near your primary audience to improve the performance of your website.
Changing regions requires migrating your site. Our migration tool makes the migration process relatively simple, but we recommend reading Locations and Regions before proceeding. If you are sure you want to migrate a site in order to change regions, see our guide to Migrating an existing site.
Because changing to a new region requires a migration, you will be required to update your DNS records as you will be assigned a new dedicated IP address. See our Domains & DNS guide for detailed instructions on modifying your DNS.
2.5 SFTP/SSH
Copy chapter anchor to clipboard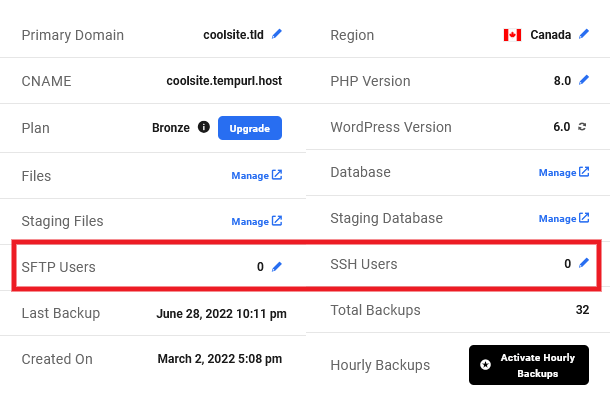
This section lists the number of SFTP and SSH accounts active for the current site’s Production and Staging environments. Click on the blue pencil icon next to SFTP Users or SSH Users to be taken to the SFTP/SSH Accounts user management tool.
See our SFTP & SSH guide for more information.
2.6 Management Tools
Copy chapter anchor to clipboardThe Overview dashboard provides quick access to several management tools which include:
- PHP Version
- WordPress Version
- Database
- Files
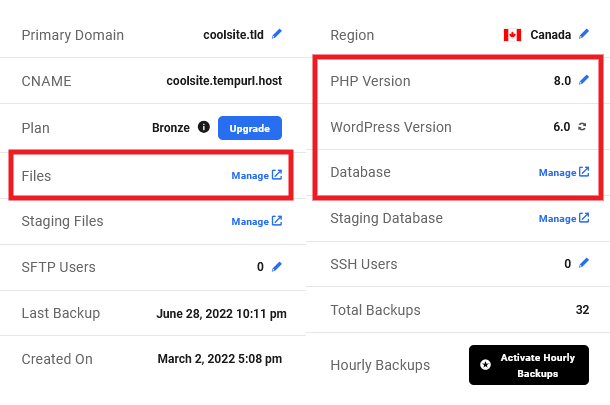
2.6.1 PHP Version
Link to chapter 6This field displays the current version of PHP that is running for your website. Click the blue pencil icon to choose a different version of PHP.

This opens the Change PHP Version module. Use the dropdown menu to select a new version. Click Apply button to save your changes or Cancel to close the module.
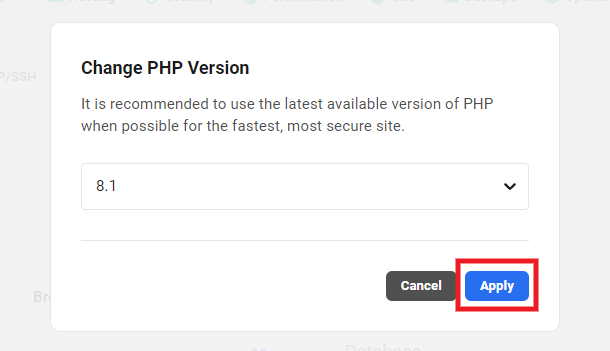
This feature is also available under the Tools tab and more information can be found in the PHP Version document.
2.6.2 WordPress Version
Link to chapter 6This shows the current version of WordPress core running on your server. Click the refresh icon after running an update to verify that the version updated successfully.
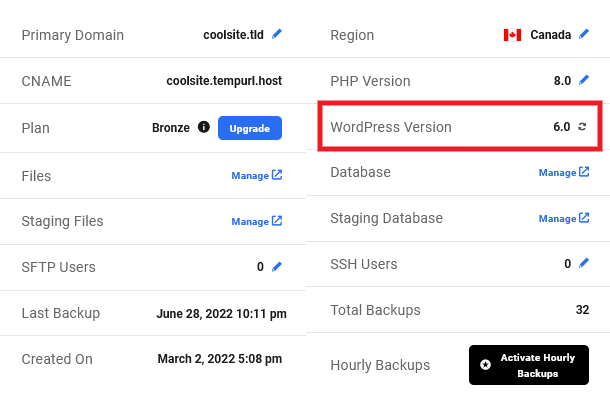
Sites hosted by WPMU DEV are checked every 12 hours and always receive minor WordPress core updates automatically.
2.6.3 Database
Link to chapter 6
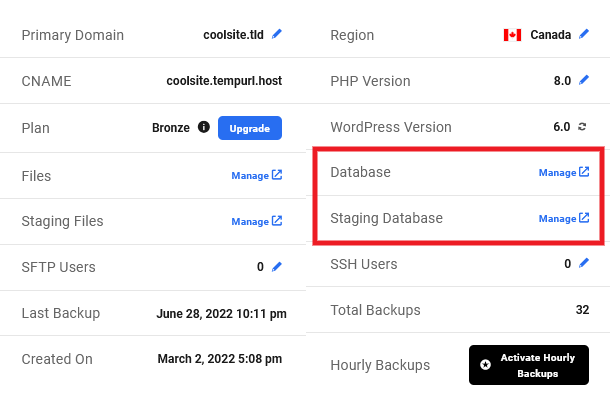
Click the Manage link to go straight to the phpMyAdmin interface for your production site. If you have created a staging site, you will also see a link for the Staging Database that will take you to phpMyAdmin for your staging site.
See our Database document for more details about the tools offered by phpMyAdmin.
2.6.4 Files
Link to chapter 6
Click the Manage link to go straight to the File Manager for your production site. If you have created a staging site, you will also see a link for the staging files that will take you to the File Manager for your staging site.
See our Files document for more details about the tools offered in the File Manager.
2.7 Backups
Copy chapter anchor to clipboardThe Backup section shows when your last backup was taken and the total backup points that are available.
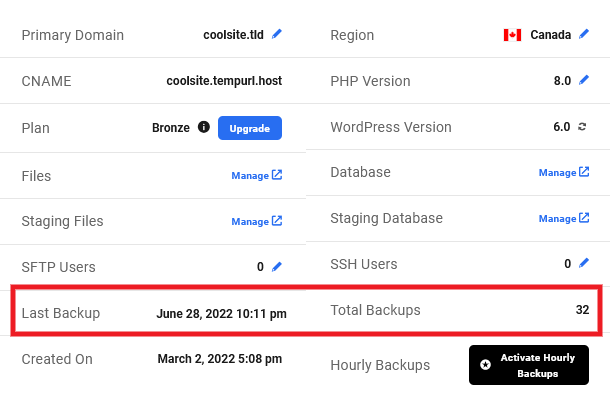
WPMU DEV Hosting automatically captures a backup each day, and manual backups can be created anytime. Backups are removed after 30-days.
Click on the Backups tab to jump to the Backups menu to view all your backup points for one-click restoration. The WPMU DEV Hosting Backups document provides detailed information about the available backup features.
Hourly Backups
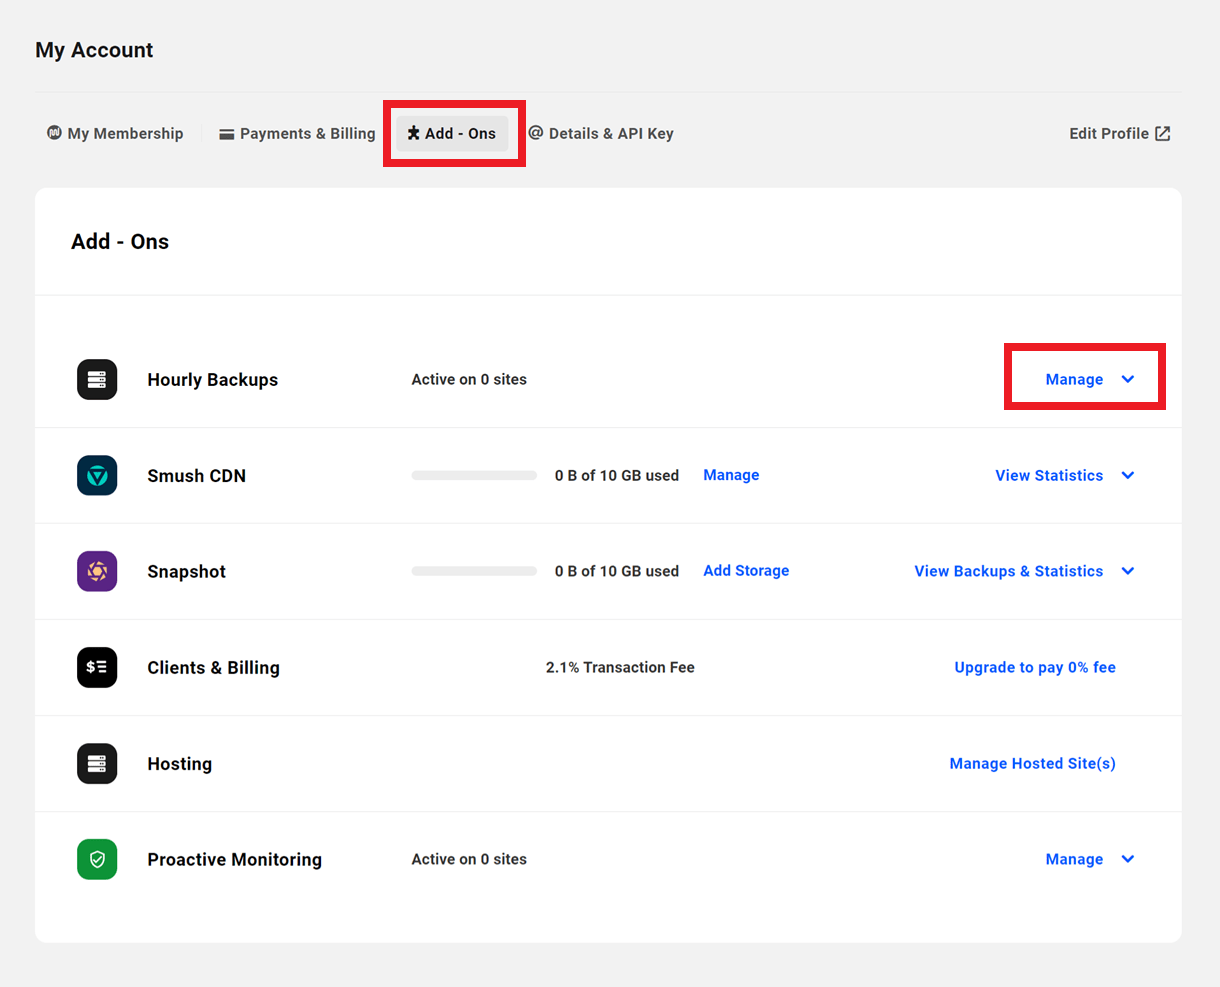
Just under the Backups information, you’ll see an option to activate the Hourly Backups paid add-on if needed.
With this add-on enabled, backups are created every hour, giving you up to 720 restore points every 30 days. This can be handy if you have a very active e-commerce site and don’t want to risk losing any recent orders if your site experiences issues.
Click the Activate Hourly Backups button to pop open a modal window where you’ll be prompted to confirm the add-on purchase. You’ll then see the feature listed as Active.

You can activate this add-on on each site individually from this screen. To activate it on multiple sites, and to manage your hourly backups, visit the Add-ons tab of your WPMU DEV Account page.
Did you know that WPMU DEV supports multiple ways to backup sites, including hosting backups, managed backups, and backups created with either of two versions of our Snapshot plugin? To help you make an informed decision on which backup option is best for your project, see our Backups FAQs doc.
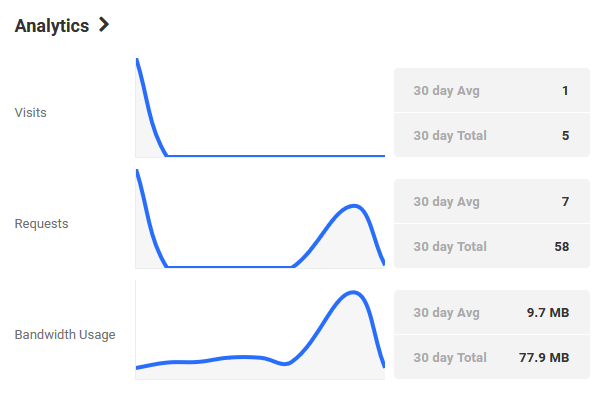
2.8 Analytics
Copy chapter anchor to clipboardThe Analytics display gives a snapshot overview of basic 30-day analytics, including:
- Visits
- Requests
- Bandwidth Usage
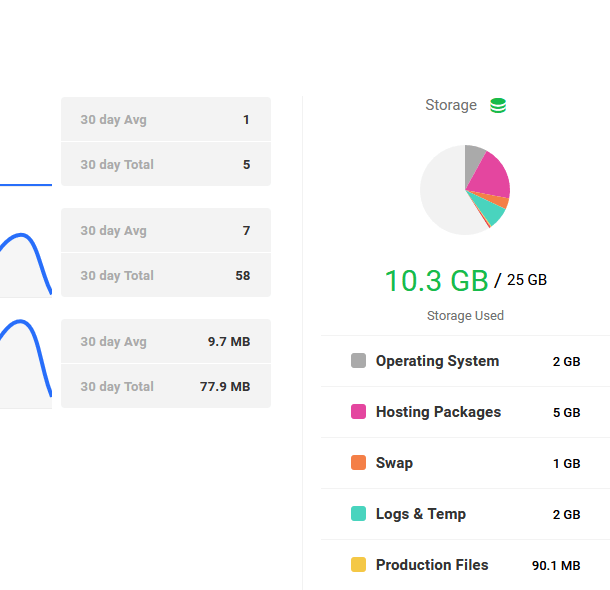
The Storage display refers specifically to the SSD storage capacity provided with each of our hosting plans. Features like dedicated RAM, CPUs, and bandwidth are essential performance factors but have no impact on storage capacity or usage. More on how storage works and how it is calculated can be found in the Storage document.
Detailed live stats, storage information, and traffic data can be accessed using the Analytics tab near the top of the hosting dashboard. In addition, a thorough guide to the Analytics tab can be found in Analytics.
It’s normal to observe a difference of around 100-200MB between the storage size displayed on WordPress > Tools > Site Health Info and the value displayed on the Hub analytics. But, if this difference is significantly larger, it might be due to WordPress caching the Directory and Sizes data, causing a delay in reflecting the actual storage size changes when files are deleted or removed. To view accurate storage data, you’ll need to clear all caches, including the WordPress transients and the Object Cache. You can use the Hummingbird’s Database Cleanup feature to clear the cache.
2.9 Get Support
Copy chapter anchor to clipboardIf you still have questions or need assistance after reading this document, please don’t hesitate to contact our support superheroes using the available options under the Support tab in your Hub or via the Support tab in your WPMU DEV Dashboard.
