4. SFTP & SSH
This guide explains how to create SFTP and SSH users with authority to transfer files to and from your server.
For more information about the SSH & PHP functions and commands that you can use on WPMU DEV hosting, please see our Allowed & Disabled Functions & Commands document.
4.1 SFTP and SSH users
Copy chapter anchor to clipboardSFTP/SSH users are required to connect to a WPMU DEV hosted site using an FTP client or terminal application.
SFTP vs SSH
SFTP and SSH users connect to servers using the same security protocol, so neither is more or less secure than the other.
SFTP users can connect to a server and edit files using an FTP client like Filezilla or Cyberduck.
SSH users can connect to a server from their preferred terminal. After connecting, they can use tools such as the WordPress command line interface, WP-CLI. In simple terms, SSH users need no special software to connect to a server and have access to a powerful set of commands not available to SFTP users.
Do I need an SFTP/SSH user?
The rules of thumb are:
- If you don’t know whether or not you need an SSH user, then you don’t.
- If you need to move files to or from your site using anything other than the built-in WordPress tools– a file that exceeds the file size limit of the WordPress uploader, for example– you will need an SFTP user to do so.
- If you can achieve your goals using the file transfer tools built into WordPress, you don’t need one either.
SFTP/SSH users are site-specific, which means users created for Site A cannot access Site B or any other site, including different sites attached to the same member account. Staging sites, for example, require their own SFTP/SSH users even if the production sites from which they are pulled already have existing SFTP/SSH users. Users created for multsite networks can transfer files to and from any subsite of that network, but only sites within that network.
4.2 Creating SFTP/SSH Users
Copy chapter anchor to clipboardBegin by selecting a site in Hub 2.0. From that site’s dashboard, click Hosting and then SFTP/SSH to access the SFTP/SSH Accounts screen.
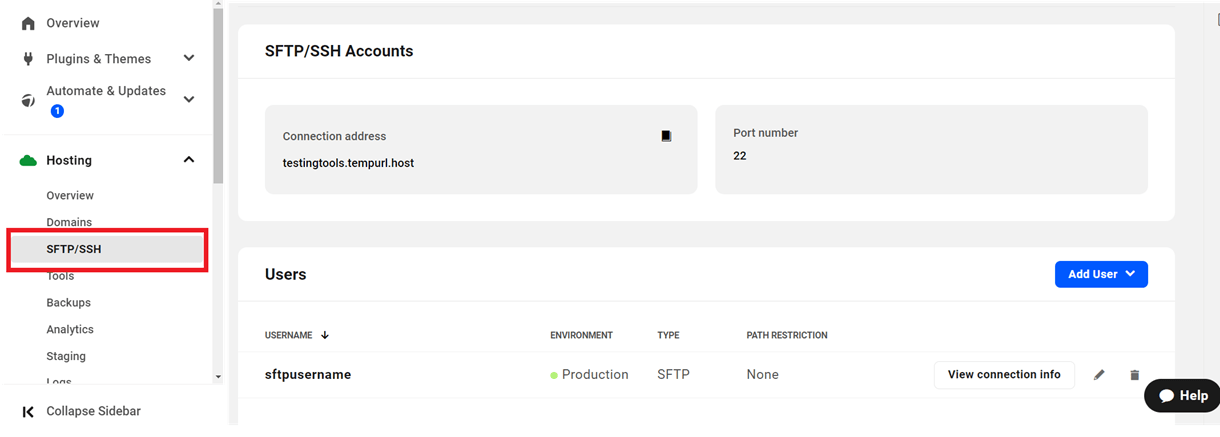
The page includes the SFTP/SSH connection information for the current site and a list of the existing SFTP/SSH users. From this screen members can create and delete users or change the password(s) for existing users.
The information displayed includes:
- Connection Address (Host) – This is the URL used by WPMU DEV internally to identify your site and is the required URL for SFTP/SSH connections. Many FTP clients refer to the Connection Address as the Host.
- Port number – We use port 22 for SFTP & SSH connections. This port is closed by default on all WPMU DEV hosted sites and is opened only if one or more SFTP/SSH users have been created. If you require port 22 to be closed on your site, to ensure PCI compliance for example, please ensure you only create SFTP/SSH users when needed and delete them when their job is done.
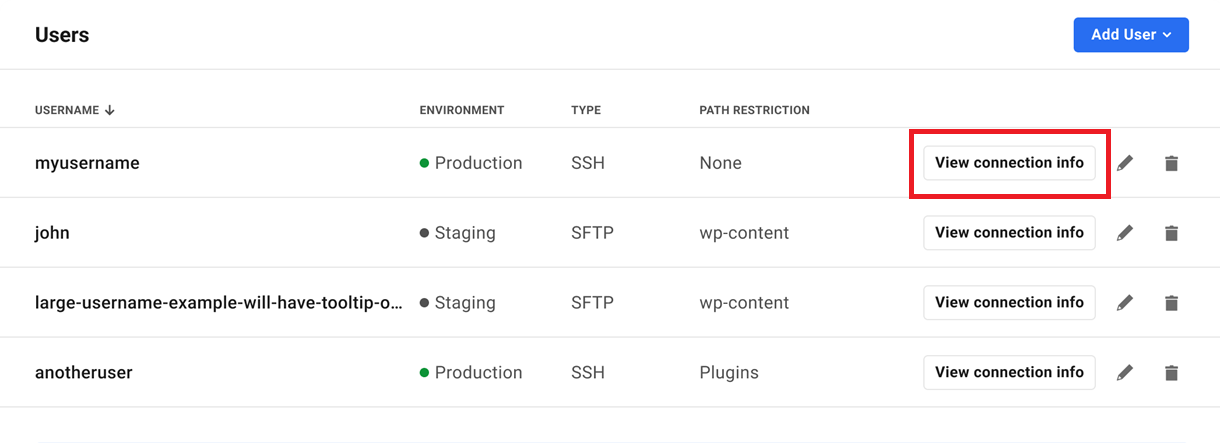
- Username – The username(s) of both SFTP and SSH users that have been created for this site. If no users have been created, the list will be empty.
- Environment – During creation, SFTP/SSH users are given access to either a production (live) site or a staging site, and that status is displayed here.
- Type – These users are either SFTP or SSH, and that designation is displayed here.
- Path Restriction – The access granted to SFTP/SSH users can be restricted to certain areas of a site’s file structure. This label indicates the type of restriction, if any, has been placed on the user. The label None indicates a user with no restrictions and with access to all site files.
- Connection Info – A convenient link created to simplify the configuration necessary to connect to a WPMU DEV hosted site via SFTP/SSH.
- Edit Password (pencil icon) – Click the pencil icon to access the edit password modal. SFTP/SSH user passwords can be changed as necessary, but user names cannot changed after creation.
- Delete – Click the trash icon to open the delete user modal.
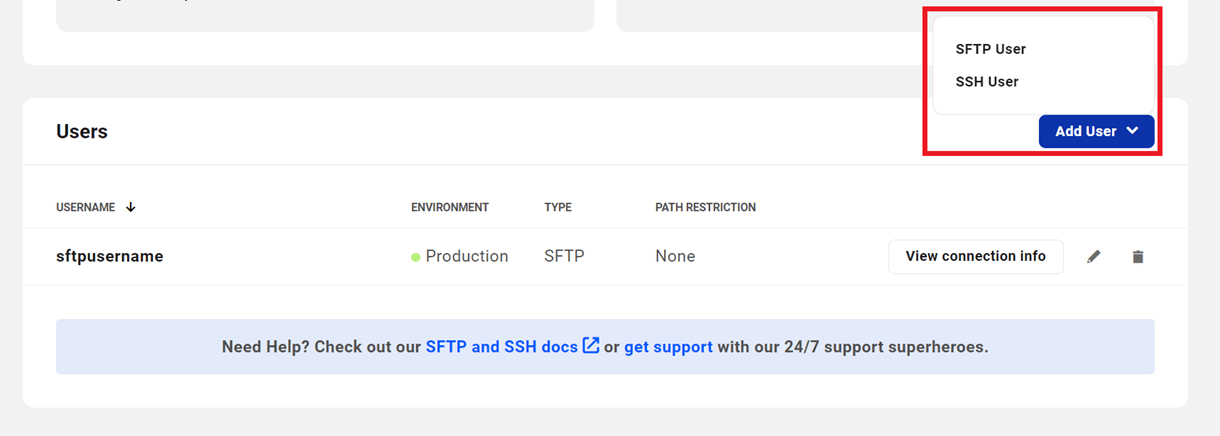
Click the Add User button and choose SFTP User or SSH User from the drop-down menu.
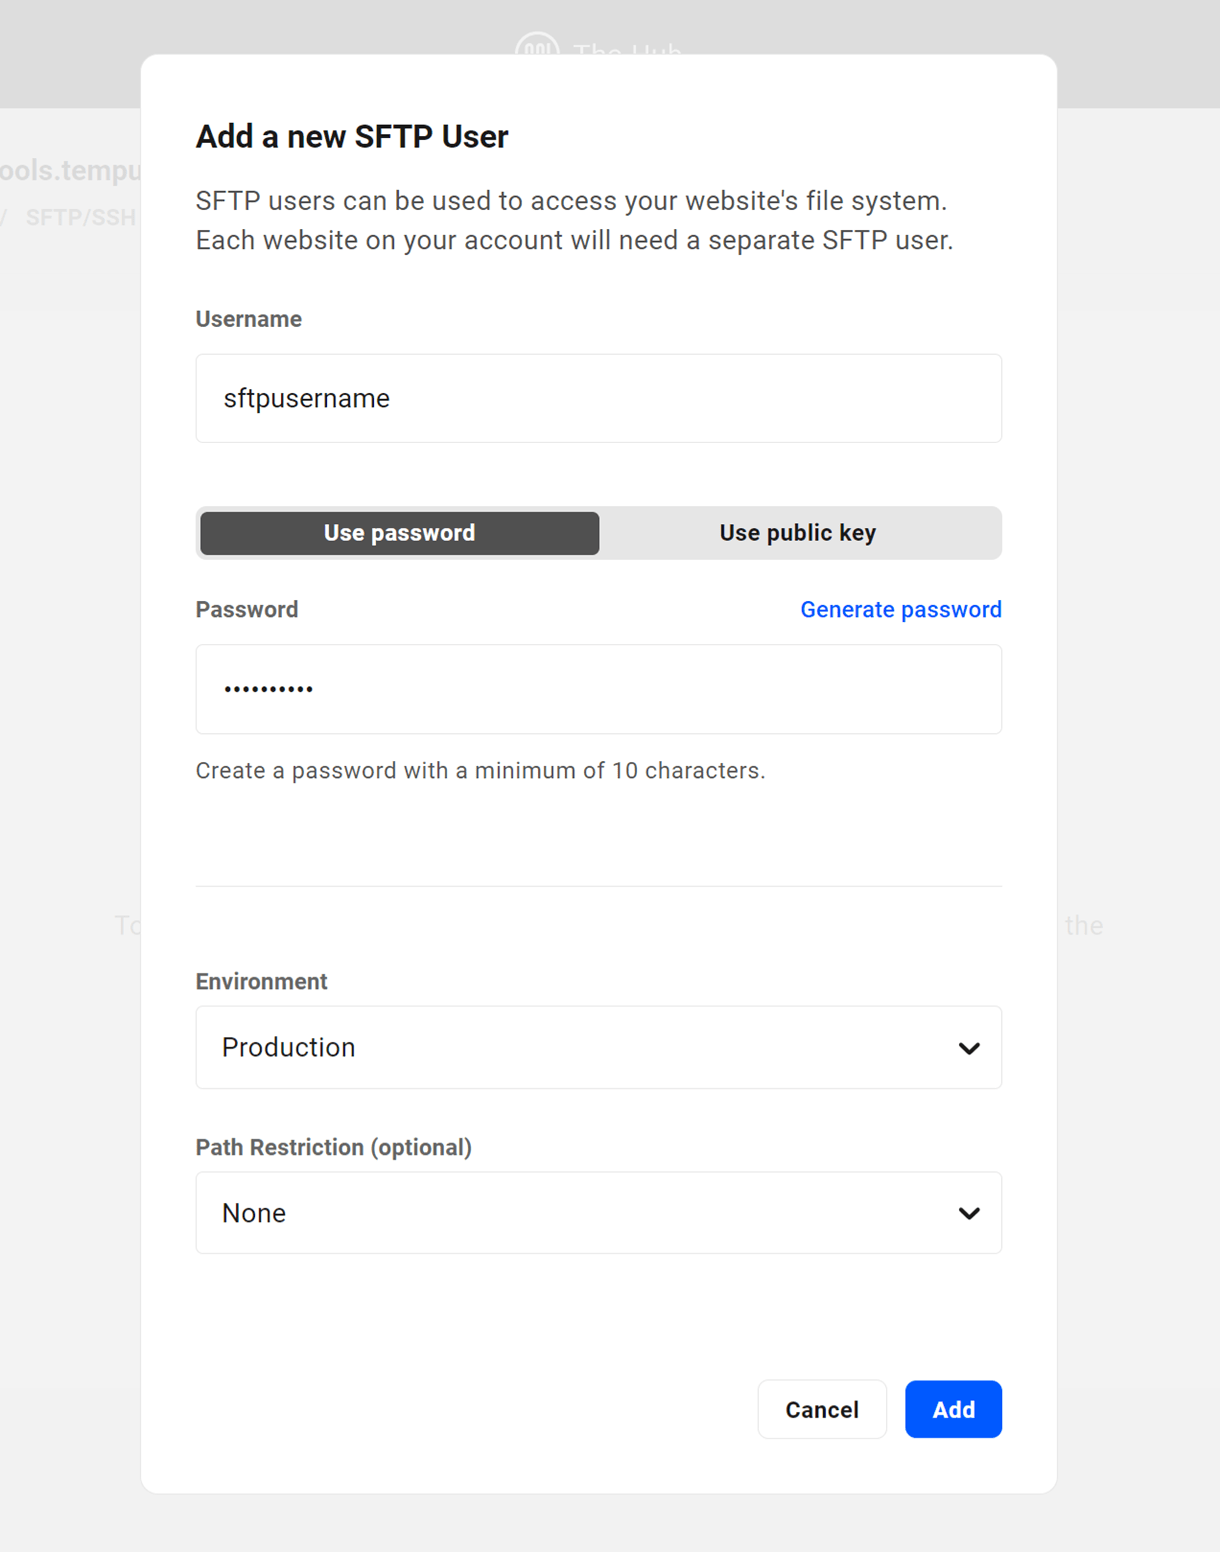
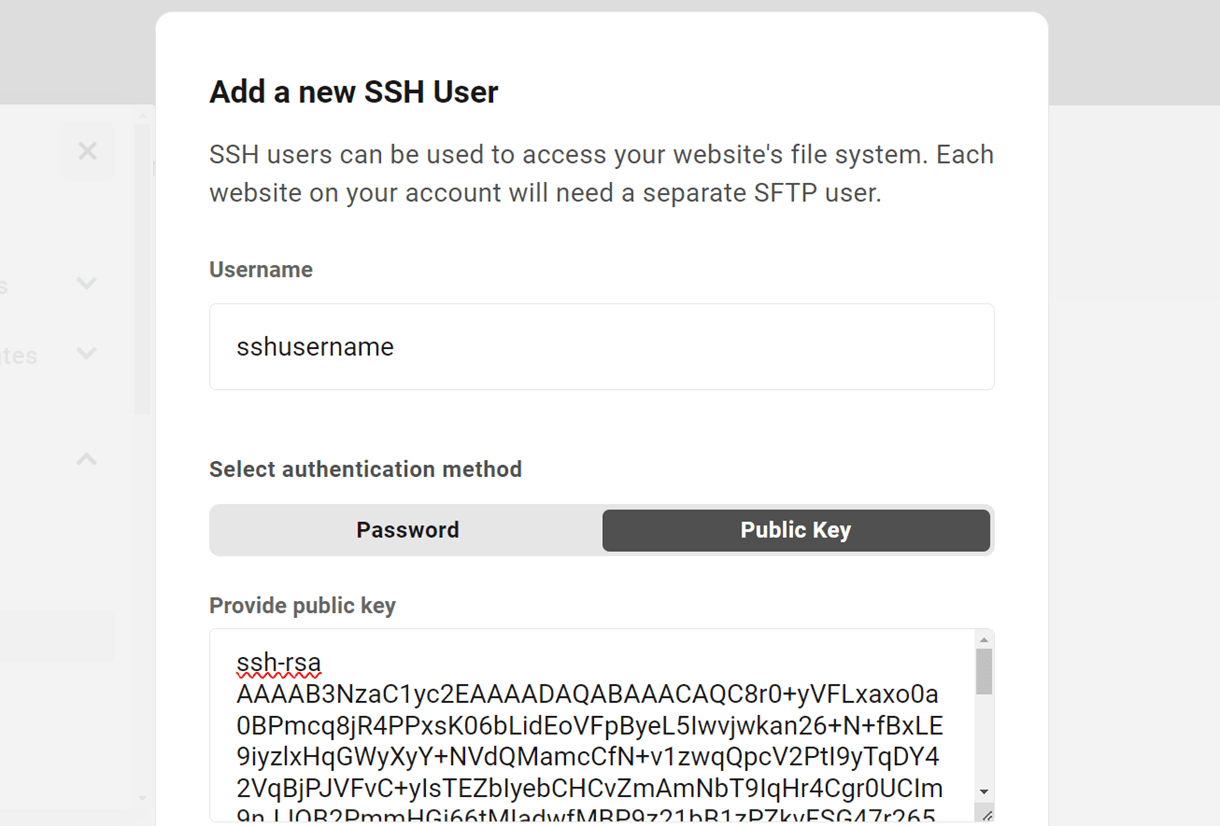
In the modal that appears, enter the username you’d like for this user. Then choose whether you want to use a Password or a Public SSH Key.
For a password, you can either use the strong password that is automatically generated, or enter a custom password.
If you want to use a public key instead and need help setting that up, see Creating SSH Keys below.
SFTP/SSH user passwords can be changed as necessary, but the username, restriction, and environment selected when a user is created cannot be modified later. Fortunately, users can be deleted and new users with new access rights can be created at any time.
Environment
WPMU DEV members whose sites we host can create a staging copy of any production site where changes can be implemented and tested before they go live. Production sites and staging sites require separate SFTP/SSH users.
Use the Environment drop-down menu to associate the new user with the correct environment.

Path Restriction
SFTP/SSH users can be restricted to specific folders within the WordPress file structure. This might allow, for example, a graphic designer to access the Uploads folder where images are stored, while preventing that person from accessing files elsewhere.
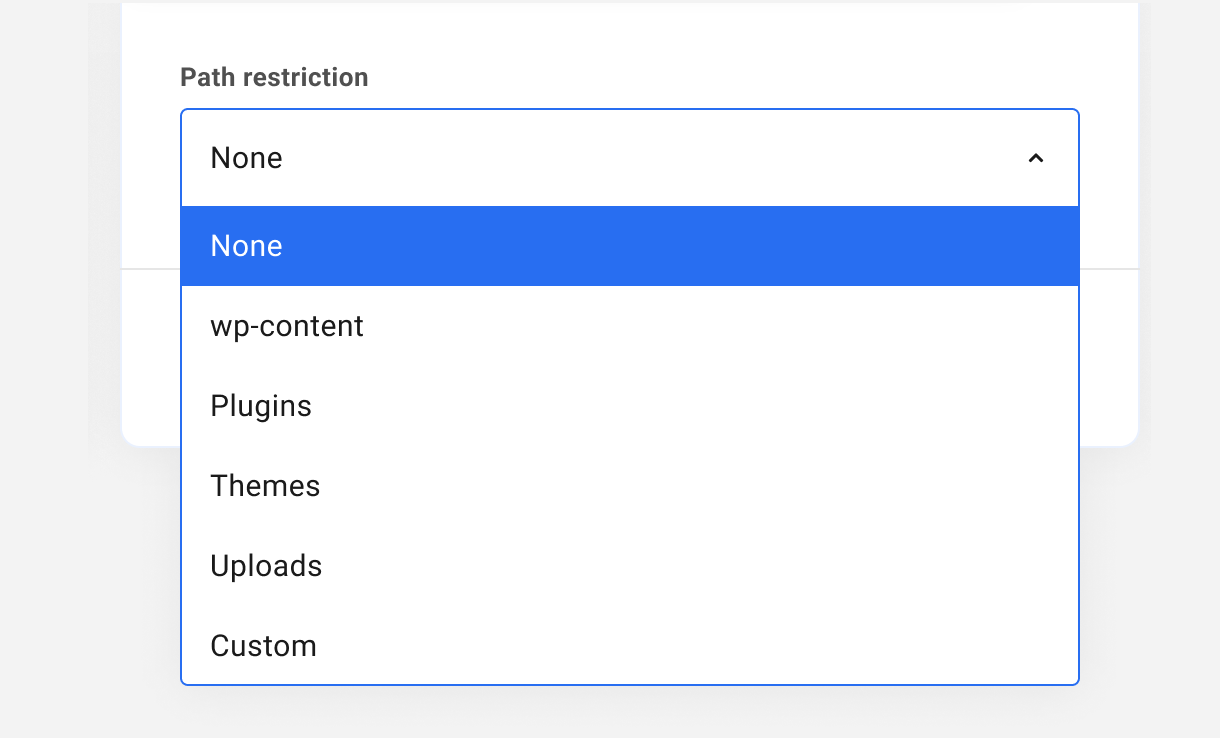
Use the Path Restrictions drop-down menu to determine the scope of a new user’s access as follows:
- None – No restrictions. User can access all site files
- wp-content – Grants access to the wp-content folder, which contains all uploaded files, plugin files, theme files, the site index, and language files
- Plugins – Grants access to the Plugins folder only
- Themes – Grants access to the Themes folder only
- Uploads – Grants access to the Uploads folder only
- Custom – Grants access only to a custom directory inside the public_html directory that you specify in an additional field that appears when you select this option. See details below.
When you’re ready, click Add User and the new SFTP/SSH user will be created.
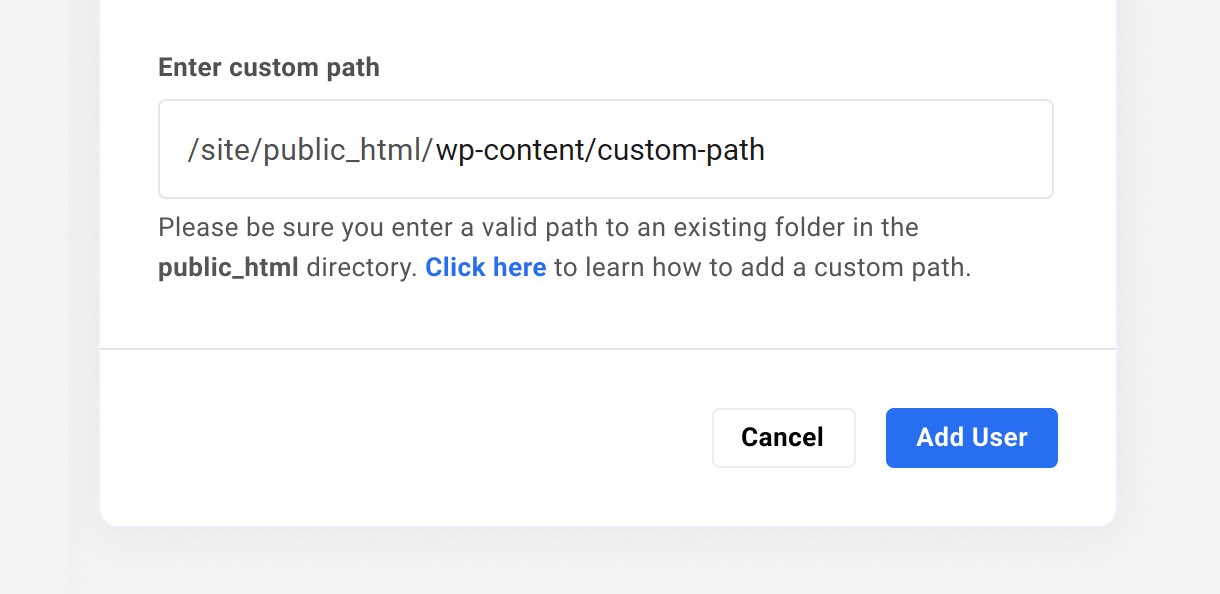
Custom Path
When you select to restrict user access to only a specific directory, you must ensure that:
- The directory already exists inside the public_html directory; this tool cannot create a directory for you.
- You enter only the path to that directory after public_html, without a trailing slash.
- You use only allowed characters in the path/directory name: (A-Z, a-z), digits (0-9), spaces, underscores (_), hyphens (-), or slashes (/).
- The entire custom path is no more than 120 characters long.
For example, let’s say the directory you wish to specify exists at this location: ~~~/public_html/wp-content/custom_path
You would enter only wp-content/custom_path in the field that appears when you select this option.
Note that if a user is created with a custom path and later that custom directory is deleted, the user account will remain active, but they will not see any files and won’t be able to upload files since the path/directory no longer exists. However, if the directory specified in the custom path is recreated later, the user will be able access and upload files again to that directory.
4.3 Connection Info
Copy chapter anchor to clipboardThe following information, located near the top of the SFTP/SSH Accounts page, is required to connect SFTP/SSH users to a site:
- Connection Address (Host) – This is the URL used by WPMU DEV internally to identify the current site, and is frequently referred to as the Host or the Host Address. Regardless of how many domains may be associated with a given site, the Connection Address/Host displayed on the SFTP/SSH Accounts page is the only URL that can be used to connect to that site via SFTP/SSH.
- Port number – The port associated with the current site.
- Username – The username for the SFTP/SSH user being connected.
- Password – Click the pencil icon next to any SFTP/SSH user to view that user’s password.
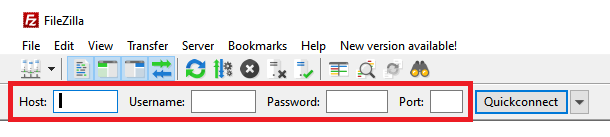
These credentials must be entered into the relevant fields in an FTP client to connect to the site, as shown in this Filezilla example.
The OpenSSH version number mentioned in the banner when a connection is made doesn’t represent the actual OpenSSH version running on our hosts. It specifies how the SSH identifies itself when someone makes a connection.
Quick Connect Link
Click the View Connection Info button next to any SFTP/SSH user to reveal a quick link created for that user.
The quick link, when copied into an FTP client or terminal application, identifies the site and the user to be connected.
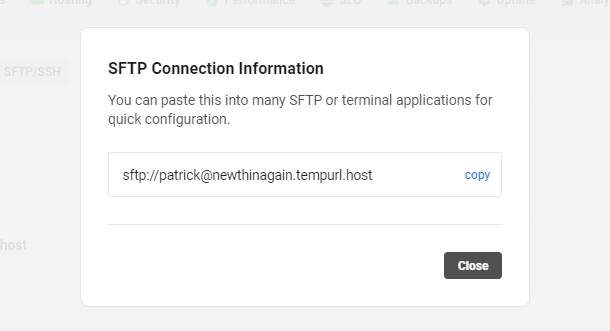
The site’s port and SFTP/SSH user password are still required when using the quick link.
4.4 SFTP Sync
Copy chapter anchor to clipboardYou can access and manage the files on your server using the File Manager. But as an advanced user, you might want to perform advanced tasks such as debugging, editing, or adding new files on your server using a code editor via SFTP.
4.4.1 SFTP Sync Using Visual Studio Code
Link to chapter 4In this example, we’ll cover the SFTP configuration process for Visual Studio Code (VS Code). We’ll assume you already have VS Code installed on your computer. You will also need to install the SFTP extension or any other Visual Studio code SFTP extension.
First, you need to create a local working directory and create a folder for your workspace. To do that go to File > Open Folder.
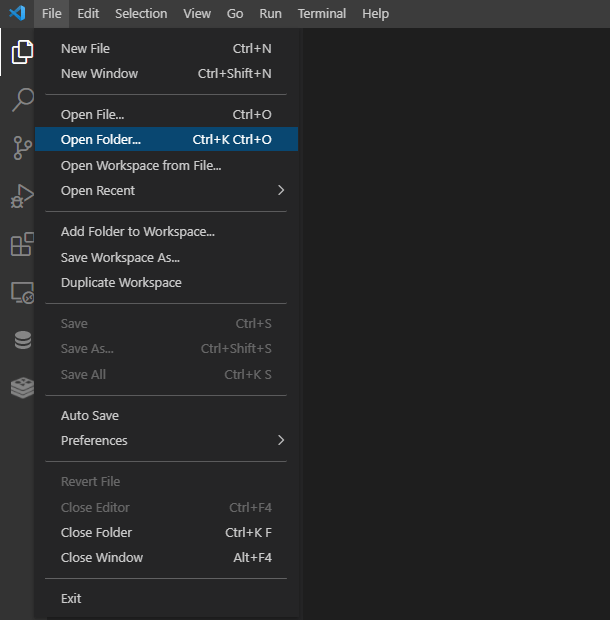
Choose your workspace folder or create a new one then, click the Select Folder button.

Go to View > Command Palette and type SFTP: Config and hit enter. This will open the sftp.json configuration file that enables you to add the SFTP details.
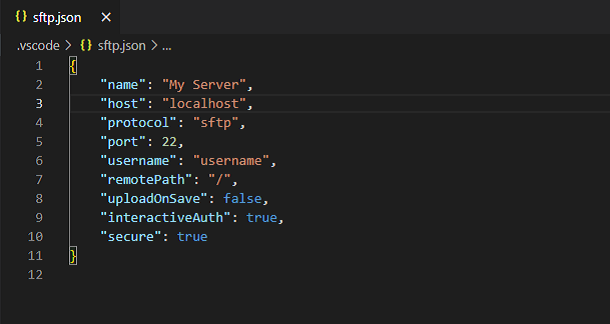
Use the configuration below and replace the host and username with your own SFTP host and username then save the file:
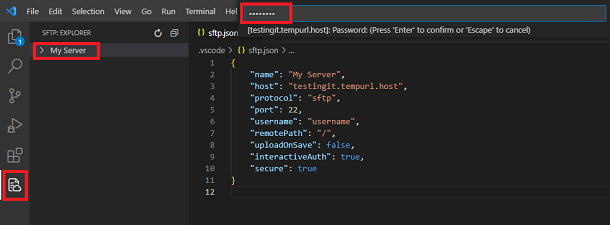
Click the SFTP menu icon in the sidebar and click the server name. In our example, it is “My Server”. Add your SFTP password and hit enter to connect to your server.
Now, you should see all the files on your server. Right-click the file you want to edit and choose the Edit in Local option. This copies the file on your server to your local workspace folder.
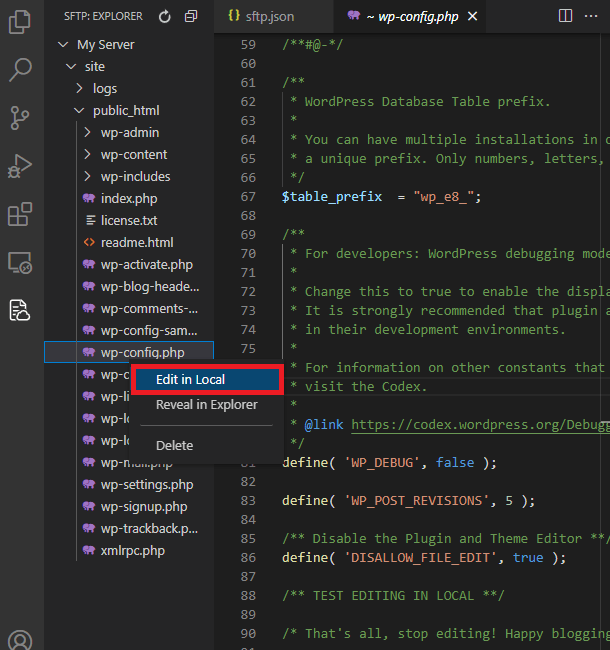
Now, edit the file then save the changes to sync them with your server.
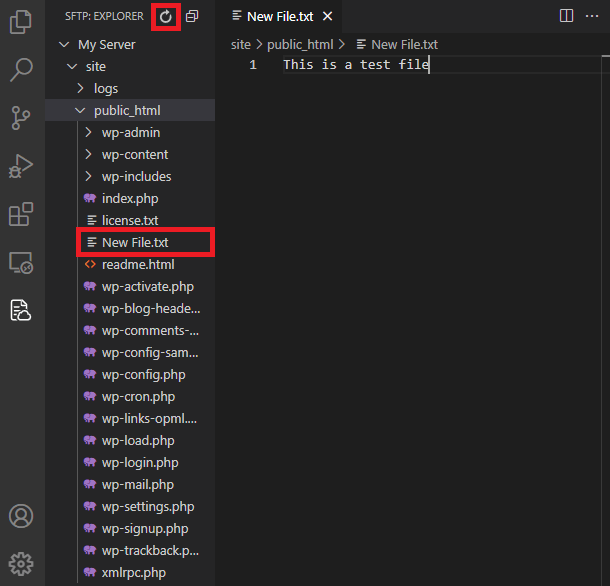
If you wish to create a new file on your server, add it to your local workspace folder to the directory where you want the file to be created on your server. After saving the file, click the Refresh icon to see it in the navigation menu.
4.5 SSH Tunneling
Copy chapter anchor to clipboardIn our managed hosting for WordPress, it is not possible to directly access the database except by using the Manage Database options in your Hub.
However, advanced users may have the need to access their database from some other client application. This is where SSH tunneling comes in handy.
SSH tunneling enables you to remotely connect to your site’s database and securely perform any needed tasks from within your preferred application.
Regardless of the application you use for an SSH tunnel, all you need is an SSH account and the access credentials to your database.
Step 1
Create an SSH user for the environment you need – production or staging – as detailed in Creating SFTP/SSH Users above. Then copy the following credentials as seen in Connection Info above:
- Connection Address (used for the hostname in most applications)
- Port (should always be 22)
- Username
- Password
Step 2
Access the wp-config.php file for the corresponding environment, and copy the following credentials (depending on the application you’re using, you may or may not need all of these; see the examples below):
- DB_HOST
- DB_USER
- DB_PASSWORD
Note that the DB_HOST includes both the localhost IP address (127.0.0.1) and the port needed to connect to your database. You’ll want to be sure to use the correct port for either your production or staging site’s database.
- Production port: 3306
- Staging port: 3307
You can access the wp-config.php file for your production environment using the Manage Files option found under the Tools tab in your Hub.
Access the wp-config.php file for your staging environment using the Manage Files option under the Staging tab in your Hub.
Note that if you need credentials for both environments, you can switch between production and staging directly in the File Manager once you’ve accessed it.
Step 3
Open your preferred desktop application and enter your SSH & database credentials. Of course, the interface will vary according to the application used, so we’ve provided a few setup examples below.
4.5.1 SSH Tunneling Setup Examples
Link to chapter 5Configuration examples are provided here for the following applications:
- PuTTY – Command line interface – Windows & Linux only
- HeidiSQL – Pretty GUI – Windows only
- MySQL Workbench – Pretty GUI – Windows, Linux & MacOS
- Visual Studio Code – Pretty GUI – Windows, Linux & MacOS
PuTTY
We’ll assume you already have PuTTY installed on your computer.
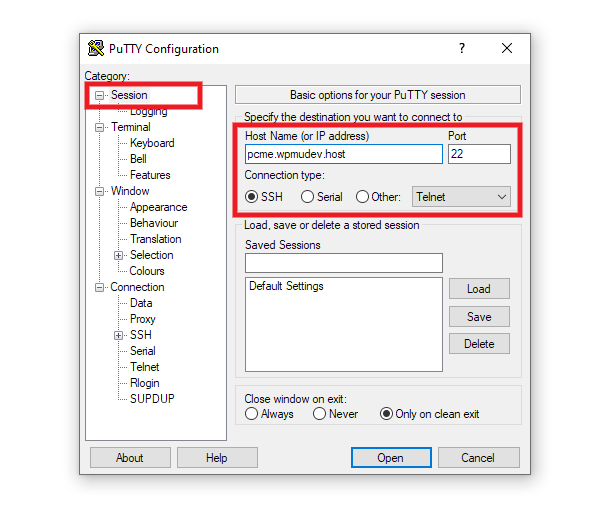
Launch PuTTY and be sure you’re viewing the main Session window.
Enter your SSH Connection Address in the Host Name field. Leave the Port there as 22, and the Connection Type should be SSH.
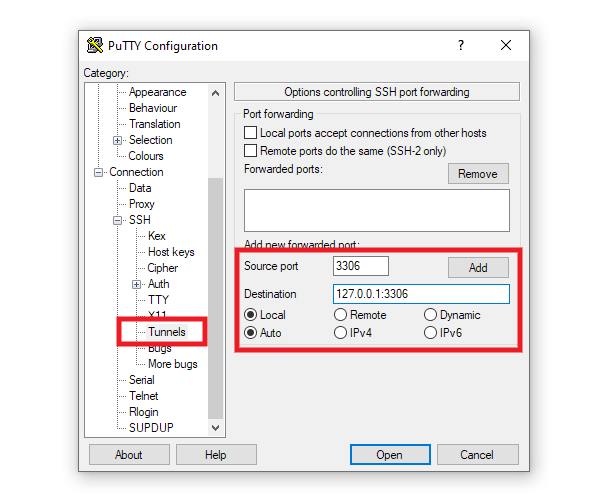
Next, expand the SSH menu in the left-hand sidebar and click on Tunnels.
In the Source Port field, enter the database port that corresponds to the environment for which you created your SSH user, as seen in Step 2 above: 3306 for production, or 3307 for staging.
Then, in the Destination field, enter the DB_HOST info you copied in Step 2, including that same port again. So, for a production environment, you’d enter 127.0.0.1:3306, or for a staging environment, you’d enter 127.0.0.1:3307
Leave the Local and Auto options checked.
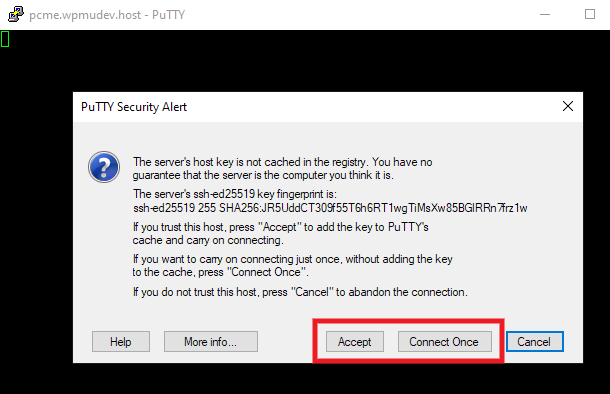
Click the Open button, and your command line interface will pop open. A security alert will appear if this is the first time you have connected with these credentials. Click either Accept or Connect Once to proceed.
You’ll then be prompted to enter the username for the SSH user you created in Step 1 above. Click Enter once you’ve typed that in.

Then type in the password for your SSH user, and click Enter again. You should now be securely connected to the database of your chosen environment, and can proceed with whichever management tasks you need to perform.
HeidiSQL
We’ll assume you already have HeidiSQL installed on your computer.
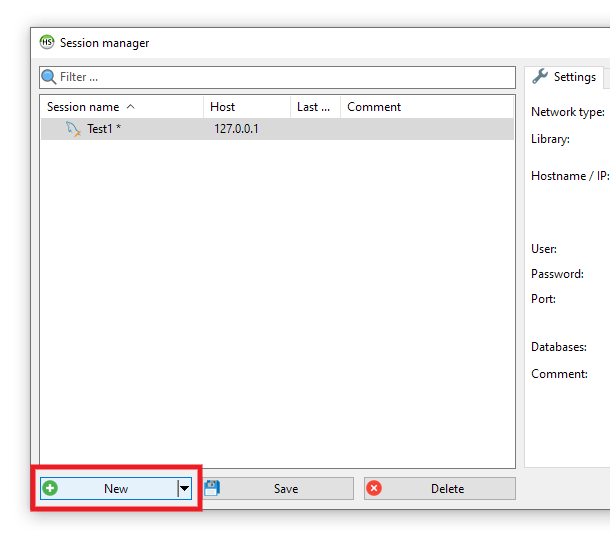
Launch HeidiSQL and click the New button at the bottom-left to create a new session for your connection if you wish to.
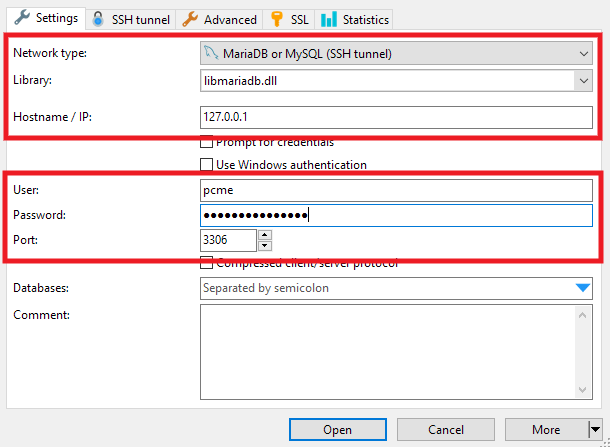
Then in the right-hand pane, under the Settings tab, select MariaDB or MySQL (SSH tunnel) for the Network type, and libmariadb.dll for the Library.
The Hostname/IP should be the localhost IP address from the DB_HOST info you copied in Step 2 above: 127.0.0.1
Enter the DB_USER and DB_PASSWORD that you copied in Step 2 above in the User and Password fields.
The Port should correspond to the environment for which you created the SSH user in Step 2 above: 3306 for production, or 3307 for staging.
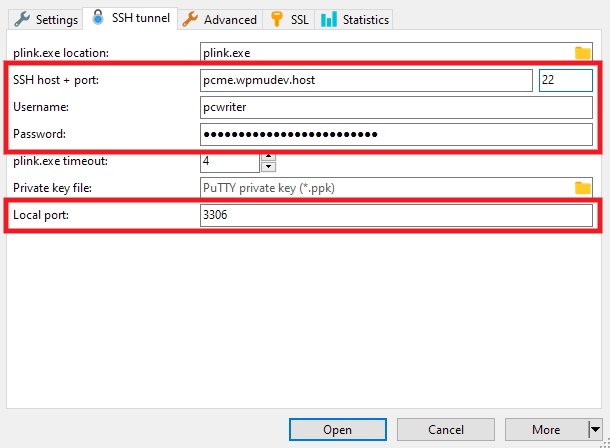
Next, switch to the SSH tunnel tab and, using the SSH credentials you copied in Step 1 above, enter the Connection Address and Port in the SSH host + port fields.
Enter your SSH Username and Password in the corresponding fields.
Set the Local port to the port corresponding to the environment for which you created your SSH user in Step 2 above: 3306 for production, or 3307 for staging.
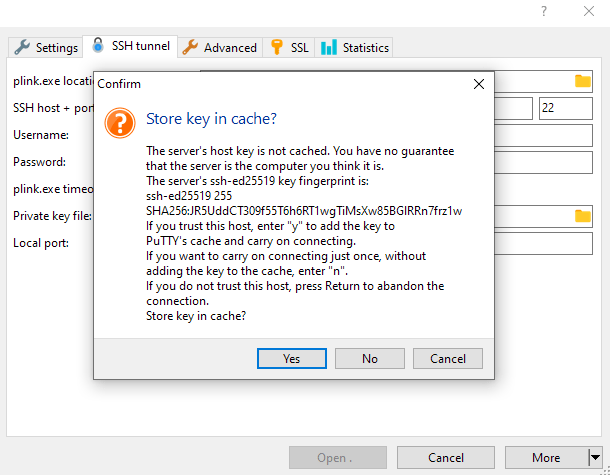
Click the Open button to proceed. A security alert will appear if this is the first time you have connected with these credentials. Click the Yes button to proceed.
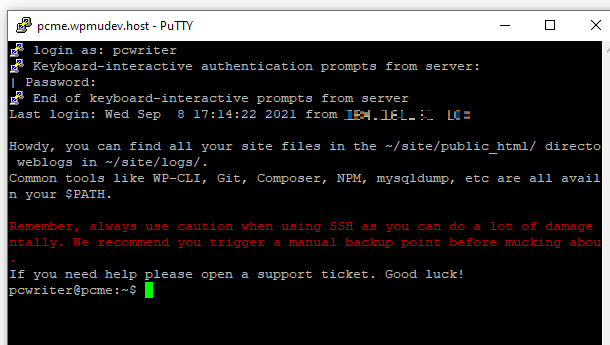
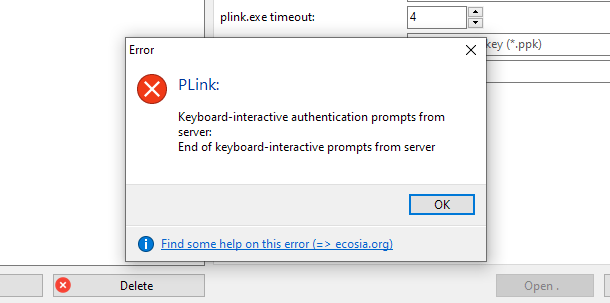
If you get an alert saying something like “End of keyboard interactive prompts from server”, just click the OK button there.
The interface will then update and you should now be securely connected to the database of your chosen environment, and can proceed with whichever management tasks you need to perform.

MySQL Workbench
We’ll assume you already have MySQL Workbench installed on your computer.
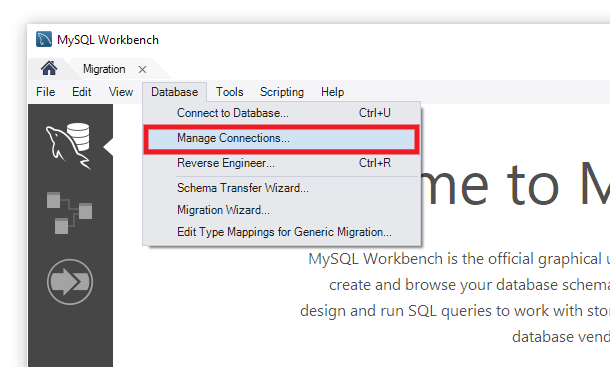
Launch MySQL Workbench and select Manage Connections from the Database menu to set up a new connection for your SSH tunnel.
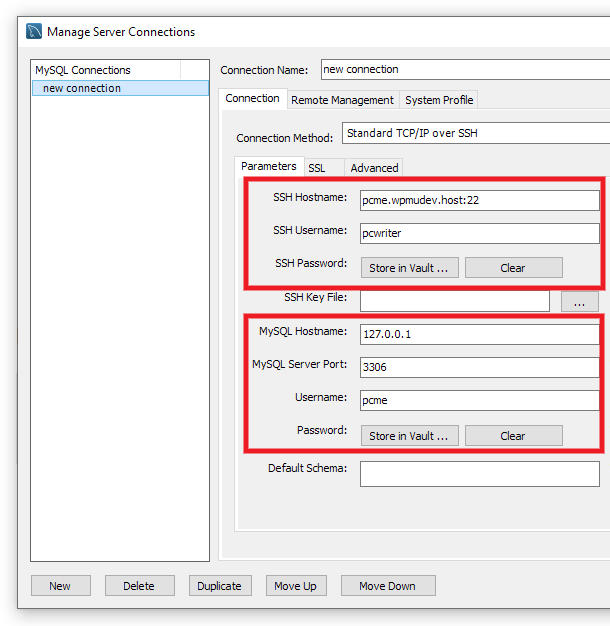
Click the New button at the bottom-left. Then enter a Connection Name and, under the Connection tab, select Standard TCP/IP over SSH as the Connection Method.
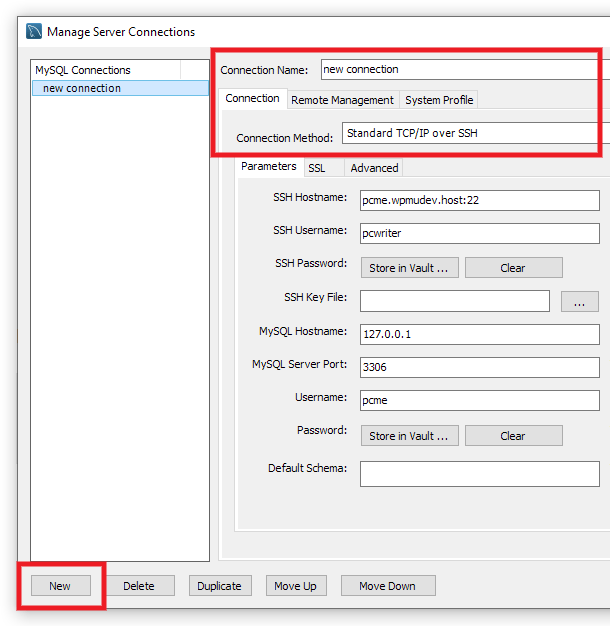
Next, under the Parameters subtab, using the SSH credentials you copied in Step 1 above, enter your Connection Address in the SSH Hostname field (you do not need to include the port 22 as that will be added by default when you save this connection).
Enter your SSH Username in the corresponding field. Then click the Store in Vault button next to SSH Password and enter your SSH password there.
Enter the localhost IP address of your database in the MySQL Hostname field: 127.0.0.1
Enter the port corresponding to the environment for which you created your SSH user, as seen in Step 2 above, in the MySQL Server Port field: 3306 for production, or 3307 for staging.
Enter the DB_USER and DB_PASSWORD that you copied in Step 2 above in the Username and Password fields. Here again, click the Store in Vault button to save the password.
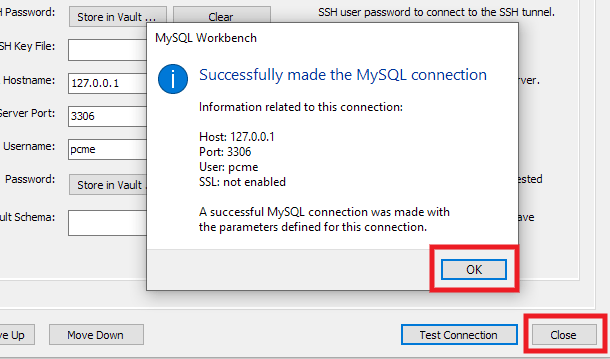
Once all the info has been entered, click the Test Connection button at the bottom-right.

You may be prompted to enter either your SSH user or DB_PASS password, and should then see a message confirming that the connection has been successfully made.
Click the OK button to close that message, and click the Close button at the bottom-right of the new connection window.
You should now see your new connection appear on the Home screen of the Workbench.
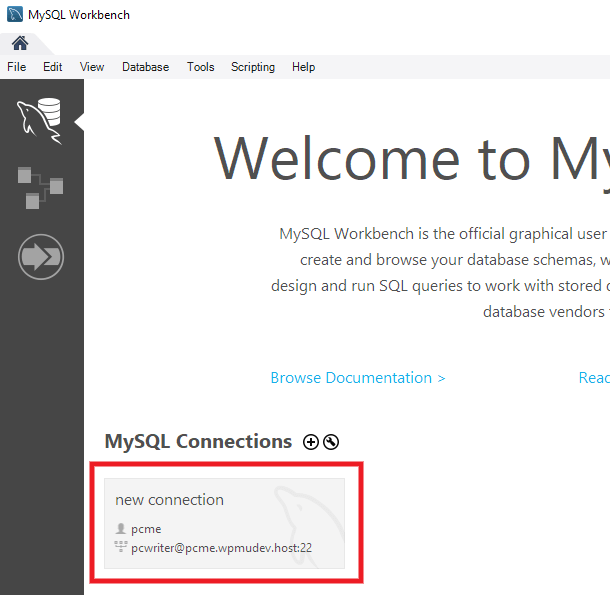
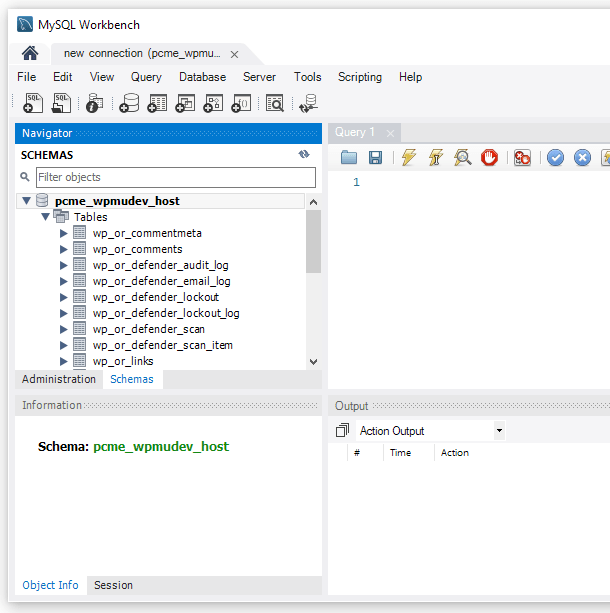
Click on your new connection to open the Workbench SQL Editor where you will be securely connected to the database of your chosen environment, and can proceed with whichever management tasks you need to perform.
Visual Studio Code
We’ll assume you already have Visual Studio Code (VS Code) installed on your computer. You will also need to install MySQL extension or any other Visual Studio code database management extension that allows you to connect via SSH.
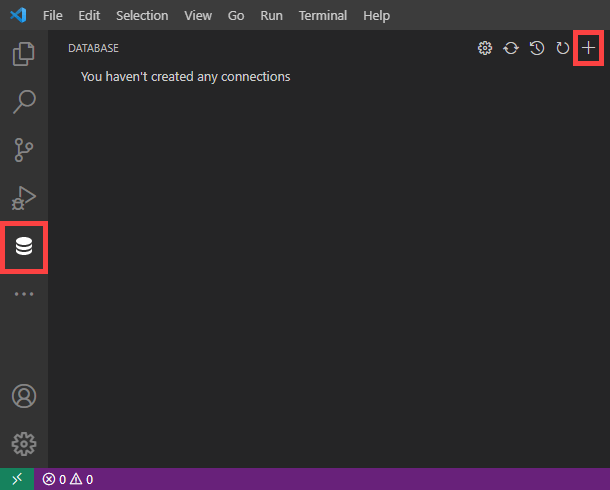
Launch Visual Studio Code and open the Database Explorer panel. Click the plus icon to add a new connection.
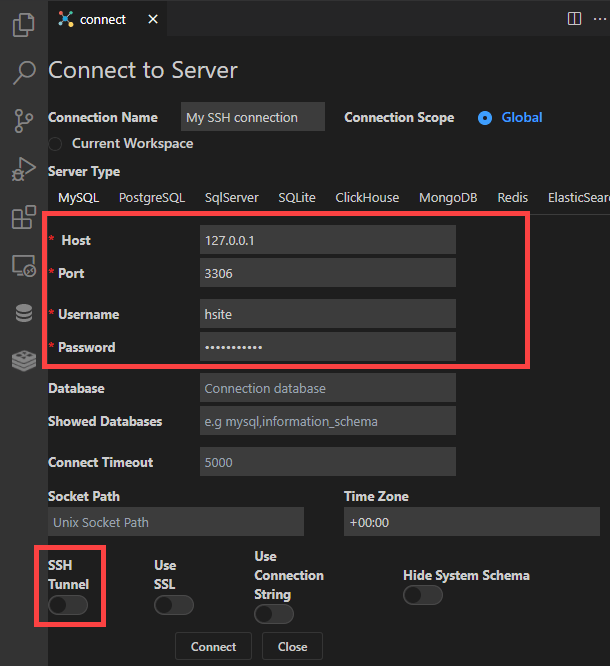
In the connect editor, be sure you are under the MySQL tab. Then, enter the localhost IP address of your database in the Host field: 127.0.0.1
Set the Port field to the port corresponding to the environment for which you created your SSH user in Step 2 above: 3306 for production, or 3307 for staging.
Enter the DB_USER and DB_PASSWORD that you copied in Step 2 above in the Username and Password fields.
To add the SSH details, click the SSH Tunnel toggle.
Enter your SSH Host, SSH Port, SSH Username and, Password you copied in Step 1 above, in the corresponding fields. Then, Click the Connect button.
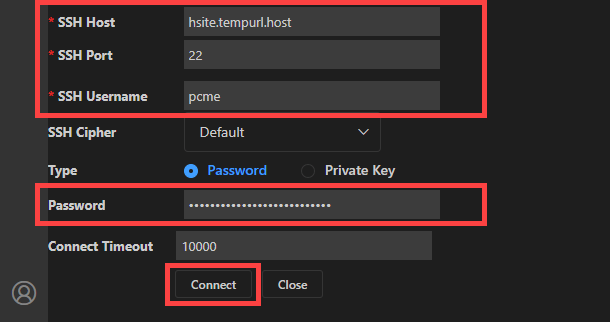
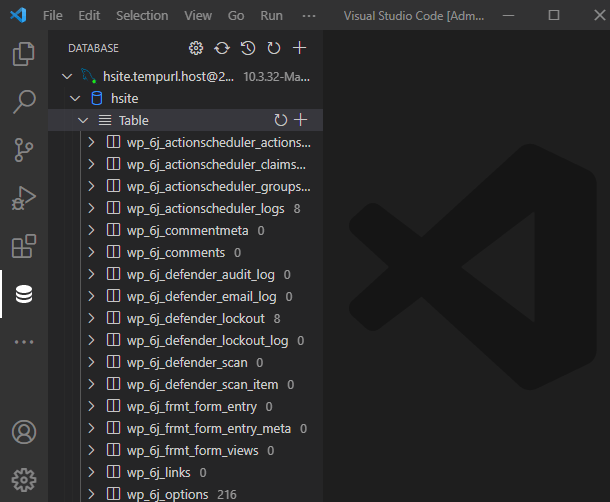
You should see a message on the top confirming that you are connected successfully.

You should now be securely connected to the database of your chosen environment, and can proceed with whichever management tasks you need to perform.
4.6 Creating SSH Keys
Copy chapter anchor to clipboardThis chapter provides examples for creating a public SSH key using either of 2 methods:
Regardless of the method you use to generate an SSH key, including a passphrase is optional. It is of course highly recommended to include one to prevent unauthorized use of your Public Key.
You’ll want to remember your chosen passphrase as you’ll need it when connecting using the public key you create. We recommend using a password manager like LastPass or similar.
Note that in some instances, you may want to create a key without a passphrase; for example, if you are creating one for CI/CD use.
PuTTY for Windows
We’ll assume you already have PuTTY installed on your computer.
- Open the PuTTYgen Key Generator program.
- Select RSA as the Type of key to generate at the bottom of the window.
- Click the Generate button.

You’ll be prompted to move your mouse around the blank space to get some randomness, and will then see your new key displayed.

Enter and confirm the optional Key passphrase (or password) that you would like to use with your key in the fields provided.
Then click the Save public key and Save private key buttons, and save the files in a location of your choice on your computer.
Finally, copy the entire contents of the box under Public key for pasting into OpenSSH authorized_keys file, and paste that into the Public Key box in your Hub when adding or editing your SSH user. Then click Save or Update.
Now when you enter the quick connect link in your terminal or SSH app, your public key will be used for authentication.
Command LIne for Windows, Mac or Linux
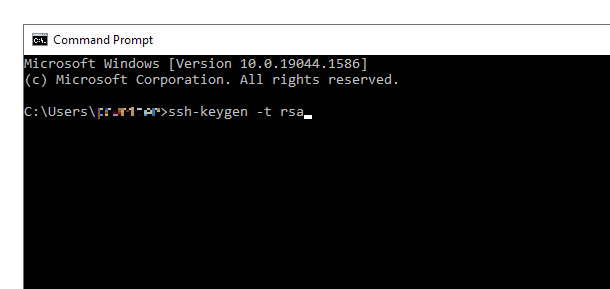
In your terminal, shell or command prompt utility, Enter the following command.
ssh-keygen -t rsa
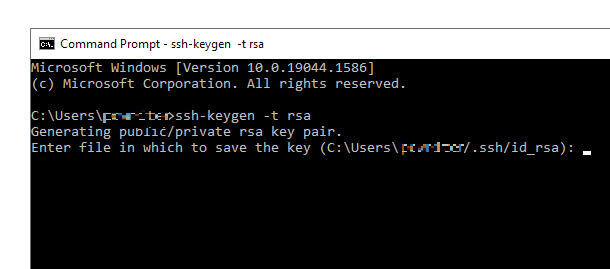
The tool will generate a public/private key pair and you’ll be prompted to accept the file location suggested, or enter a new location of your choice. Then click Enter.
You’ll then be prompted to enter & confirm the passphrase to use for your SSH key. Note that what you enter at this step will not be visible on-screen, so be sure to type accurately.
If no passphrase is needed, simply click Enter at each prompt without typing anything in.
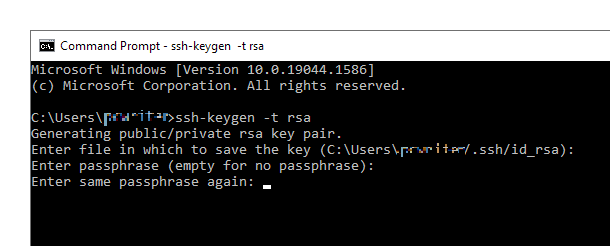
You should then see confirmation that the key has been saved in the specified location.

Navigate to that .pub file on your computer and open it in a text or code editor.
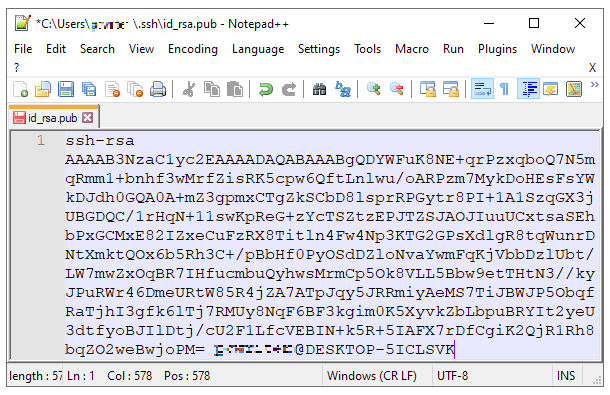
Copy the entire contents of that file and paste it into the Public Key box in your Hub when adding or editing your SSH user. Then click Save or Update.
Now when you enter the quick connect link in your terminal or SSH app, your public key will be used for authentication.
4.7 Get Support
Copy chapter anchor to clipboardIf you still have questions or need assistance after reading this document, please don’t hesitate to contact our support superheroes using the available options under the Support tab in your Hub or via the Support tab in your WPMU DEV Dashboard.
