Easily Configure Your WordPress SEO with SmartCrawl and The Hub
With SmartCrawl and The Hub, you can dominate your WordPress SEO optimization with features to drive traffic to your website or network. Adjustments can be all done right from The Hub’s dashboard for all of your sites, making keeping on top of your SEO more streamlined, accessible, and easy!

With SmartCrawl and The Hub, you can manage WordPress SEO with modules that will optimize your website or network for more traffic and better search engine results.
Access to SmartCrawl can be all done right from The Hub’s dashboard for all of your sites, making keeping on top of your SEO more streamlined, accessible, and easy!
You can quickly view and get into your site’s content analysis’, scans, reports, and more. Plus, most of the features can be enabled in one click.
All of this is done from The Hub’s SEO tab or the SEO section in The Hub overview.
In this article, we’ll be going over how to:
- Instantly Run and Set Up Automated SEO Checkups
- Access SEO Checkup and Site Crawler Reports with One-Click
- Automatically Generate Detailed Sitemaps
- Review and Fix SEO Checkup Issues
- Control Search Engine Display of Your Pages, Posts & Custom Posts
- Optimize Your WordPress Site’s Social Appearance
- Set Up Additional SEO Features
You’ll be creating clear, targeted content and rank higher in Google. Also, you’ll keep up with the SERPs by continuously being able to monitor tabs on improvements and optimization.
1. Instantly Run and Set Up Automated SEO Checkups
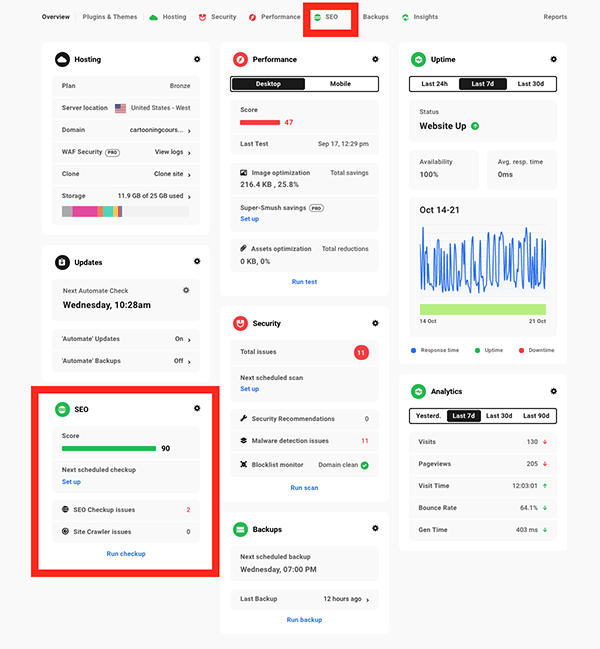
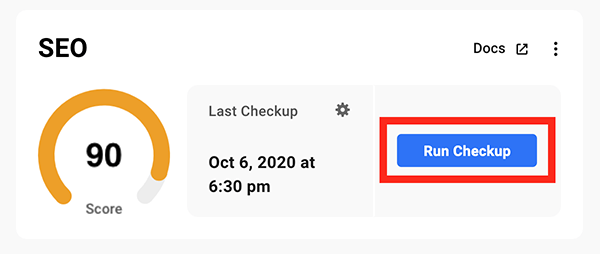
From the SEO section in The Hub, you can quickly view your SEO score and see when your last SEO checkup was.
The SEO Checkup will run a full SEO scan of your WordPress site and provide a comprehensive report of how good your site is optimized for search engine optimization and social media.
To instantly run a checkup and get a full report about what you need to fix or adjust on your site to make it more SEO friendly, click Run Checkup.
It will run a check-up and let you know if your score has changed at all. It’s as simple as that to get a glimpse of where you’re at with your SEO.
To get this set up automatically, click on the gear icon. The gear icon will open a new tab in SmartCrawl’s Reporting dashboard.
From here, you can enable scheduled checkups in one-click. Once enabled, you can add recipients and schedule daily, weekly, or monthly reports. Plus, you can choose the day of the week and time.
Pick whatever date and time are convenient for you.
See our SEO Score documentation for detailed information about using this section.
Now that we have our reports set up let’s…
2. Access SEO Checkup and Site Crawler Reports with One-Click
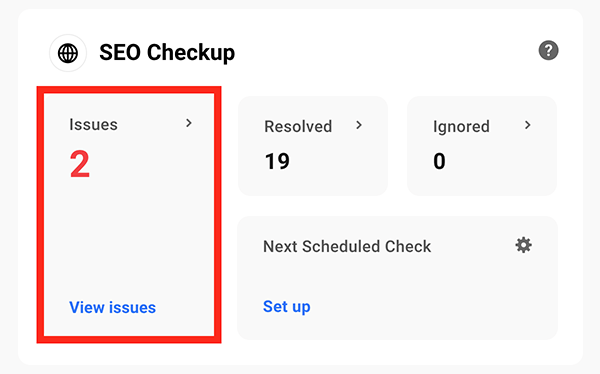
The SEO Checkup area in The Hub offers you a comprehensive report on how optimized your WordPress site is for search engines. It shows you the number of issues you have and how many of them have been resolved or ignored.
Plus, you can view your next scheduled check and edit accordingly.
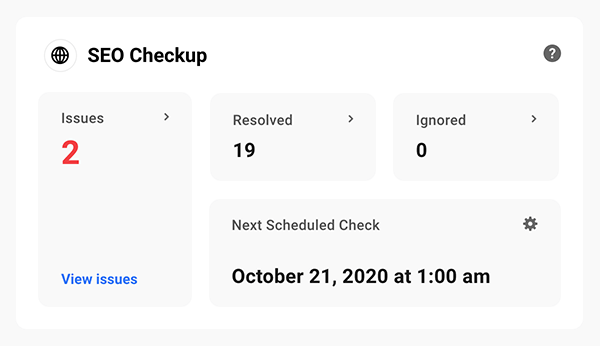
By clicking on Issues, you’ll have a new tab open up that will display your SEO score. You’ll also see your last checkup, the SEO issues, and your next scheduled report.
Also, you can run a checkup from here and view detailed documentation.

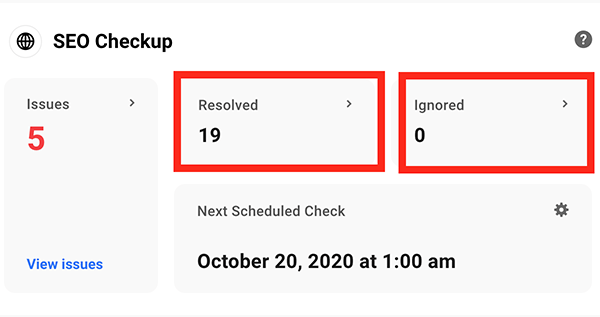
If you scroll down to the Checkup section below this area, you can review all of your SEO issues with a yellow exclamation point. You’ll also see all of the resolved issues, indicated by a green checkmark.
Scroll down to see all of the issues that need to be addressed and taken care of.
Furthermore, you’re able to view your issues that need taken care of or resolved by clicking on Resolved and Ignored from The Hub.
When it comes to site crawler reports, all of that is done in The Hub’s Site Crawler area.
From here, you can run Site Crawler to detect any URL issues (e.g. broken links, 404s, multiple redirections, etc.) that might interfere with rankings in search engines.
All the Issues, Missing URLs, and Total URLs are on display. You can also schedule your next scan, run a scan, and see when the last site crawl scan was completed.
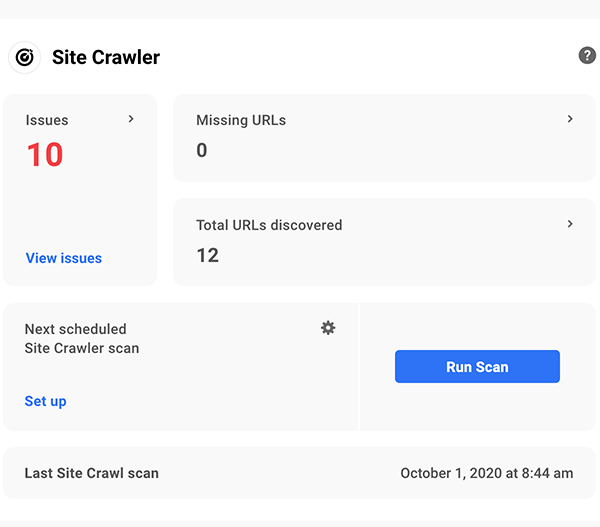
By clicking on View Issues, you can view all of the issues that the site crawler discovered. It will open up a new tab in SmartCrawl’s dashboard. The number of issues is then displayed.
Scrolling down, you can view each issue in detail, ignore them, list occurrences (to see where these links can be found), and redirect any broken URL to a new link.
By tapping on the gear icon, you can list occurrences, redirect, or ignore any issue.
You can quickly run a new scan by clicking New Scan or get one set up by clicking Set Up.
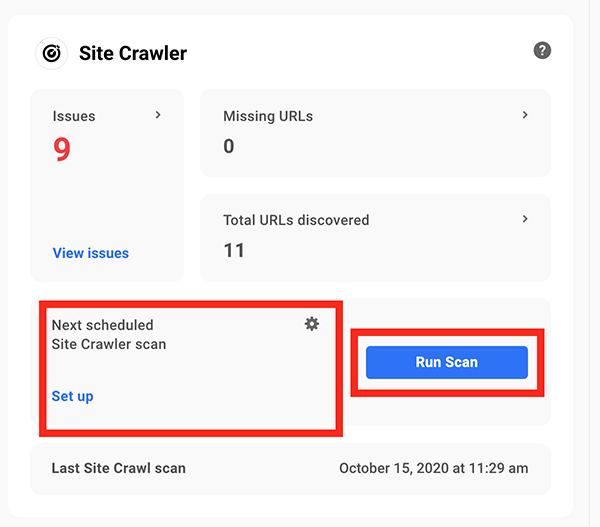
To run a regular URL crawl and have reports sent to your inbox, all it takes is a flip of a switch. Once you’ve done this, you can add recipients and set a daily, weekly, or monthly schedule. Also, you can set the day of the week and time to have reports sent out.
Run a report and add recipients.
You’re now all set up for automated reporting to keep track of your site’s SEO!
3. Automatically Generate Detailed Sitemaps
With The Hub and SmartCrawl, you can automatically generate a sitemap and regularly send updates to Google. A sitemap ensures that your site stays as SEO friendly as possible consistently.
Get started by clicking on Site Crawler in The Hub dashboard.
This will open up a new tab in SmartCrawl’s dashboard. Here, you can see that SmartCrawl’s sitemap is activated, and it provides the URL where the sitemap is available. You can also switch to the WordPress core sitemap if you’d prefer.
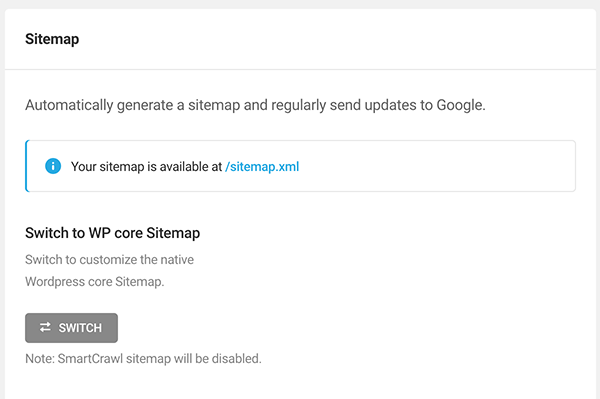
To see the difference between WordPress’ and SmartCrawl’s sitemap, you can find out more here.
From this point, you can choose which post types, archives, and taxonomies you’d like to add to your sitemap in one-click.
You can include Posts, Pages, Categories, and Tags.
Add any URLs you want to include in your sitemap that isn’t a part of your default pages, posts, or custom post types. Likewise, you can exclude any posts IDs as well.
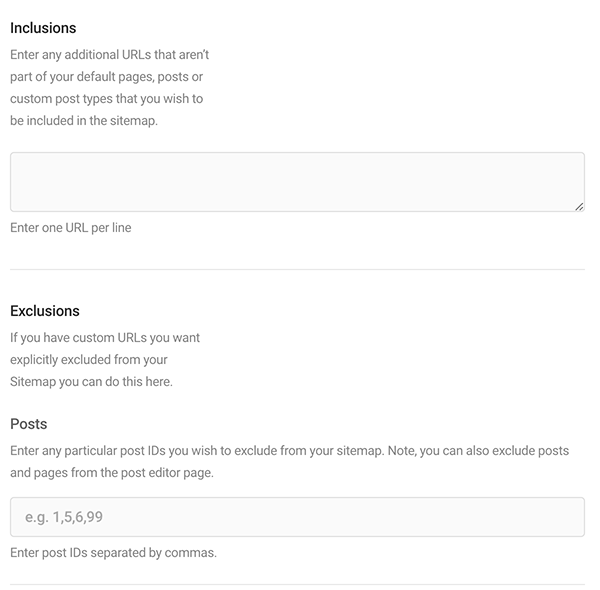
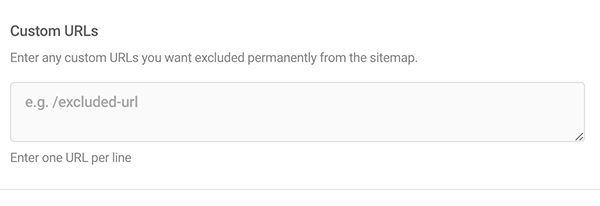
Also, include Custom URLs you’d like to exclude by entering them in.
And with that, your sitemap is up and running. Read more detailed information about Site Crawler and The Hub here.
4. Review and Fix SEO Checkup Issues
If you have any issues with SEO, it’s important to review them and clean them up. With The Hub, checking and fixing any SEO issue can be done quickly and easily.
In the SEO Checkup area, you can access problems and get them fixed by clicking Issues.
This will open up a new tab in SmartCrawl’s dashboard, where you can review your SEO recommendations highlighted in yellow.
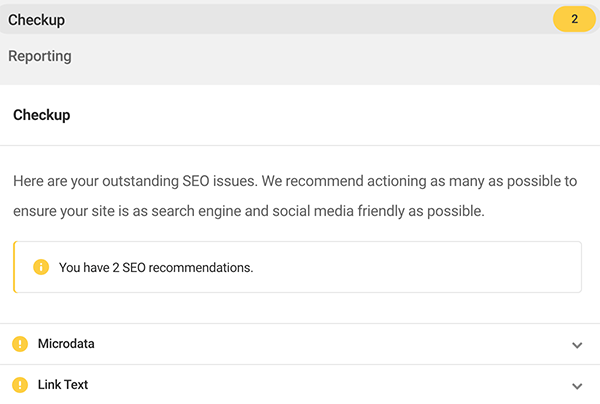
Now you can get a detailed look at each issue by clicking on the dropdown by each one. When doing so, you’ll get an Overview, Status, and a look at How to Fix.
From here, you can Ignore the issue or fix it with SmartCrawl’s recommendations.
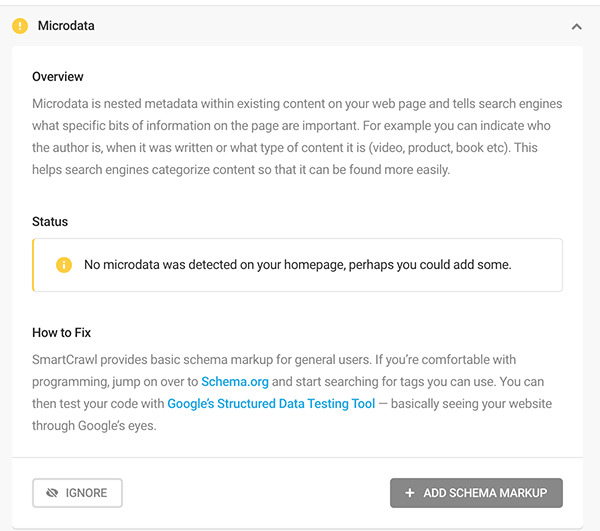
Once all of the issues are resolved, they’ll be highlighted green, and you’ll be all set.
To learn more about SEO Checkups, read our documentation.
5. Control How Pages, Posts, and Custom Posts Display in Search Engines
Appearances are important — especially when it comes to SEO. You can customize your titles and meta to be more Google-friendly and easily searchable right from The Hub’s Titles & Meta section.
This section shows you the Homepage and the number of Public Post Types.
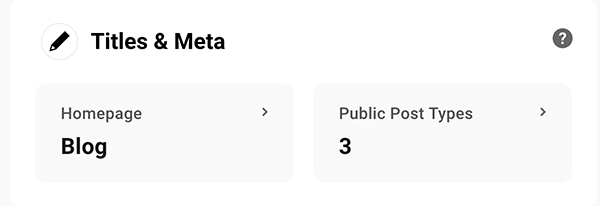
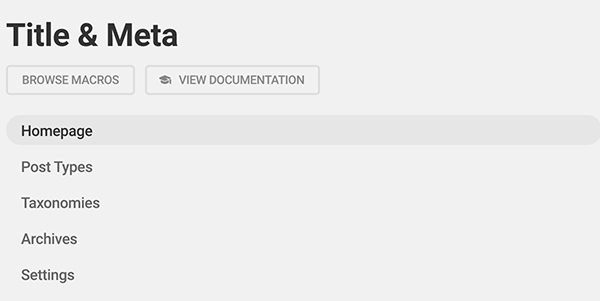
To start setting up how your pages, posts, and custom posts appear in search engines, click on either Titles & Meta, Homepage, or Public Post Types. All three options will open up a new tab in SmartCrawl where you can start editing.
This is all done from the Homepage section. From here, you can customize your homepage title and description.
It shows you recommendations of the number of characters to use (which will highlight in green when good), a live Google preview, and also offers other pointers (e.g. keep things simple).
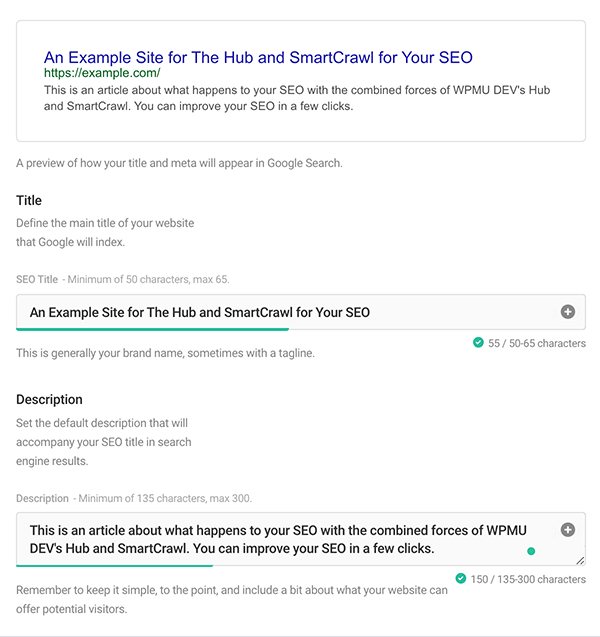
In this area, you can also enable OpenGraph, enhancing how your content appears when it’s shared on social media. You’re also able to enable Twitter cards and enable Indexing in one-click, which is for adjusting whether you want your site to appear in search results.
Tweak and adjust accordingly.
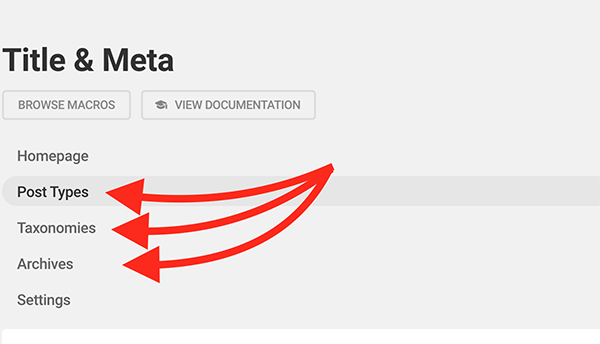
The set up is the same as the Homepage for editing the titles & meta for Post Types, Taxonomies, and Archives. You can get to any of these areas from the top of the page.
You can also adjust additional settings in the Settings area, including separators (page break between variables) and character length.
Check out SmartCrawl’s documentation for more information.
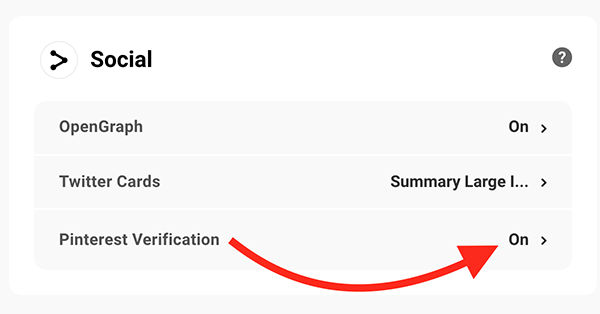
6. Optimize Your WordPress Site’s Social Appearance
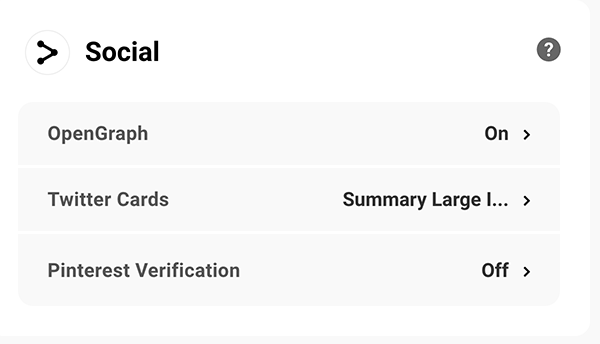
Control how your pages and posts appear on social media with a few clicks, leading to better engagement and traffic, from the Social tab in The Hub.
You can enable OpenGraph, Twitter Cards, and also turn on Pinterest Verification.
OpenGraph adds metadata to your pages to make them appear amazing when shared on popular social networks.
It will use your default titles, descriptions, and feature images.
To enable it, click on OpenGraph. It will open up a new tab in SmartCrawl, and you can have it functioning instantly.
OpenGraph is one-click away!
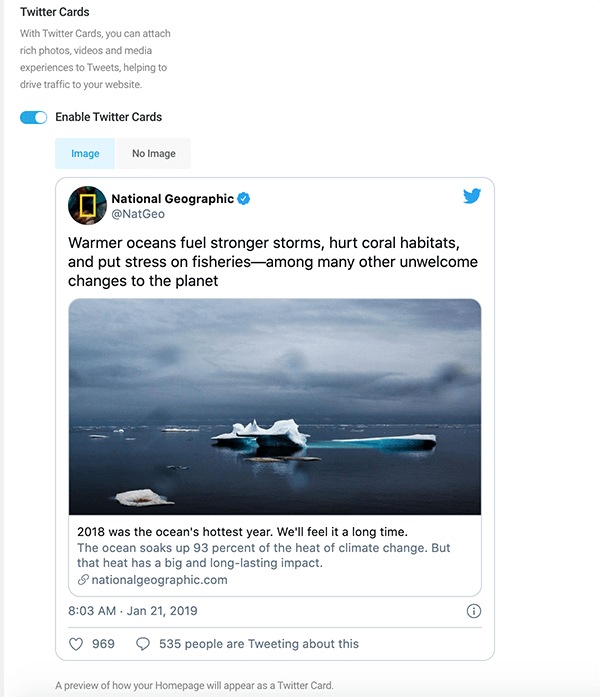
With Twitter Cards, you can add metadata to your pages to make the appearance of your posts better with rich photos, videos, and media experiences. In return, this helps drive traffic to your site.
Like OpenGraph, you can enable it in one-click. You also have the choice of including an image or not. Plus, there’s a preview of what a post will look like.
Turning on Pinterest Verification will verify your website with Pinterest. This will attribute your website when your site’s content is pinned to the social platform.
It’s done by adding your website to Pinterest and copying the meta tag to SmartCrawl. Once confirmed, you’ll get a notification.
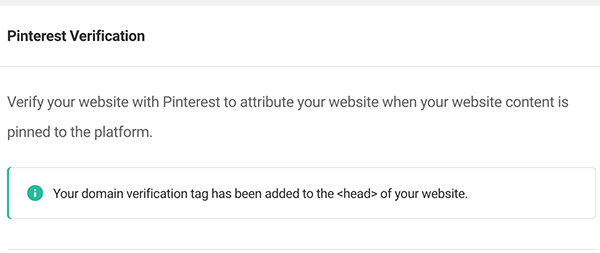
And it will reflect that you’re connected in The Hub.
From The Hub, keeping your social media accounts optimized for SEO is easier than ever! You’ll be on the way to more likes, shares, and traffic in no time.
7. Set Up Additional SEO Features
There are other ways to optimize your SEO in The Hub that you can set up quickly and easily. Here’s a rundown of what else you can do.
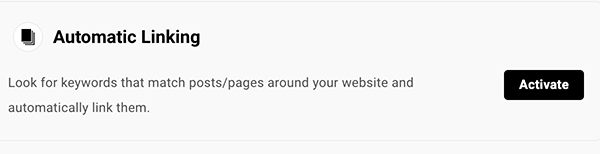
Automatic Linking
Set up Automatic Linking in just a couple of clicks so that it will look for keywords that match pages & posts around your WordPress site and automatically link them.
Just hit Activate to set it up.
From here, SmartCrawl will confirm with you that you want to get started. And then, you set up what post types to allow to link to and where to insert links.
Click to link on posts, pages, comments, and also insert links, too.
You can also add Custom Links, Excluded Keywords, and Minimum & Maximum lengths, which limits the number of characters and link amounts.
Along with that, include Optional Settings like:
- Allow autolinks to empty taxonomies
- Prevent linking in heading tags
- Process only single posts and pages
- Process RSS feeds
- Case sensitive matching
- Prevent duplicate links
- Open links in a new tab
- Nofollow autolinks
A lot can be done to fine-tune your automatic linking and improve your SEO.
Learn more about this feature here: Instantly Turn Keywords Into SEO Links: This SmartCrawl Tool Automates It For You
Schema
Schema is set up to let search engines know whether you’re an organization or a person, and then from there add all of your social profiles. This is so search engines know what social profiles to attribute your web content to.

There is a ton you can do with Schema. You can add your website details, logo, descriptions, corporate contacts, set up a contact page, and social media accounts.
As you can see, there’s a lot you can add to Schema.
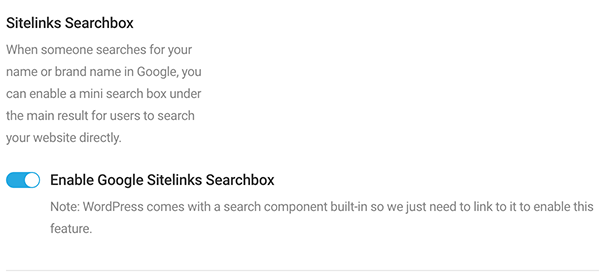
There’s also an option to enable Google Sitelinks Search, which adds a mini search box under the main result for users to search your website directly when searching on Google.
Beyond this, there are advanced settings and plenty more you can add, such as special pages, structured data, and author options. For more detailed information on Schema, be sure to read our documentation.
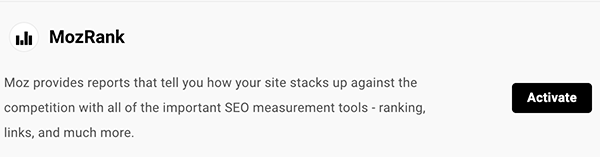
MozRank
Moz is the industry leader in SEO reports and this feature allows you to integrate with their API.
With MozRank activated, it will provide reports that tell you how your site is performing against the competition with all of the crucial SEO measurement tools, like ranking, links, and more.
From The Hub, you can click Activate to get started.
You’ll have to set up an account with MozRank to get it to function. Once you have an account and enter your credentials into SmartCrawl, you’ll begin to see metrics specific to your site. Also, you’ll be able to see individual stats per post in the post editor.
Be sure to check out our documentation on MozRank and also view their website for more SEO information and to get an account started.
Reports
The Hub has a Your Reports area, where you can automatically run SEO checkups and site crawler, followed by an email report.
It will display what reports you have activated and you can get access to them in one-click.
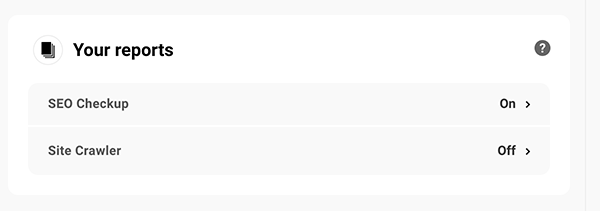
Once accessed, you can modify recipients of the reports, schedule, view SEO issues, and more.
Content Analysis
The Content Analysis area will recommend improvements to your content to give it the best ranking possible. You can see your Overall SEO Analysis and Overall Readability Analysis.
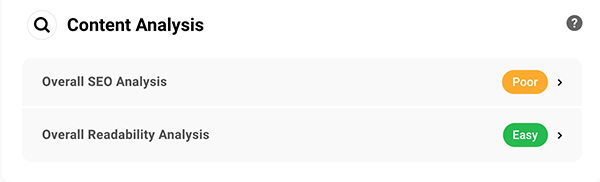
Once clicking on an analysis, SmartCrawl offers some detailed information, and you can make the recommended improvements.
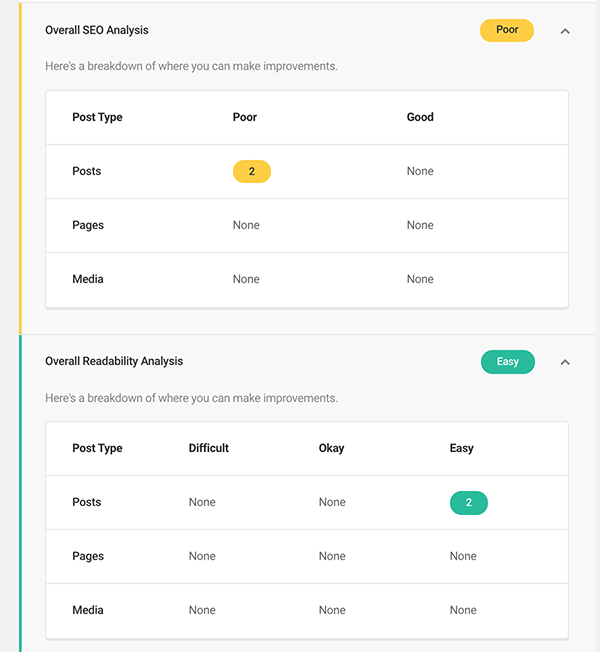
Content Analysis is a sure way to keep your SEO in good shape and improve as necessary.
Your SEO Has it All with The Hub and SmartCrawl
With The Hub and SmartCrawl, your SEO is always in check, and assessing how well it’s optimized is always just a few clicks away. Your site’s ranking will always be up to par with detailed reports, internal linking, social enhancements, and more!
And that’s not all. We’re constantly upping the SEO game and improving The Hub, so be sure to check out our Roadmap to see what’s next.
Plus, for more detailed information, you can always refer to our documentation on The Hub and SmartCrawl.
As you can see, with The Hub and SmartCrawl, your SEO has it all!
Share article
All the good WordPress stuff, once every two weeks
Subscribe
Create your free account to post your comment
Login to post your comment