How to Get the Most Out of Defender Security
Keeping your WordPress site safe often requires no more than the click of a button. This guide shows you how to get the most out of Defender, our 5-star WordPress security plugin.

Keeping your WordPress site safe often requires no more than the click of a button with Defender, our 5-star WordPress security plugin.
Defender protects your site 24/7 against hackers, malicious code, SQL injections, and much more. This guide shows you how to get the most out of using the plugin.
With Defender installed, your site’s security needs are automatically handled.
One of the great things about Defender is that he’ll automatically start suggesting ways to boost your site’s security as soon as he’s installed. He’ll then continue making regular suggestions while keeping your site safe, secure, and protected.
Despite all the built-in automation, when it comes to getting the most out of the plugin, Defender gives you plenty of room to tweak, finetune, and harden your site’s security settings.
This guide covers seven areas of WordPress security that you can count on Defender to monitor and address:
- Set Up Security Tweaks
- Activate One-Click Malware Scanning
- Track Changes with Audit Logging
- Ban Suspicious Behavior with Firewall
- Block Attacks with Web Application Firewall (WAF)
- Protect Your Logins with Two-factor Authentication
- Enhance Site Security with Advanced Tools
You will also find links to other great articles about Defender for more information on specific topics.
Let’s begin by showing you how to…
1. Set Up Security Tweaks
Once Defender is installed and activated, security issues are immediately brought to your attention.
This is where Security Tweaks can take care of most of them with one-click. Defender will show you how many issues you have, what they are, and how to fix them almost instantly.
Everything is displayed in an actionable list under Issues.
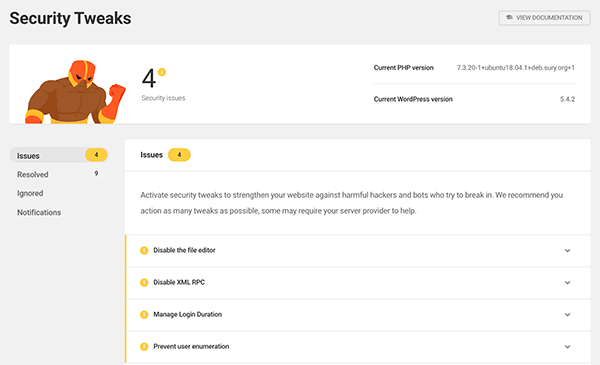
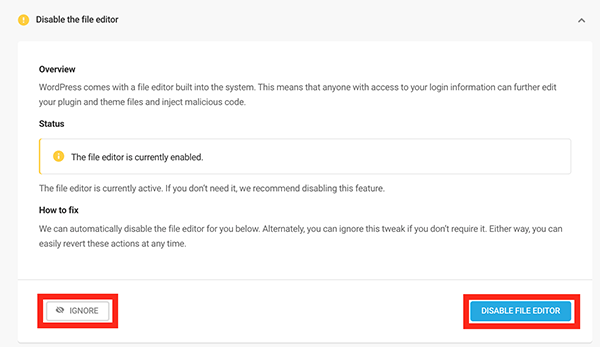
When you click on the dropdown for a specific issue, it gives you two options: Ignore or click the blue button to take care of the suggested security tweak with one-click.
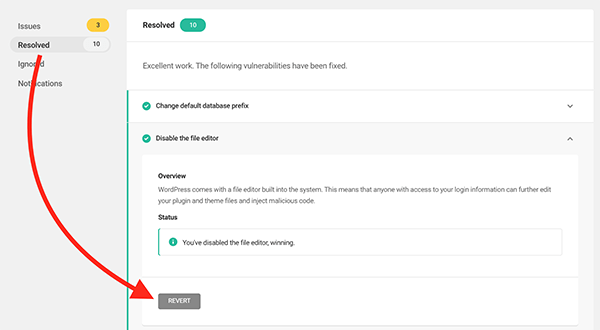
If you choose to resolve the issue, it will then be in the Resolved area. If you ignore it, it will go in the Ignored section. If no action is taken, it will stay as an Issue.
If you resolve the issue and decide that you want to keep it the way it was, you can revert it at any time by clicking the Revert button.
As you can see, any issues that come along will be brought to your attention and can be taken care of quickly and effortlessly.
Be sure to read detailed information about security tweaks and more in our article about stopping hackers in their tracks.
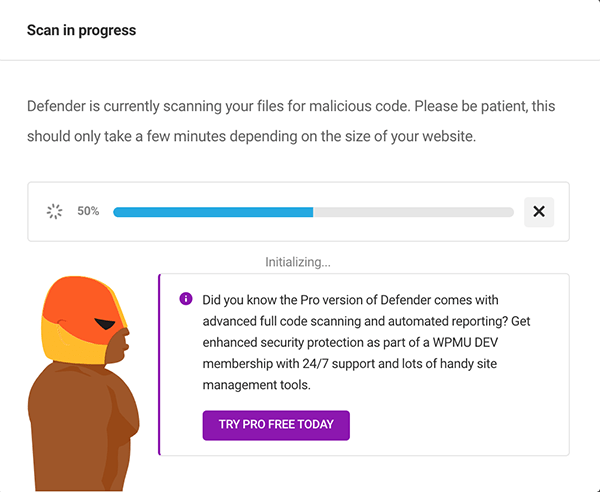
2. Activate One-Click Malware Scanning
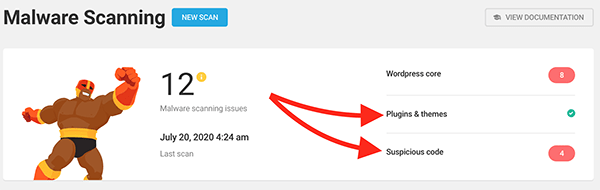
The Malware Scanning section lets you scan for malware in one-click and set up Defender to scan all your files on a regular basis, check if there are any problems, and report back to you (and anyone else you specify).
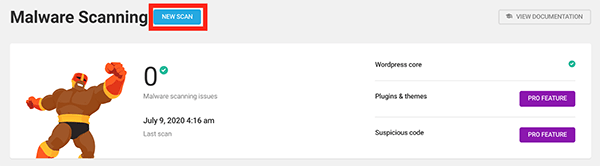
Once activated, Defender scans your WordPress core files and alerts you if it finds anything suspicious.
Once the scan is complete, Defender then lists all the files it thinks could be suspicious under Issues.
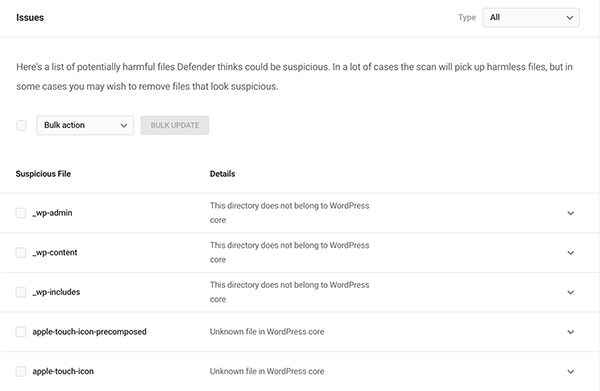
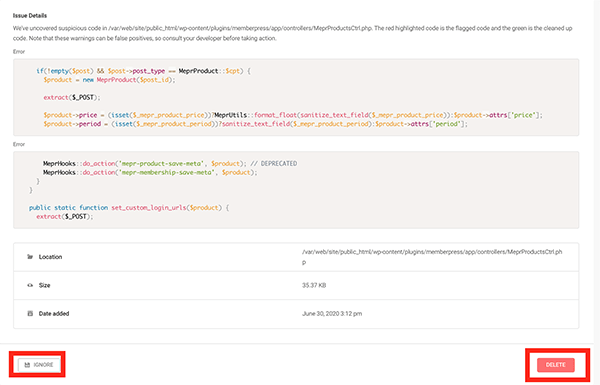
If you click the dropdown of the suspicious file, it will give you precise information about the issue, including the issue details, error code, location, size, and date it was added.
From this point, you can ignore the issue or delete it with one-click.
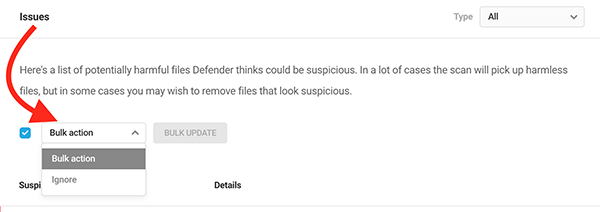
If you have multiple issues, you can also take care of all issues in bulk by selecting Bulk Update or Ignore in the dropdown.
Note of caution: It’s recommended that you are 100% certain that something is harmless before deleting and/or ignoring it. We have our team of experts available 24/7 for live support if you’re unsure or need advice.
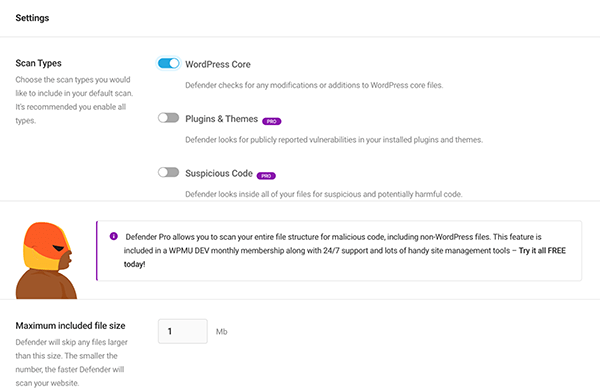
For additional scanning, Defender Pro will tackle these areas:
- Plugins and Themes: All plugins and themes will be scanned for publicly-reported, known vulnerabilities.
- Suspicious Code: This cranks-up the scanning potential by scanning all site files for suspicious PHP functions and code.
Along with the scanning aspect, you can adjust the settings to determine what kind of scans you want to do and to turn off a scan with Scan Types. If you have Defender Pro, you’ll get to determine all three scan types.
You can also include the maximum size of files to include. Any files larger than the specified size (in Mb), Defender will exclude from the scans.
Plus, adjust the notifications so that you can get emails sent directly to you about issues when they’re detected.
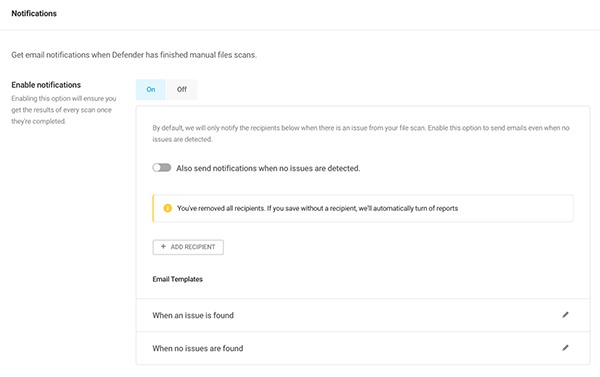
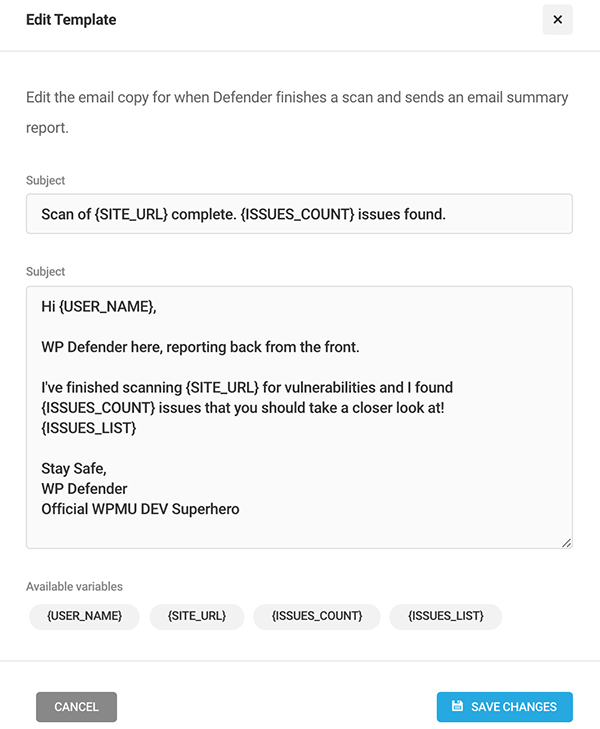
It’s just a one-switch option to turn on. Also, easily customize the emails for when an issue is found and also when no issues are found.
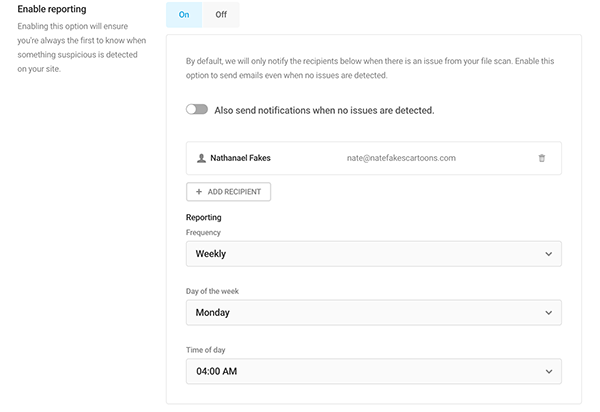
Additionally, you can enable reporting with Defender Pro.
It allows you to send reports about issues at a specific time of your choosing. You can choose from daily, weekly, or monthly. You can also specify the day of the week and time of day you would like to receive reports.
Once reporting is enabled, Defender will then let you know if it finds suspicious activity and send you a report as you have scheduled. Defender also gives you the option of receiving notifications even when no issues are detected.
For more detailed information about Defender’s malware scanning, be sure to read our article about finding and deleting suspicious code with Defender.
3. Track Changes with Audit Logging
With Defender Pro, you can track and log every event that happens on your website with Audit Logging. You’ll get detailed reports on what exactly is going on behind the scenes (e.g. hacking attempts) so you can keep track of any security threats.
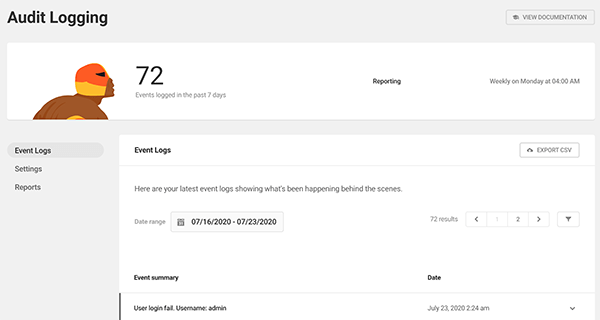
Defender can export all the events as a CSV and arrange the events by dates.
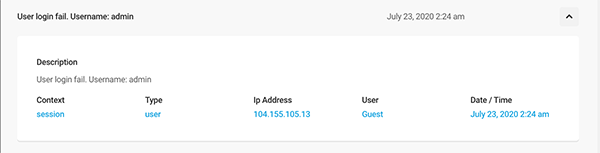
Each event summary has detailed information about it in its dropdown.
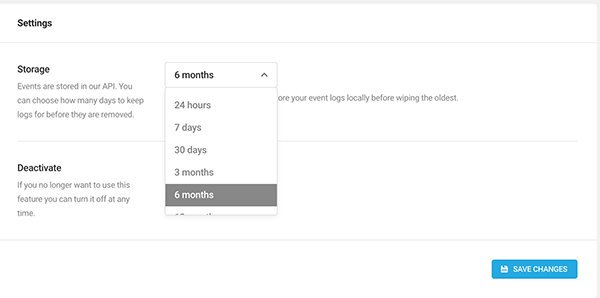
Adjust the settings to set up how long you’d like to keep the events stored in our API. You can also turn off this feature at any time.
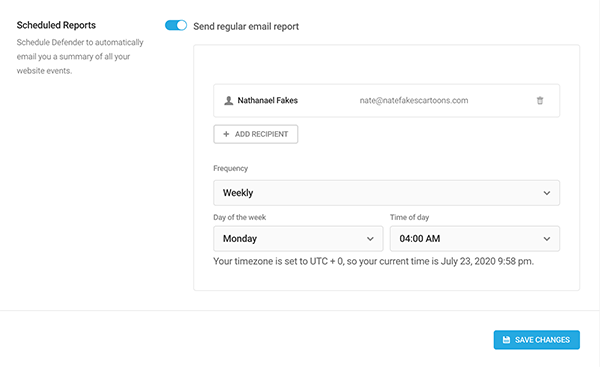
This also includes scheduled reporting, where an email of a summary of all events on your WordPress site gets automatically emailed to you. You can add recipients, schedule the frequency, day of the week, and time of day for when they’re sent.
Audit logging is a great way to stay on top of all events happening on your site and keep it secure.
4. Ban Suspicious Behavior with Firewall
Defender’s powerful firewall can keep your WordPress safe with IP banning, location banning, automatically identifying bad acting IPs, and more. There’s a ton that it does (as you’ll see).
Defender’s firewall includes:
Defender automatically bans repeat offenders so it’s effortless on your part to keep them away. Beyond that, there are a lot of areas with Defender’s firewall you can activate for added security.
This is a brief overview of what’s included with Defender’s firewall so you can take advantage of using it:
Login Protection
Put a stop to hackers trying to randomly use your login credentials. It will lock out users with too many login attempts.
You can put a threshold on how many failed login attempts a person is allowed and the timeframe for lockout. Then, you can specify the duration of time for the lockout.
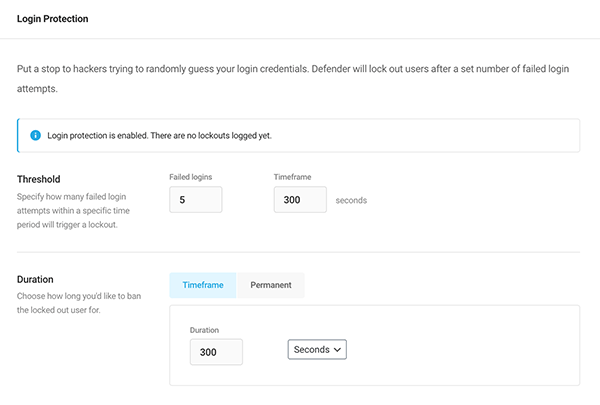
Also, create a customized message that will be sent to locked out users. In the same section, there’s an area to enter banned usernames.
An example of this is users shouldn’t be using admin, hostname, or administrator as their username. If someone tries to login with one of those names, it’s a clear indication that it’s a malicious attempt and is blocked by Defender when those usernames are listed in the Banned section.
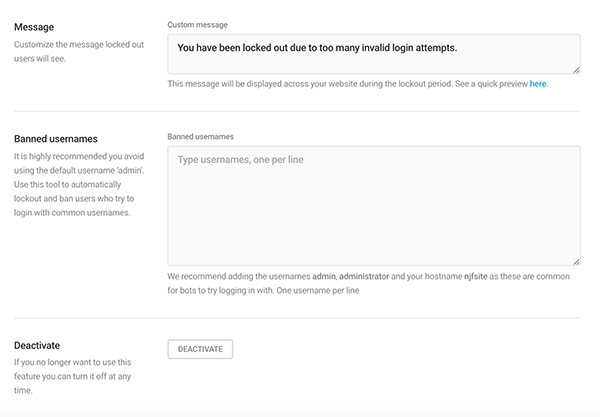
To deactivate, you can do so with a click of a button.
It’s a great deterrent for hackers that will simply get tired of getting locked out of your site because of failed login attempts.
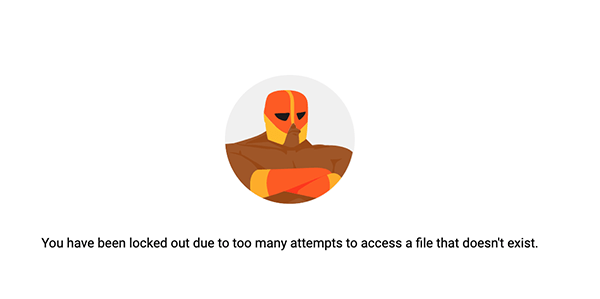
404 Detection
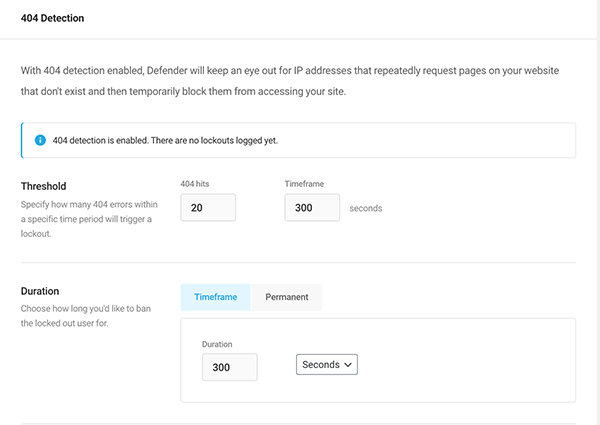
Defender keeps an eye out and reports IP addresses that repeatedly request pages on your website that don’t exist. From there, he’ll temporarily block them from your WordPress site.
This occurs usually from bots that crawl every link in your site trying to locate a back-end admin area so they can wreak havoc or requests from the same IP addresses for pages on your WordPress site that are non-existent.
If this happens too regularly, Defender will block users from accessing your site.
In the 404 Detection area, you can see how many lockouts were logged, adjust how long they’re locked out if banned, create a custom message, and more.
When activated, the top of the screen tells you the current lockouts that are logged. Below that, you can adjust the amount of 404 errors before it triggers a lockout. Beyond that, you change the duration of how long you’d like to ban a locked-out user. You can also opt for a permanent ban.
Next is a spot to create a customized message for locked out users.

Once created, offenders will be greeted by Defender with the message of your choice.
You can also choose specific files and folders you’d like to Allowlist or Blocklist.
Any files or folder URLs that you want to automatically ban, you can do so here. Likewise, you can include common files or folders that your website is missing, but you don’t want to Blocklist, by adding them to the Allowlist.
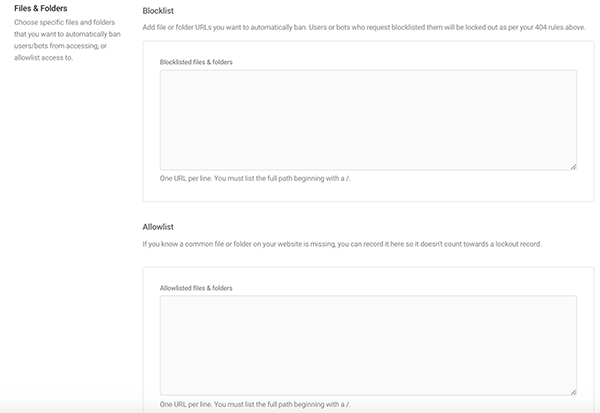
You can also Allowlist and Blocklist file types and extensions in this area.
There is also a switch to turn off monitoring 404s from logged-in users if you decide to do so.
IP Banning
Here you can add any IPs you’d like to permanently ban and also allow.
The Blocklist is for blocking IPs and the Allowlist allows them access all the time.
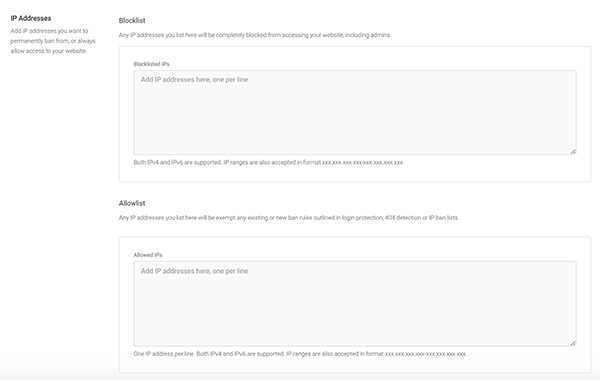
Here, it also displays the active lockouts. Also in this area, Defender can ban locations by countries in this section with the help of Maxmind.
Finally, Import and Export any Allowlist and Blocklist so you can add or export to another website with just a few clicks.
Logs
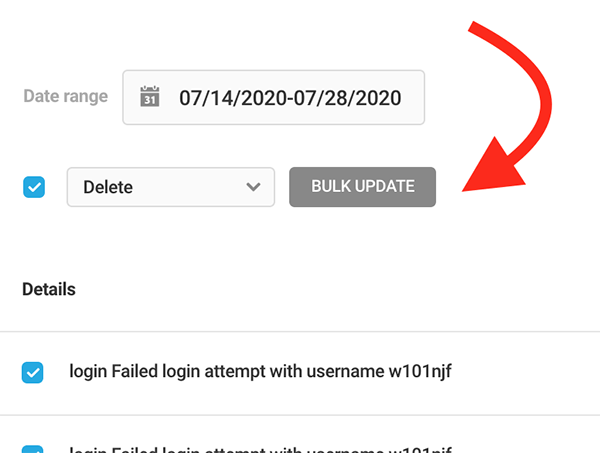
Defender logs all IP lockouts and has them available for you to view so you can stay on top of your security.
You can sort by date, add them to allowlist, and bulk update in one area.

Under each detail, you can click the dropdown to get a detailed look at the description, type of issue, IP address, date & time, and ban status. Plus, you can Allowlist or ban the individual IP in this section, too.
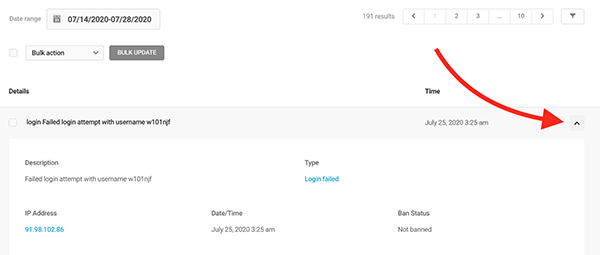
There’s an option to bulk update everything by clicking on individual issues or all of them at once. The updates include Ban, Allowlist, and Delete.
All activity is monitored and controlled so you can stay on top of suspicious activity on your WordPress site with ease.
Notifications
You can choose several email notifications for specific issues, who the email recipients are, and also choose when to stop receiving notifications after a certain number of lockouts.
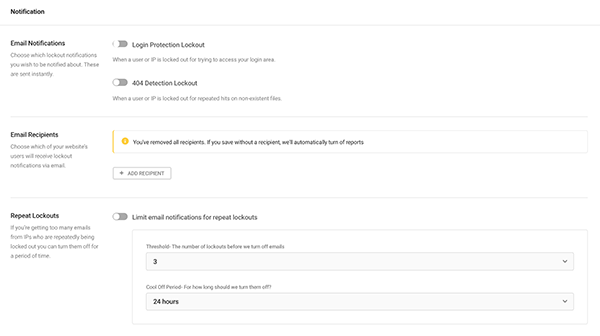
The notifications you can enable are Login Protection Lockout and 404 Detection Lockout.
With Login Protection, you’ll get emails when an IP address is locked out for trying to access your login area. And with 404 Detection Lockout, you’ll get notified when an IP has repeated hits on non-existent files.
This gives you notifications so you can be aware of any issues happening immediately.
Settings
The Firewall has a settings area to adjust how long to store logs and also where to delete logs in one-click.
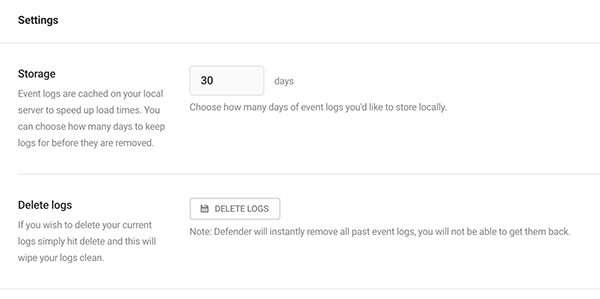
The capability to choose how many days of event logs to be stored can be changed at any time by specifying the days.
Reporting
Reporting is a feature available in Defender Pro. With this, you can get regular updates that you schedule however you’d like. You can also add any recipients you want to receive the reports and the frequency of reports.
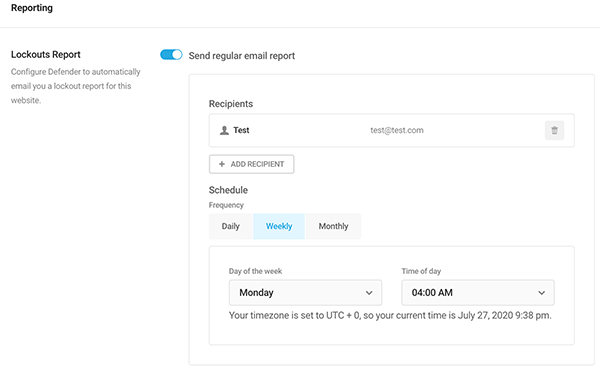
This is a great way to get lockout reports for your WordPress site regularly.
Be sure to check out our step-by-step more detailed look at Defender’s Firewall in our article How to Create a Powerful and Secure Customized Firewall with Defender.
5. Block Attacks with WAF
Another feature is WAF (Web Application Firewall). This comes included with our hosting. When combined with Defender Pro, it’s the first layer of defense to block troublemakers and bot attacks way before they even reach your site.
It filters requests against our optimized managed ruleset covering frequent attacks (OWASP Top Ten) and performs virtual patching of WordPress plugin, core, and theme vulnerabilities.
This can be enabled directly from WPMU DEV’s The Hub.
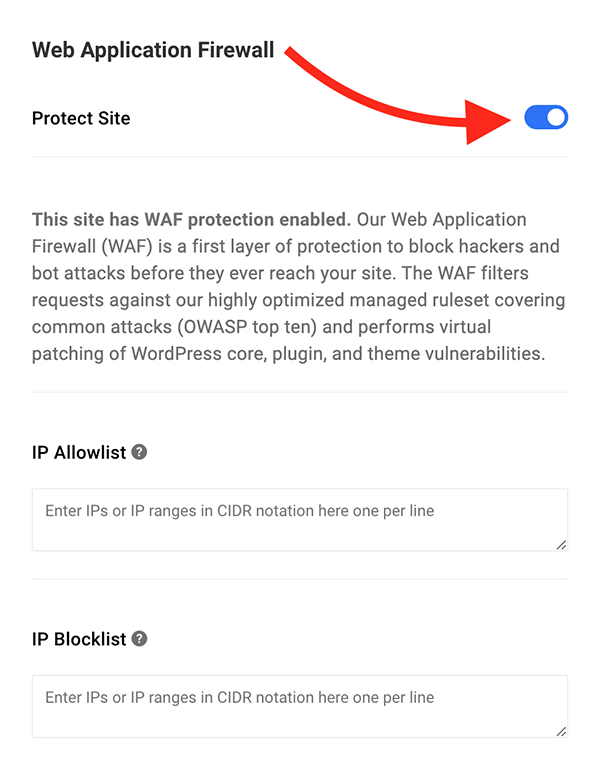
In the Hub, you can also add IPs to the Allowlist and Blocklist. Also, there is a User Agent Allowlist, User Agent Blocklist, URL Allowlist, and an area to disable Rule IDs.
For more information on WAF and our hosting, be sure to read this article all about it.
6. Protect Your Logins with 2FA
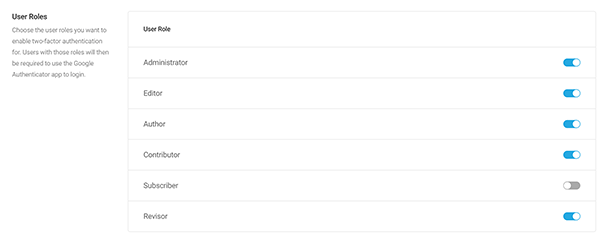
2FA (Two-Factor Authentication) is a great added line of defense when it comes to protecting your site. You can enable it in Defender and adjust a ton of its capabilities.
Once activated, you can choose the user roles you want to enable two-factor authentication for. Those users with those roles will then have to use Google’s Authenticator app to log in.
Below this area, you can activate Lost Phone, so that if a user is unable to access their phone, they can be sent the password to their email instead.
Along with that, you can Force Authentication for all users. There’s also an option to add a Custom Graphic for the login field (Pro only).

You can customize the default settings for the Lost Phone email, get quick access to the app download for Google Authenticator for Android & Apple, and view your active 2FA users.
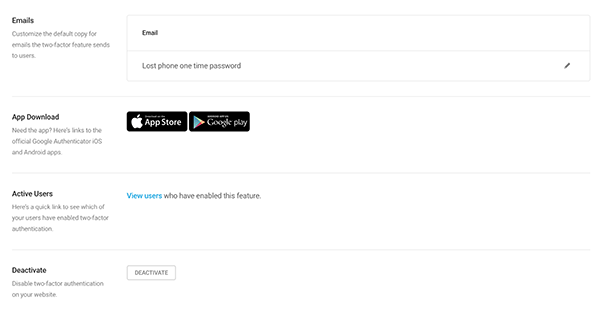
If you ever need to deactivate 2FA, you can do so with one-click.
This is a great necessity for security and also have more options for users to gain access when needed.
7. Enhance Site Security with Advanced Tools
Defender has plenty of options for more advanced protection.
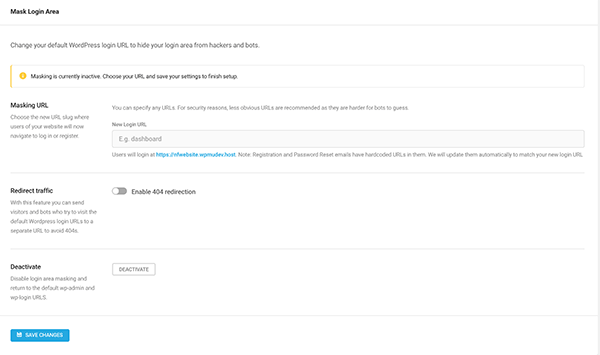
One big security measure is the Mask Login Area.
Here you can create a customized URL for users and admin to login in. This helps prevent hackers and bots from finding your URL.
In this area, you can also redirect traffic to a specific URL to avoid 404s.
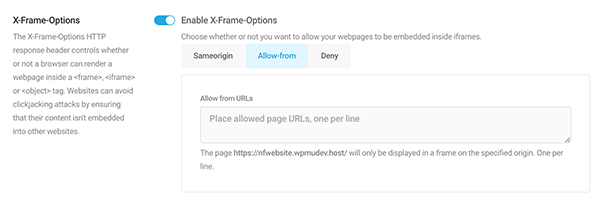
Also in the Advanced Tools area is a section called Security Headers.
This is where you can add extra security by enabling security headers of various types, including X-Frame Options, X-XSS-Protection, Strict Transport, and more.

When you enable them, they will display any additional security options if applicable.
Coming to Your Defense
As you can see, Defender comes to your defense and has your WordPress site security covered. Oftentimes it just takes one-click or just sitting back and letting Defender take care of things automatically.
If you ever have any questions about security settings, malicious code, or just need some advice, our amazing 24/7 support staff is always here for you.
Check out Defender’s documentation for more information. And to keep tabs of what’s next for Defender, be sure to check out our roadmap.
Share article
All the good WordPress stuff, once every two weeks
Subscribe
Create your free account to post your comment
Login to post your comment