How to Eliminate Render-Blocking Issues With Hummingbird for WordPress
Render blocking issues can slow down your WordPress site significantly. And while you can tinker on your own, Hummingbird can help you eliminate these issues, speed up your site, and improve your SEO in one fell swoop.

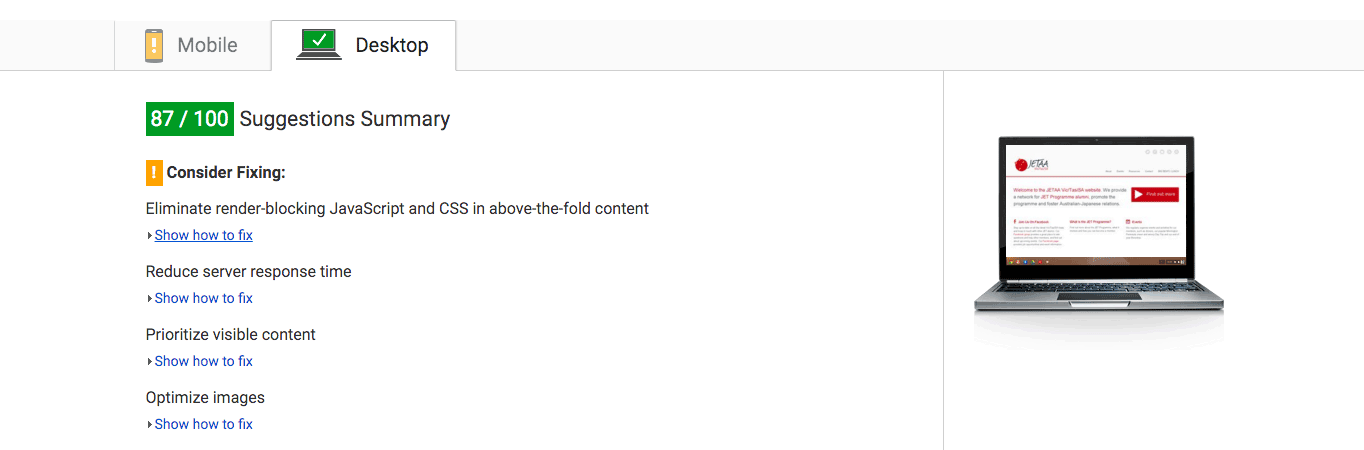
Have you ever run your website through Google Pagespeed Insights tool and got the cryptic message: “Eliminate render-blocking JavaScript and CSS in above-the-fold content”?
Since Hummingbird was launched we’ve added sooo much new stuff. Head over to the project page to check out all the new features!Updated: 08/16/2018 Hummingbird includes page, browser, RSS and Gravatar caching, full Multisite support, all new developer tools and a new streamlined interface.
If the answer is “yes,” the good news is you’re not alone. And there’s an easy way to fix it with our Hummingbird performance and optimization plugin.
An important part of a good user experience online is a super fast website, because when your website loads fast your conversion rate goes up. But many website owners sacrifice site speed for eye-candy or a great new functionality thinking that what they are doing is in the best interest of their visitors. Unfortunately, a good majority of website visitors care more about the time it takes for your website to load, than any of those extra bells and whistles.
To make matters even more interesting, Google has stressed on more than one occasion that speed is a ranking factor when it comes to SEO. It was first brought up in April of 2010 when both Google officially announced it on their blog and the company’s Matt Cutts from the webspam team gave further explanation of that decision on his blog.
Eliminate your render-blocking issues with Hummingbird and supercharge your pagespeed – free for WPMU DEV membersA slow website equals poor user experience. And Google is very much interested in delivering an excellent user experience. To be clear, this doesn’t mean your website won’t show up in search engine results at all; rather, it just means that Google might crawl your site slower which will result in a limited number of URLs that get crawled from your site.
So in this article, I’m going to explain what Google PageSpeed’s render blocking message means, how to deal with render blocking issues, and how Hummingbird can help you fix those problems.
So, How Slow is Too Slow?
According to John Mueller’s answer in a Google Webmaster Help thread, anything over 2 seconds is considered too slow. And by two seconds, he means that if your page displays nothing – a blank screen – for over 2 seconds, you’re in trouble and readers will leave your site in droves. It’s okay if your page continues to load with slower data after 2 seconds.
This is further backed up by research done by Gomez.com and Akamai.com whose combined results found that 47% of consumers expect a web page to load in 2 seconds or less while 40% of people abandon a website that takes more than 3 seconds to load.
These results show us that website speed is indeed crucial, not only in the eyes of Google but in the eyes of your typical website visitor, too.
If you have no idea how fast (or how slow) your website loads, a good place to start is Pingdom Tools. The service will analyze your site and tell you how much time it takes to load.
If you want to dive deeper and see how you score according to Google, find out what is slowing your site down, and what you can do about it, then look no further than Google Page Speed Insights.
Usually, you want your score to be 90 and up. However, without doing anything to optimize your page speed, the fact is your score will be much, much lower than that. More often than not, you will find that the biggest culprits for a low score are poorly compressed images and render blocking issues.
Poorly compressed images are pretty self-explanatory. But what are render blocking issues exactly?
Common Render Blocking Issues
The most common render-blocking issues, especially when it comes to WordPress, are JavaScript and CSS, which load in above-the-fold content or in the area of the website that you see before you have to start scrolling down. Unfortunately, they are also a part of the critical render path, which means you can’t just leave them out completely and expect your site to display and function properly.
Let me explain what that means.
Usually, a web page consists of an HTML file, which holds the structure of the web page. That file contains links to CSS files, which are responsible for adding visual styles, and JavaScript files, which add little extras to a web page, like animations, a scroll-triggered pop-up or fly-in, and so forth.
The critical render path is the series of events that must take place to render (display) the initial view of a web page and the optimizing of these events leads to significantly faster web pages.
When you understand how the critical rendering path works, you can properly apply the fixes necessary to make any web page load fast.
The most basic critical rendering path looks like this:
- The browser downloads the HTML file
- The browser reads the HTML and sees that there are three additional files: a CSS file, a javascript file, and an image
- The browser first starts downloading the image
- The browser realizes it can’t display the webpage without first getting the CSS and JavaScript
- The browser downloads the CSS file and reads it to make sure nothing else is being called
- The browser realizes it still can’t display the webpage until it has the JavaScript
- The browser downloads the JavaScript file and reads it to make sure nothing else is being called
- The browser can finally display the web page
In essence, this means that before anything on your website can be displayed, the browser has to load and read each and every one of your CSS and JavaScript files. Until that happens, your visitors are staring at a blank screen.
Now, imagine what a critical rendering path looks like in a website that has several CSS files, JavaScript files, images, social media buttons, several audio files, attachments like PDF files, and the list goes on.
It’s easy to see how things can get pretty messy pretty quickly. Especially in the case of WordPress where it’s all too common to have multiple CSS and JavaScript files in your theme. If you add in the numerous plugins many people tend to install, things get even more complicated and messy, which leads to slow-loading websites.
All of this means that when Google talks about page speed and its importance as a ranking factor, they are referring to how long your users have to wait before they start seeing content and how quickly they can start interacting with it.
Your primary concern when it comes to page speed optimization should be reducing the time it takes for your users to be able to view your content and interact with it. This means you should do whatever you can to optimize the critical rendering path. Let’s examine a few ways you can fix those issues.
Render Blocking CSS
CSS files are what make up how your website looks. It’s what defines the colors, the fonts, and the layout of your web page. The more CSS files you have and the bigger those files are, the longer it takes for the browser to read them and display the website.
There are a few ways of dealing with render blocking CSS:
- Properly calling your CSS files
- Lessen the number of CSS files in the critical path
- Use less CSS overall
1. How to Properly Call CSS
There are two ways of calling CSS you should absolutely avoid: @import and improperly labeled conditional CSS files.
The @import method of calling CSS will be near the top of your regular stylesheet and look something like this:
@import url("style.css")
This means the browser first has to go find the imported file before it can read the rest of your CSS file which will further delay the time it takes to display your web page.
Instead, it is better to just copy the contents of the imported file and paste it into the original stylesheet; or delete that line completely from your original stylesheet and include the imported CSS file in your HTML file by using the following line of code:
<link rel="style.css" href="style.css">
Make sure to replace “style.css” with the location and name of your CSS file.
Conditional CSS refers to CSS files that aren’t necessary for the web page to display before a certain condition is met, i.e. when you go to print the web page or a stylesheet that is used when a page is a certain width. When those files aren’t properly labeled, it means the browser will load all the stylesheets before the web page displays.
Here’s an example. A typical CSS file is called as shown below:
<link href="style.css" rel="stylesheet">
This code basically tells the browser that this file is a link to your stylesheet.
Any CSS file called like this will take priority over displaying anything on your web page. In the case of a CSS file that doesn’t have to load before the page is rendered, it should be called like this:
<link href="print.css" rel="stylesheet" media="print">
This translates to “this is a link to my CSS file which is meant for printing only.” In this case, the browser understands that this particular file is not necessary for the page to display properly and it will place a lower priority on that file. It will still download it, but it won’t interfere with the rendering of the web page.
The same thing happens when you have CSS files that are specific to displaying a web page across various screen widths.
2. Use Fewer CSS files in the Critical Path
The best way to use less CSS files is to combine those files. In essence, this means copying the contents of one CSS file and pasting it into another. Once that is done, you have to remove the call to the extra CSS files from your HTML file.
3. Use Less CSS Overall
The last way of dealing with render blocking CSS is not the most practical solution, even though it sounds easy. In most cases, WordPress themes that claim to be highly customizable, come with additional CSS files which aren’t really necessary. The reason this is not the most practical solution is because more than likely you either had a theme custom designed for your website or you bought it from a theme marketplace. In that case, the only solution you have is to contact the theme designer and see if they would be willing to help you out.
Render Blocking JavaScript
When it comes to JavaScript, you need to know how many JavaScript files your website is loading and where the calls for those files are placed. The easiest way to do this is to use the Google PageSpeed Insights tool. It will tell you the names of the exact files that are blocking a particular page. Once you know which files are causing the problem, you can work on implementing a solution.
How to Remove Render-Blocking JavaScripts
The most common culprit is jQuery, which is a JavaScript framework that is used on a large percentage of web pages. It’s only one file but it is rather large.
Most often, it is used to add extra functionality to your websites like fading an image in or out, displaying an email optin form when the visitor goes to leave your website, and other similar features. Realistically speaking, there is no reason for that file to load before the web page, yet a good majority of websites are guilty of it.
To fix this issue, you need to change where the call for jQuery is made in the HTML of your website. A partial solution is to place the call for it in the footer of your website, along with the calls for all the other JavaScript files, like Google Analytics, or social media widgets like your Facebook Like Box, or Google+ Profile Badge. The reason this is only a partial solution is because that still doesn’t let the browser load the web page first and JavaScript files second. Ultimately, that method will still impact your website speed.
A much better solution would be to defer JavaScript completely. This will remove it completely from the critical rendering path and will play a huge role in increasing page speed.
You can do this by adding a few lines of JavaScript code to your HTML ,which creates an “onload” event. That event will call an external JavaScript file, which will take effect only after the web page has loaded.
Taking all of this into consideration, sometimes it may not be feasible for you to do all of those optimization tweaks yourself. In those cases, using a plugin to help you with resolving them is the most natural course of action.
That’s why we built Hummingbird.

Eliminate Render Blocking Issues with Hummingbird
Hummingbird is a performance optimization plugin with a goal of helping you optimize your website and make it load faster. Its focus is on the same components of your website that Google Pagespeed Insights inspects but instead of cryptic messages that send you on a search to decode their meaning, Hummingbird offers the solution right there in your dashboard.
Like the Pagespeed Insights tool, it shows you how you score on a scale to 100 then gives you a breakdown of what you need to improve. The suggestions are written in clear and easy-to-understand language, along with the list of specific files you need to edit or move to the footer of your site, as well as the images you need to compress.
In short, it eliminates the need to write down and manually find the files you need to edit. With Hummingbird, all the changes are done with a click of a button. You don’t have to worry about doing irreversible changes to your site. If you’re not happy, or a particular optimization step leaves your site unusable, you can always undo the changes.
How to Eliminate Render Blocking Issues with Hummingbird
When it comes to render blocking issues and WordPress, the best practice is to load as many scripts as possible in the footer of your site, so slow-loading scripts won’t prevent vital parts of your site from loading quickly.
However, not all plugins and themes follow this idea.
Hummingbird lets you move script calls from the header to the footer with a click of a button. Although some caching plugins give you the option to move the render blocking files to the footer, more often than not you have to manually locate the files yourself.
Hummingbird lets you see which files are causing issues – it names the exact files – so you can then decide whether you want to move them to the footer, header, or leave them in their original position. You can also choose to combine and minify them to improve site performance.
All you need to do is go to Hummingbird > Minification in the backend of your site and you’ll see the screen below:
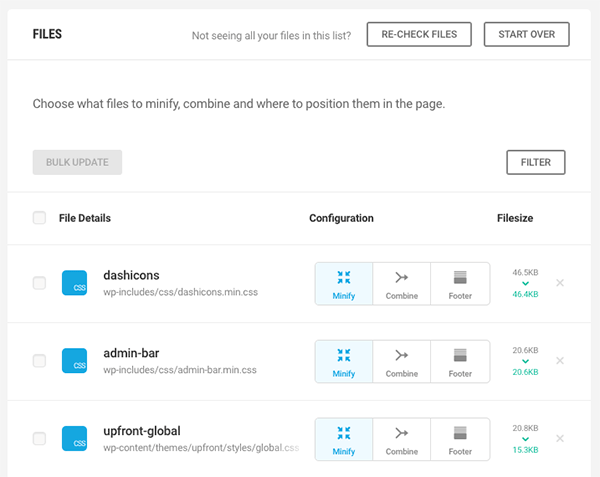
Then all you need to do is scroll through the file names on the left and choose where you would like to re-position each file. Don’t forget to click “Save” when you’re done.
As is always the case with WordPress, make sure to backup your site before playing with this feature. After each optimization, be sure to test your site and see if every element is loading as it should. The reason behind this is that sometimes WordPress themes and plugins don’t follow WordPress standards, which can lead to certain elements being broken when JavaScript is minified. However, every change you make with Hummingbird is easily reversed with the “Clear” button in the Hummingbird dashboard.
Further Optimizing Your Site with Hummingbird
Eliminating render blocking issues is just the tip of the iceberg, however. Hummingbird can also help you with minification, browser caching, gzip compression, and even be configured to monitor your site’s uptime. Let’s take a look at each of these features briefly before we go:
- Minification. Minification does what the name implies – it minifies your HTML, CSS, and Javascript files by removing white space, carriage returns, and unneeded characters. This results in smaller files that help your site load faster.
- Browser Caching. This creates cached versions of your static content, which means when a visitor refreshes or lands on the page again, the browser serves up a cached version instead of reloading everything from scratch.
- GZIP Compression. GZIP uses an algorithm to create code where large strings of data can be stored as a single bit, effectively making your pages and stylesheets much smaller. It’s a fairly common practice used to decrease site load time.
- Uptime Monitoring. With Uptime monitoring activated, you will be able to tell not only if your site is down but how fast it loads. It will email you each time your site goes down, and again when your site is back online.
Wrapping Up
Website speed is crucial. Not only does it affect your visitors’ user experience, it can also a deciding factor in whether or not a visitor returns to your site or makes a purchase. The most common issues happen when browsers have to deal with too many CSS and JavaScript files, which causes a delay in displaying your website. Render blocking issues must be fixed if you want to improve user experience and make your site load faster. Now thanks to Hummingbird, you can easily fix render blocking issues and implement other fixes to significantly improve your website’s speed. Which we think is pretty cool.
How fast is your website? How did you handle render-blocking issues? Let us know in the comments and don’t forget to tell us if you took Hummingbird for a test drive.
Share article
All the good WordPress stuff, once every two weeks
Subscribe
Create your free account to post your comment
Login to post your comment