6. System Cron & Custom Cron Jobs
By default, WP Cron “fires” whenever you have a visitor on your site. This is what sends out email notifications to your members, and triggers various other website activities.
However, sometimes your website won’t have enough traffic to trigger this on a regular basis and it can be frustrating when you have things like memberships that need to be updated often.
This is where system cron or custom cron jobs come in, and there are a few options available to you as detailed in this document.
Note that WPMU DEV hosting environments utilize server-side crons that call the WordPress scheduling system via WP-CLI every 5 minutes to ensure your scheduled tasks run on time, every time. This eliminates the need for alternative cron usage or external services.
However, if you do need to define a custom cron job that fires more frequently than every 5 minutes on our hosting, you can use a plugin or 3rd-party service (on our managed hosting for WordPress, members do not have the root access required to modify this behavior via SSH).
The plugin method also works fine on most 3rd-party hosts to define cron jobs at any frequency you need whether or not you have root access or SSH knowledge.
6.1 Cron in Multisite
Copy chapter anchor to clipboardIf you’re running a multisite WordPress install, it’s important to note that doing a cron job on your site’s domain will only run that job on the main site by default. Each subsite is basically a different site when it comes to cron. This applies to both subdomain and subdirectory multisites.
So if you want to trigger cron jobs on your subsites, you can either specify each subsite’s URL/domain individually, or use a custom solution to trigger cron on all sites in the network.
Cron on Each Site in the Network
If your main site is site.com and you have a subsite at a.site.com or site.com/a/, your subsite crons should be called individually as in the following examples:
a.site.com/wp-cron.php?doing_wp_cron
site.com/a/wp-cron.php?doing_wp_cron
Note that running individual cron jobs on subsites can put undue strain on your server, and should be avoided unless absolutely necessary.
Cron for the Whole Network
An alternative solution to the above is to create a custom file to replace the default wp-cron.php, and a custom file to call cron for all sites in the multisite.
See this excellent tutorial for instructions on how to set this up for your multisite: You Are Using WP Cron Incorrectly In Your WordPress Multisite!
6.2 Using a Plugin or 3rd-Party Service
Copy chapter anchor to clipboardUsing a Plugin
There are a few Cron plugins freely available from the WordPress.org plugin repository with different setup options. For example, WP Crontrol enables you to create cron jobs using a URL or a WordPress hook, while with Get URL Cron, you can set them up to fetch a URL or fire a WordPress shortcode.
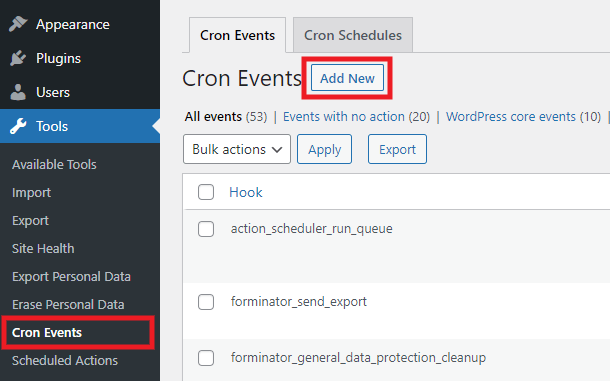
We’ll use Wp-Crontrol for this example. Once the plugin is installed and activated, go to Tools > Cron Events in your site’s wp-admin, and click on the Add New button.
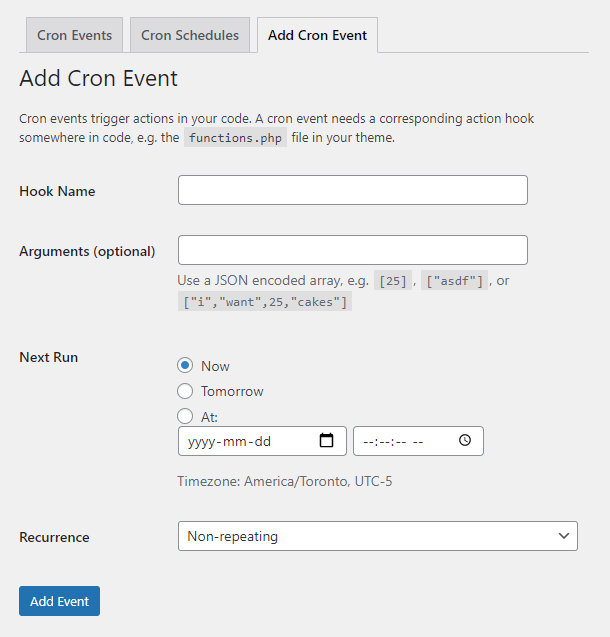
On the next screen, enter the Hook Name to use as the trigger to fire your cron event, and any optional arguments your cronjob may need. Then set the run time and recurrence schedule, and click Add Event to finish.
If your event needs to call a file or external URL, use the WordPress wp_remote_get function in the Hook Name field to fetch the file or URL; for example:
wp_remote_get( 'http://example.com/some-file.php' );
For more information on using WP-Crontrol for your custom cron jobs, see the FAQ on the plugin’s WordPres.org page.
Using a 3rd-Party Service
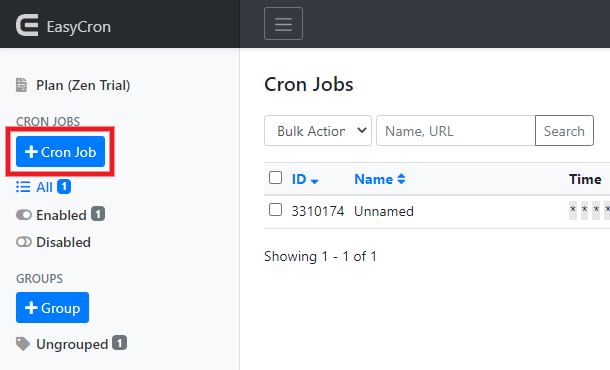
There are a few 3rd-party services that can be used to create custom cron jobs, but we’ll use the free EasyCron service for this example.
Once logged into your EasyCron dashboard, click the + Cron Job button.
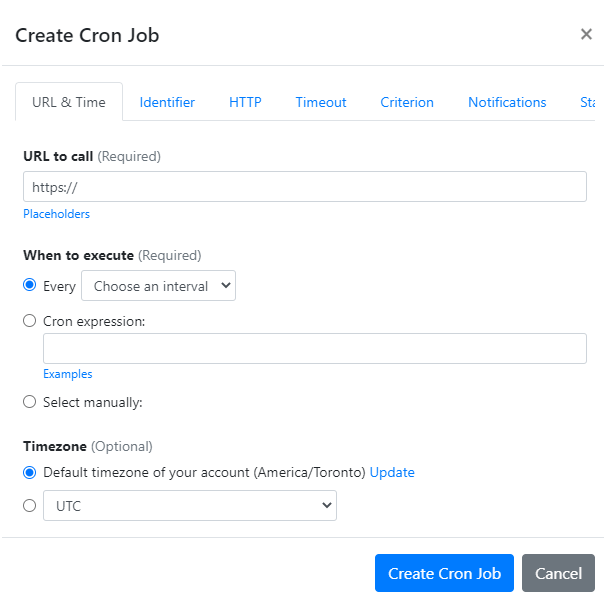
That will pop open a modal window where you’ll enter the URL to call for your cron job, set the frequency it should run, then click Create Cron Job to finish.
For more information on using EasyCron for your custom cron jobs, see the EasyCron FAQ and tutorials.
6.3 Using cPanel (3rd-party hosts only)
Copy chapter anchor to clipboardIf your host uses the popular cPanel interface, setting up a custom cron job is actually quite simple.
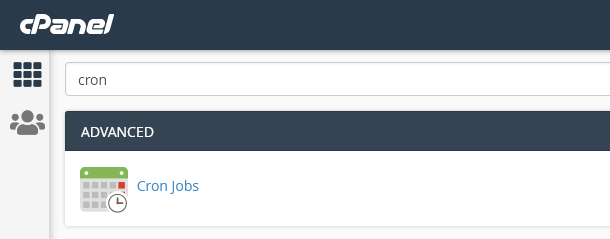
Log into your cPanel and look for Cron Jobs in the Advanced section, or enter “cron” (without the quotes) in the search box to find it.
If the Cron Job option is not available in your host’s cPanel, try a plugin or 3rd-party service as above.
Use the Common Settings dropdown to quickly select the schedule for your cron job, or fine-tune it per your needs in each field below. Then enter the full file path to your script in the Command field, and click Add New Cron Job.
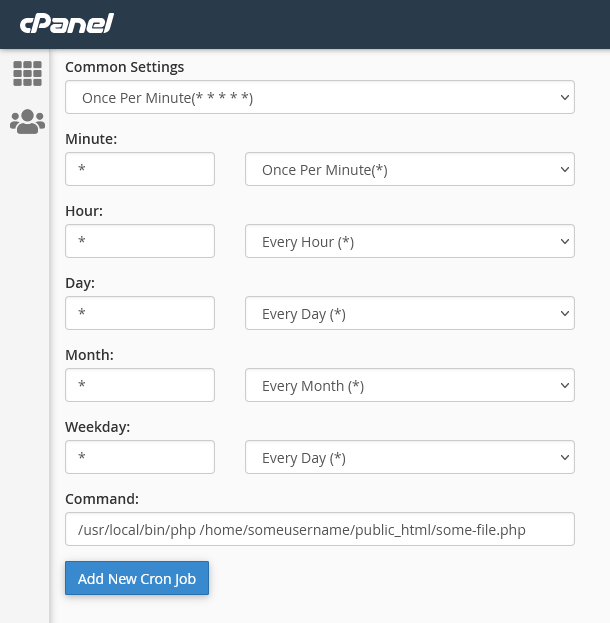
You’ll then see your new cron job appear in the Current Cron Jobs section beneath the form.
For more information on creating custom cron jobs in cPanel, see this article on the cPanel Blog, or check out our tutorial on How to Set Up a Cron Job in cPanel Hosting.
6.4 Using SSH (3rd-party hosts only)
Copy chapter anchor to clipboardIn this chapter, we’ll go through the SSH commands you need to use in order to configure cron properly. You will need a working knowledge of how to use SSH before getting started. If you are unsure how to set up up SSH on your computer to work with your host, please contact your host directly for more information.
Note that on WPMU DEV managed hosting for WordPress, members do not have the root access required to modify cron via SSH. See Using a Plugin or 3rd-Party Service above.
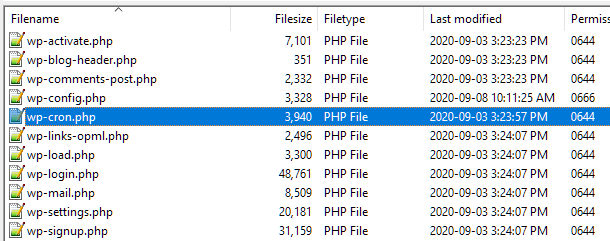
Locating your WordPress Cron file
This is the file that is currently controlling the Cron jobs on your site. We need to locate it so that we can tell the System Cron to take over.
Usually this can be found in the WordPress installation directory. You will need to know the full path to this file, for example:
/home/username/www/public_html/wp-cron.php
You can locate this file via FTP through a program like FileZilla.
From here, you can right click on the wp-cron.php and select “Copy URL(s) to clipboard” –
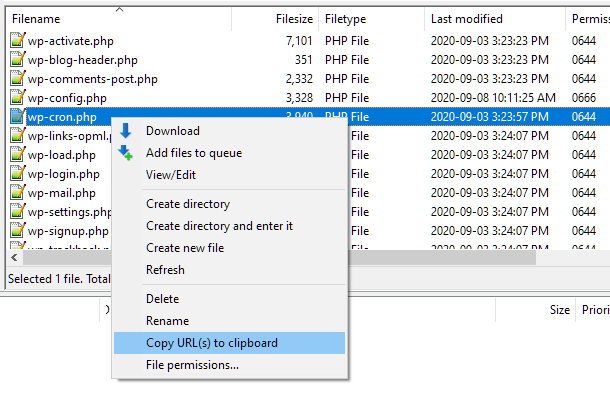
Paste the URL in a text file and save it so you don’t lose this file path and need to repeat these steps later.
Locating your PHP Executable
Now things get a little more complex. Remember how we mentioned earlier that you will need a working knowledge of SSH in order to configure your System Cron? This is where that knowledge comes into play.
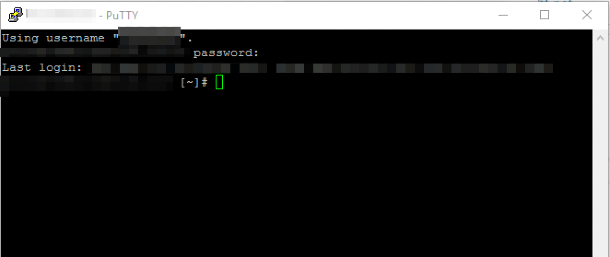
First, open your SSH program. In this example, we are using PuTTY on a Windows PC. You’ll then need to login using your SSH credentials. If you are not sure what these are, please contact your hosting company for more information:
Next, you’ll type in “whereis php” (without the quotation marks) and press enter:
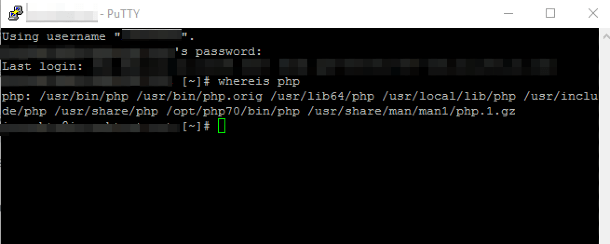
What you’re looking for is the file path “/usr/bin/php“. If that shows up in your results, then you’re good to move onto the next step.
If that file path does not appear, then select one of the other available file paths, such as “/usr/includes/php“.
Once you’ve identified your file path, you’re ready for the next step – configuring your System Cron.
Configuring your System Cron
After you’ve identified both file paths that you need, you’ll be able to schedule the Cronjobs for your site.
To do this, enter the following command (without quotation marks) into your SSH program and press enter: “crontab -e”
You’ll then be presented with the following screen:
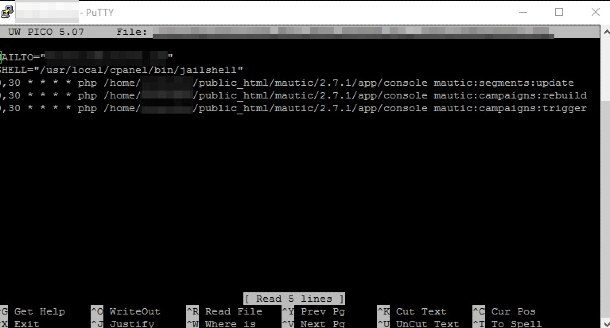
Using your arrow keys, move your cursor to a new line, below the last entry. There you’ll input the frequency you’d like for the Cron events to occur, followed by the file paths you found earlier. The result will be something like this:
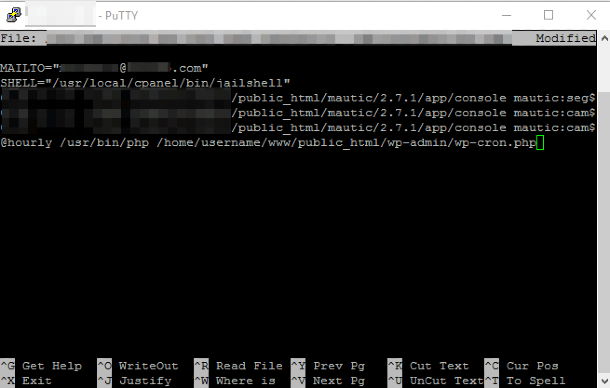
The format is: [interval] space [path to PHP executable] space [path to wp-cron.php]. Make sure you include an actual “space” (not the word) after the interval and between the two file paths.
After you’ve input this command, all that is left to do is exit – your changes will be saved automatically.
For my program, I will type “CTRL + X“.
That’s it! Congratulations, you’ve successfully configured your System Cron.
6.5 Get Support
Copy chapter anchor to clipboardIf you still have questions or need assistance after reading this document, please don’t hesitate to contact our support superheroes using the available options under the Support tab in your Hub or via the Support tab in your WPMU DEV Dashboard.
