A Guided Tour of Calypso, WordPress.com’s Desktop App
If you've been reading about Calypso, the new system for managing your WordPress site from Automattic, you may be wondering how it works and what's different from the familiar WordPress admin screens. Here's our guided tour, complete with plenty of screenshots and tips.

If you’ve been reading about Calypso, the new system for managing your WordPress site from Automattic, you may be wondering how it works and what’s different from the familiar WordPress admin screens.
Calypso isn’t what you’re used to: it’s entirely written in JavaScript and it interacts with the WordPress.com REST API (which is different from the WordPress REST API for self-hosted sites). To use it, you have to have the Jetpack plugin installed and activated and a WordPress.com account. You can then access Calypso either via the WordPress.com website or by downloading the standalone Calypso app for desktop computers (Mac or Windows).
Calypso is an exciting development. It’s inspired me to think about how the WordPress REST API could be used to build custom WordPress admin systems in the future. But it does have a downside at the moment – it doesn’t use the REST API for self-hosted sites, but the WordPress.com REST API, which you can only link your site to by installing Jetpack and setting up a WordPress.com account (the teams behind the two APIs are working together to converge these so this may change in future).
If you’re happy doing this, then it’s a great way to manage all of your WordPress sites from one place, and the user interface has its benefits too.
In this post, I’ll give you a guided tour of the Calypso interface and show you how to create and edit content and manage your site with it.
We’ll cover:
Let’s get started.
Installing Jetpack and Accessing Calypso
First, install and activate the JetPack plugin. Make sure the Manage module is activated:

Log in to WordPress.com. Make sure you have the correct site displayed. If the wrong site is displayed, click the Switch Site link at the top of the admin menu:

The first screen you will see when you open your site will be the site stats:

Mine doesn’t have any stats yet as I’ve only just activated JetPack – these stats will build up as your site pulls in traffic.
Note: If you want to use the desktop app instead (it has the exact same interface), you can download it from the Calypso website.
Creating and Editing Content
Let’s take a look at creating content via the Calypso screens. First, adding a new post.
Creating Posts
In the admin menu on the left you’ll see a Posts item. To add a new post, simply click on the Add button next to it, to view the new post screen:

Type in your post title and content in the title and content areas in a similar way as you would using the WordPress admin screens.
The formatting options available to you are the same as in the WordPress admin. Click on the toggle icon to the right of the formatting bar to toggle the advanced formatting options (sometimes called the kitchen sink) on and off.
Here’s a new post with some formatting applied:

To add media files, click on the media icon to the left of the formatting bar. This gives you access to a media uploader that will look very familiar:

To upload an image click the Add New button. This is just one example of how the text used on inputs and prompts in Calypso is slightly different from the standard WordPress admin screens – terms like Add New are used in place of Upload because it’s more intuitive for users. You can drag media files onto the screen just as you would in the WordPress admin.
The Media Library separates attachments into images, documents, video and audio, which you can access via links at the top of the screen. This will make it easier to find media files of a specific type.
If you want to create a gallery, there isn’t a button for this, instead, just select more than one image and click the Continue button. This takes you to a screen where you can edit the gallery layout. You can choose to display full size images, a grid of thumbnails or a slideshow.

Then click the Insert button to insert your gallery to your page.
Here’s my draft post, ready to publish:

Once you’ve got your post ready, you’ll probably be wondering where the metabox is for publishing it. Calypso works slightly differently – instead of using a metabox on the right, you use the Publish button on the left. You’ll also see tabs for categories and tags, featured images, sharing, post formats and more here: this is where you’ll find everything you’ll normally find in metaboxes on the main screen.
Calypso will automatically save your post as a draft in the background, so there isn’t a button for that.
Before we publish our post, let’s take a look at those tabs. First, categories and tags:

If you click on the Categories & Tags tab, its contents will slide down. Select the categories and tags that apply to your post by checking them.
To set a featured image, click the Featured Image tab:

Click on the Set Featured Image button and you’ll see the media uploader again, from which you can add your featured image.
After doing this, the featured image will be displayed at the top of the post editing area:

To edit the slug, write an excerpt or change discussion settings, click the More Options tab:

The final step before publishing the post is to preview it, which you can do via the Preview button at the top of the admin tabs. If you want to schedule your post instead of publishing it immediately, you can click on the calendar icon on the right of the Publish button:

If you do this, the text on the Publish button will change to Schedule, in common with the normal WordPress admin screens. Finally, publish (or schedule) your post and it will be published on your main site. You’ll see a notification to let you know that’s happened:

Click the View Post link to the right of the notification to see your post on your site:

Creating Pages
Creating Pages is very similar to reading posts. To go back to the main admin screen, click the All Posts link at the top of the admin menu when editing a single post (if that’s where you are).
This takes you to the main screen, with your posts displayed this time:

To add a new page, click the Add button in the Pages menu item, to view the page editing screen:

Adding your page title and content is the same as for a post so I won’t cover that again. Instead let’s take a look at the admin tabs on the left hand side.
The first tab is for featured images, which works in the same way as for posts. Note that these will only be displayed on pages if your theme supports them.
Next is the Page Options tab:

Here you can select the parent page for this page and specify the menu order. If your theme has multiple page templates, this is where you can select the one that applies to your page.
Finally, there’s the More Options tab:

Here you can specify the slug, discussion settings, and any other specific page settings added via your theme.
Finally click Publish to publish your page in the same way as you would for a post. Again you’ll see a notification message:

Editing Posts and Pages
To edit posts for pages, first you need to access the posts or pages listing screen. From the main admin menu on the left, click the Blog Posts or Pages tab. Here’s the posts listing screen:

You can filter the selection to display published, draft, scheduled or trashed posts by clicking the options at the top of the listing, or click the search icon to search for a specific post.
To edit a post, click the Edit link beneath it. Alternatively, click the View link to view it on your site, the Stats link to view visitor stats for that post or the Trash link to trash it.
Managing Your Site
As well as creating and editing your content, Calypso lets you manage your site and its settings.
There are two menu sections for this:
- Personalize, which includes the Themes and Menus tabs along with the Customize button.
- Configure, which includes the Sharing tab for linking to social media via Jetpack, People for managing your site users, Plugins for installing and activating plugins, Settings for other site settings, and WP Admin which takes you to the admin screens in your main site.
Let’s start with the Customize options.
Personalizing Your Site
Calypso lets you view your theme and link to the main site admin to customize it or install new themes. It also lets you manage and create menus.
To view your themes click the Themes tab. Unfortunately, when I tested Calypso this didn’t display the themes installed on my site except for the active theme:

To install a new theme, click the More button, which will take you to your main site admin.
To customise your current theme, either click the Customize button next to its name in the themes screen or click the Customize button in the Themes tab. This load the Customizer in your main site admin:

Fortunately Calypso does have full functionality when it comes to menus. To access the menus admin screen, click the Menus tab:

This displays the main menu and shows me how many menu areas my theme has and how many menus I have set up, above it. To specify which menu area uses which menu, click first on the menu area, then on the menu:

Above I’ve selected the Social Links Menu menu area in my theme, and assigned the Testing Menu menu to go in it. You can also create a new menu by clicking on the Add New Menu option:

Editing a menu that isn’t assigned to a menu area seems a bit tricky. The only way I can find of doing this is to select the menu on the right (which assigns it to the currently selected menu area on the left), edit and save it, then reselect the menu that should be assigned to that menu area. Don’t forget the final step if you want the correct menu to be assigned to the correct menu area.
Calypso won’t save the changes to your menus until you click the Save button, but you’ll have to do this to save your unassigned menu before switching the correct menu back to the menu area – which will mean that the wrong menu will temporarily be displayed on your live site. For this reason I’d caution against using this feature on a live site – switch to the main admin screen for unassigned menus instead.
Note: If it is possible to do this in another way, please let me know in the comments – I can’t work one out, but that doesn’t mean it’s not possible!
To add new items to a menu, click on the + icons to the left of menu items. This displays a menu that lets you choose between content types and individual items of content:

Select the item and click the Add Item button to add it. You can edit your menu items by clicking the little pencil icon to the right of each item. Don’t forget to save your menu afterwards!
Configuring Your Site
The final set of options are for configuring your site settings. The menu items you have available here will depend on what modules of Jetpack you have enabled (I’ve got Sharing:– you may see more if you’ve enabled more modules).
The Sharing menu item lets you configure the social media accounts you want to connect to your site:

Use the buttons to log in to each of your social media accounts and save their details. Jetpack will then let you add social sharing widgets to your site.
Next is the People menu item:

This uses some concepts which are different to the standard WordPress admin screens: it divides your users into Team, Followers and Email Followers. Team includes anyone with an account on your site, Followers are people with a WordPress.com account who’ve chosen to follow your site in WordPress.com and Email Followers will be people who’ve subscribed for email newsletters but not necessarily created a user account for your site.
You can add a new user by clicking the Add button to the left of People in the main menu. This simply takes you to the Add New User screen in the WordPress admin screens, outside of Calypso.
The Plugins menu item lets you see the plugins installed on your site, in a nice visual interface:

If a plugin update is available, a notice will appear below the plugin’s name (which you can see under Jetpack in the screenshot). Click on that notice to go to the plugin update screen:

Then click the Update button and the plugin will be updated:

You can also install plugins using Calypso, using a similar interface which I think is clearer than the standard one. To do this, click the Add button next to Plugins in the main menu:

From here you can search for plugins and install them in the same way as you would from the WordPress admin screens, still using that enhanced user interface. So to install WP Smush, I’d search for it to get this installation screen:

Simply click on the Install button and the plugin will be installed, without you being directed back to the WordPress admin screens.
The final option you have is to manage your site settings. This has a slightly different structure from the normal WordPress admin screens. If you click on Settings in the admin menu, you’ll see a General settings tab, which includes most of the settings you’ll see in the standard General settings screen, but without options for subscriptions, date or language and with Jetpack options added:

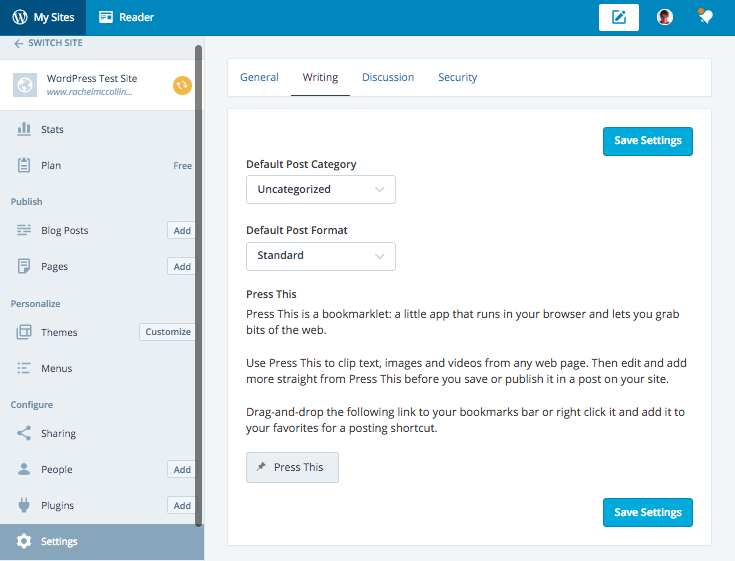
There’s also a Writing tab; again this includes some of the settings in the WordPress admin screens, but not all of them. You can amend settings for categories but you can’t set up posts via email:
The Discussion tab includes settings for enabling comments and trackbacks, but none for avatars:

And finally, the Security tab doesn’t equate to any screens in the standard admin screens; instead it includes security settings which come with Jetpack:

This means that there will be some settings you’ll have to go back to your main site to manage, such as those for Reading, Media and Permalinks.
So those are all of the screens and options that come with Calypso out of the box. You may find that you get more screens if you have more Jetpack modules enabled or you’ve got other plugins installed that Calypso can work with.
Verdict – Calypso is the Start of Something Interesting
Having worked through all of the Calypso screens and interface, I think it’s a promising new system. It shows how it’s possible to create a completely new version of the WordPress admin without any changes to core. Two of the objectives for the Calypso project were improving the UI and making it easier to push updates, and both of these have been and will continue to be met. An area which I believe has particularly improved over the standard screens is the plugin management screens, which have a really clear, intuitive user interface.
However, as it stands right now, Calypso isn’t complete. There are some menu options which send you back to your main site, the Customizer isn’t integrated into it and (importantly for anyone using WordPress as a CMS) it doesn’t let you work with custom post types. It’s also dependant on having Jetpack installed and a WordPress.com account set up. It’s certainly not something I would use for client sites at the moment, even with the UI enhancements.
This will change, though. I asked Nicolay Bachiyski, a lead member of the Calypso project, about the future of Calypso and he was confident that more features will be added to it over time.
But Calypso is just the first of what will likely be a number of alternative WordPress admin systems, and shows us what can be done. It also makes it easier for you to follow other self-hosted WordPress sites, manage multiple sites from one place and be more social – giving you a service closer to what WordPress.com users get.
I hope that developers will see this and be inspired by it to create alternative admin systems that interact with the WordPress REST API for self-hosted sites, meaning you won’t need a WordPress.com account to use them. Exciting times are ahead!
Share article
All the good WordPress stuff, once every two weeks
Subscribe
Create your free account to post your comment
Login to post your comment