The Non-Developers Guide to Git and GitHub
In this post, I’m going to teach you how to use Git and GitHub to better organize the different versions of your projects using a real life example of what a workflow would look like if you're working alone.

Git is notoriously difficult for beginners to learn, especially for non-developers. It took me at least 3 (alright more like 20) attempts before I learned how to use Git and that was only because I Googled, “Explain Like I’m 5 Git.”
Most of us navigate our computers with visual queues. “Here’s my document. I want to put my document into a folder. *drag document into folder*”
But beneath those cute little icons are rows off data structured systematically. A much cleaner and striped down form of managing information. A space perfect for collaboration, unclouded by fancy skins and void of style. Pure. Data. Management.
Git lets you create, collaborate, and manage projects (code, text, copy, information) all while recording the history of whatever it is you’re making. Even if you work alone, Git is a useful tool, because you are probably already encountering issues that a version control system can solve.
In this post, I’m going to teach you how to use Git and GitHub to better organize the different versions of your projects. This post is meant for beginners so we’re not going to delve into the technical bits of how Git works or discuss how to collaborate in depth. Instead we’re going to focus on the concepts.
- The Timeline
- Installing Git
- What is GitHub?
- Git Config
- Repositories
- Navigating with the Command Line
- Git Init
- Git Add and Git Commit
- Branches
- Forks
- Syncing with GitHub
- Push
- Pull and Clone
My goal is to make the learning curve for Git more approachable by introducing version control using a simple, real life example that would normally be done with icons and drag-and-drop, so you can connect the dots when working from the Command Line. Throughout this post, I’ll also define important Git terms in bold so you can learn the language of Git. With a strong mental model and the right vocabulary, advanced tutorials and working with other pro users will make more sense :)
At This Point in Time
Let’s say you want to look for a job, so you want to draft up a new resume with all of your koalifications. You know you’re going to have a lot of different versions of your resume so you need a way to keep them organized.

If you weren’t using Git, you would probably try to construct your own rudimentary timeline by using a naming convention to keep track of the sequence of resumes (such as Resume Jan 2016, Resume June 2016, Resume 2018, Resume 2019, etc.).
Every time you select Save As and create a new document with a different name in the sequence, you’re creating a “snapshot” in your rudimentary timeline that you can come back to. Resume-2015.docx could be considered a snapshot below, for instance.

Git mimics this process and organizes the “snapshots” you define along an explicit timeline so you can keep the different versions of a document in the right order and go back to a previous version.
GitHub for Beginners, Don’t Get Scared, Get Started
Installing Git
To use Git on your resume, you need to install it on your computer.
Once Git is installed, you can use the Git Bash app that comes with Git (or Terminal for Mac users) to enter Git commands.
Introducing GitHub
Now, your resume will evolve throughout the course of your whole life (at least until the robots take over on the labor front), so you want to make sure that you have a backup that you can access in case you lose your computer or something. This is where GitHub comes in.

GitHub is one part social network and one part file hosting service, where you can store your files for all to see. I know that sounds like a bad thing, but it makes open source projects like WordPress possible. GitHub is the largest storage hub for collaborative works in the world, so not only can other people build on your projects, you can build on theirs. Teamwork at its finest. GitHub also functions as a central location that team members can connect to in order to access shared code.
Creating a GitHub account is free, but if you want to keep your files private, you’ll need to upgrade.
1/25/19 Update: Great news everyone, creating private repos is now free. Whoop whoop!! The only restriction is you can only have three collaborators on private repos, so if you have a handful of team members, you’ll need to upgrade.
Go ahead and create a GitHub account because you’re going to need it to introduce yourself to Git.
Git is the program we’re using to manage the different versions of a file while GitHub is a social network storage location. Capiche?
Since GitHub will house your files in the cloud, this is known as the remote location for your files.
Say Hello to My Little Friend
After you install Git, you need to introduce yourself, so Git can add your name to the changes you make.

Open up Git Bash/Terminal and type in git config --global user.name “Your Name”
Of course, replace “Your Name” with your own name. Leave the quotation marks, take the cannoli.
Then enter git config --global user.email "[email protected]" but use the same email that you used to sign up for GitHub.
Professor Plum in the Repository with the Candlestick
Now that we have Git set up, let’s work on managing some files. You’re going to begin by creating a folder on your computer called Job Hunting. This folder is going to be our local repository where we’re going to keep our resume and Git files.
A Repository or Repo is a central file storage location that you’ll create for each Git project. A repo can contain files, images, data, pretty much whatever your project needs.

Notice that you can have local repos on your computers or remote repos in GitHub. We’ll go over how to connect them later in this post. First we need to get inside the folder we just created so we can run commands inside it.
Stop Cowboy Coding: 10 Tips for Improving the Quality of Your WordPress Themes and Plugins
Inside Job
You’re going to navigate through your files using the command line to get to the folder you just created. Keep calm. It’s just like using a file manager in that you’re going to open a folder, choose a folder inside and go in that folder, and so on until you get to Job Hunting.
To see a list of folders use the dir command. Git Bash/terminal will return a list of files and folders for you to choose from.
You’re going to use the cd command which stands for change directory followed by the name of the folder you want to go in to.
See how I use dir below to see the folders inside the folder I’m in? Then I can select, right click and copy the name of the folder I want to go in to. In Git Bash/terminal, I’ll enter cd and right click and paste the folder name and press enter.

If you go into the wrong folder and need to go up a level, you’ll use cd.. (note the two dots, that’s not a period).
For windows users, you can open the Job Hunting folder in your file manager, then right click and select Git Bash here so you can avoid using the Git Bash to navigate your files.
If you get stuck here, leave me a comment below and we’ll make sure you get through to the next step in this tutorial :)
Git Init to Win It
In order to “activate” Git in this folder and turn it into a repository, you’ll need to run the command Git init inside the folder you just created.
This will create a hidden .git folder in your repository. In the file manager screenshot below, I allowed hidden files to be visible. If this setting is not enabled for you, you won’t see the file, but if you used git init correctly, the file will be there, even if you can’t see it.
Git Init stands for initialize and you’re basically telling your computer that you want to use Git in this folder.

Our repository is ready, so now we’ll create the resume text file. You can either create a text file in your Job Hunting folder the old-fashioned way or enter touch resume.txt in Git Bash/Terminal. Use the touch command followed by the name and file extension to create files within the folder that you’re in. Cool right?

If you wanted to track changes to multiple files, you would create another document in the same repository. For example, cover-letter.txt or portfolio.html could live in the same Job Hunting repository because they’re all related to job hunting.
Git Your Add in Gear
By now you know that Git organizes the different snapshots of the files in your repository on a timeline. Git gives you full control over what to include in a snapshot. You can include one file, so only resume.txt or all the files in the repository or you can pick and choose.
In Git, a snapshot is called a commit, which is the term we’ll be using from here on out.
Git commit preserves a snapshot in your timeline you may want to return to.
When you add a commit to your Git timeline, you want to identify it by leaving a message. Here’s what the full command will look like, git commit -m “your message here”.

You pick and choose which files to add to a commit before you actually make the commitment by using git add followed by the name of the file or files. If you make changes to the file after you add it, you’ll have to add it again so that those changes will be included in the next commit. It’s like if you save a file and then make changes. You have to hit save again.
The command will look like this git add resume.txt.
If you want to add multiple files, you can separate them with a space git add resume.txt cover-letter.txt portfolio.html. or to add all the files in the current folder, use git add *
Adding files one by one is also an option. git add resume.txt then git add cover-letter.txt etc.

For example, say you learn a new skill (like Git) and add it to your resume. Once you make your changes, you use git add resume.txt to add your resume to the commit preview (which is sometimes referred to as the staging area) then use git commit -m “Add Git to Skills” to add your commit to the timeline. Go ahead and make your first add and commit right now.
Having a two step process gives you more control so you can break up a large chunk of changes into separate commits.
If you decide you want to remove a file you added to your commit preview, say your cover letter, you would use git rm --cached cover-letter.txt.
How to Use Git for WordPress Development
Two codes diverged in a yellow wood
You can keep track of what files you add to a commit by using git status. Git status will return changes to be committed which are the files that are going to be in the next commit.
When you use git status you’ll notice that it tells you you’re on branch master.

Branch Out of Your Comfort Zone
Git not only creates a main timeline, but it allows you and other people to create additional timelines. The main timeline, or branch in Git terms, is called the master. It’s the main tree trunk that the other branches originate from, or the original resume from which all the others are derived.
Branches allow you to explore alternatives that you can merge back into the main timeline or delete if they don’t work out.
Introduction to GitHub Workflow
To create a new branch, you’ll use git branch name-of-new-branch just replace name-of-new-branch. You can also use git branch to see a list of available branches. An asterisk will appear next to the branch you’re currently in.
To switch over to your new branch or switch back to your master branch, you’ll use the command git checkout name-of-branch-to-switch-to
For example, if you want to try adding a skills section of your resume to see if you get more interviews, you would create a branch called skills. You’d enter git branch skills to create the branch, then git checkout skills to start making your commits on the skills branch. If those edits get you more interviews, then you can merge the two branches.
To merge branches, you need to switch back to the master branch using git checkout master then use git merge skills to say I want to bring over the changes I made in the skills branch to the main master branch.
Other people can also create branches that they intend to merge back into the master branch. Teams working on different features will do this.
Sometimes, you’ll want to create something that you don’t have the intention of merging back into the main branch.
Fork Git Aboudit
For example, let’s say you find a great portfolio template on GitHub that someone else created that you want to use as a starting point for your own portfolio template. You would create a fork in GitHub so that you would, in essence, get your own copy to build on.

A fork is a copy of a repository. Forking a repository allows you to freely experiment with changes without affecting the original project. Most commonly, forks are used to either propose changes to someone else’s project or to use someone else’s project as a starting point for your own idea.
Guide to Forks and Branches in Git
By the way, make sure you check the license in the repo when forking someone else’s work.
Sync with GitHub
Let’s go over how to sync your local repositories (on your computer) with your remote repositories on GitHub next. We’ll start by logging in to GitHub and creating a public repository called Job Hunting just like the one on our local computer.

Now we need to tell Git on our computer that this remote repository exists. We’ll use git remote add origin https://github.com/username/Job-Hunting.git. Just be sure you replace username with your GitHub username.

If Push Comes to Shove
When syncing your local and remote files using a service such as Dropbox or OneDrive, you have a special folder on your computer that you can save files to. When you make a change and save a file in that special folder, your changes are automatically uploaded to the cloud.
Git gives you more control over what to send to your remote repositories by only sending the commits when you say so. To send your commits to your remote repository, you’ll use the Git push command.
Git push sends your commits to your remote repository.
Git push can be followed by two arguments, a remote name (origin is the default remote name) and a branch name (for example, master).

To use git push you’ll need to have at least one commit. Since we are working on our master branch, we’ll enter git push origin master into Git Bash/terminal. A box will pop up so you can enter your GitHub login credentials. Once you do that, if you go to your repo in GitHub, you’ll see that the files you included in your first commit have been added to your remote repository. Sweet :)
8 Ways to Sync Git Repositories with WordPress
Now some hosts, like WP Engine and WPMU DEV hosting even allow you to push your local WordPress files to your host using Git. Which is pretty awesome when you think about it. You can keep track of the different versions of your site using Git so you can revert to a previous commit when an update or change breaks your site. That’s something SFTP can’t do. This comes in handy when your projects evolve to be more complex and start taking on a life of their own.
Git Your Own Copy
If you need to get a copy of your remote repo in the future, or if you want to build on someone else’s work. You can use git clone or git pull, depending on the circumstances.
You may have seen the phrase “clone this repo on Github” in other tutorials. You can think of git clone as a way to download files. Git clone will create a folder named after the repo i.e. Job Hunting and put all the files in there.
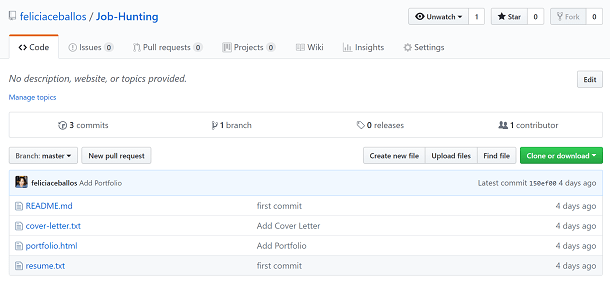
Before you use git clone, navigate into the folder where you want your cloned repo created. You’ll need the web URL for the repository for the command git clone URL-of-repo. If you wanted to clone my Job Hunting repo, you would use git clone https://github.com/feliciaceballos/Job-Hunting.git. That’s a real public repo by the way, so you can practice.

When you’re working with your team and want to refresh your local repo, you’re not going to use git clone, because you don’t want a new copy. You’re going to use git pull instead. Same thing goes if you’re working alone and want to pull your most recent remote repo commits into your local repo. You can think of git pull as a refresh. Git pull will merge your local repository and your remote repository so you’ll have the most up-to-date version of your project.
You’re Not Git-ting Any Younger
Congratulations on learning how to use Git and making it through this long tutorial! You should add Git to your resume now ;)
If you forget git commands while you’re getting the hang of it, you can use git help to return a list of the most common git commands. Git status is also helpful if you get confused and aren’t sure what branch you’re in or what files you’ve added. There’s also the GitHub desktop app that you can use if you don’t like the command line, but you won’t have access to as many commands.
There’s so much you can do with Git! We’ve only scratched the surface. Here’s some places to continue your learning now that you have a better grasp of Git and GitHub.
Even though you may think you don’t need Git and GitHub because you work alone, the truth is you don’t work alone. You’re a part of this great WordPress community and we all work together to move a third of the web forward, building on each other’s work to make plugins, themes and other cool stuff. Git and Github are the tools that have helped make open source what it is today. WordPress itself began as a fork, after all…
Share article
All the good WordPress stuff, once every two weeks
Subscribe
Create your free account to post your comment
Login to post your comment