Help, I’ve Been Hacked! How to Troubleshoot and Fix a WordPress Site
Getting hacked is one of the most frustrating experiences you’ll face as a site admin – and it's an experience you'll have sooner or later. Because no matter how careful you are, about 30,000 sites are hacked daily so the odds aren't stacked in your favor. So here's the guide you need to bookmark for that fateful day.

Getting hacked is one of the most frustrating experiences you’ll face as a site admin. Unfortunately, even if you have bolstered your site’s defenses, about 30,000 sites are hacked daily and it’s likely your site will fall prey sooner or later. So it’s important you know what to do when that day comes.
Fortunately, it’s possible to figure out exactly how your site was hacked with some simple sleuthing in your site’s logs. Once you have pinpointed exactly how the hacker has infiltrated your site, you can patch the security hole to prevent the breach happening again.
At WPMU DEV, our friendly and expert support team can help you diagnose issues with your site, or you could use a plugin like Defender to patch security holes before an attack happens (we go into more detail about this below).
If you’re keen to go it fix things yourself, here are the most common ways your site can get hacked and how to check your logs for clues.
How Good Sites Get Hacked
Hackers usually infiltrate your site one of two ways: manually or with the help of a program they create called a bot or hackbot. Since manual attacks can be time consuming for hackers (poor them, not!) hackbots can be used to systematically attack hundreds or even thousands or sites every hour.
These are the main ways hackers can gain entry to your site:
Brute force attacks – This means guessing your login details. If you use the default “admin” or “administrator” usernames and weak passwords, you’re giving hackers half of the details needed to login into your site.
Software vulnerabilities – When hackers find a security hole in the WordPress core software, plugins, themes or scripts, they can exploit to get into your site by injecting their own scripts, for example.
Backdoor exploits – A file (backdoor) is placed amongst your site’s files. It includes a script, which allows a hacker repeated entry into your site while remaining undetected. You can check out our post Getting Constantly Hacked? How to Stop WordPress Backdoor Exploits for Good for more details.
Malware and viruses – If you have a virus or malware on your computer, hackers can use these to get into your site.
Insecure server – The server your site is hosted on needs to be secure. If it isn’t, hackers could use your server’s security holes to infiltrate your site.
Improper file permissions – You can set permissions on all your files, which means you can set who can read, write and execute scripts. If you set your permissions too low, a hacker could easily edit your files, inject a malicious script such as a backdoor exploit and hack into your site.
Phishing – Hackers can hijack or create sites and masquerade as the original company, blog or a different trusted business.
They create bogus login forms designed to collect certain details for later use. In the case of WordPress, your login credentials could be stolen.
XML-RPC exploits – XML-RPC is used for WordPress pingbacks and trackbacks. It lets WordPress make multiple remote calls over one HTTP request which means your site can send a pingback to a whole other site and receive them as well. The trouble is, hackers are leveraging this feature to execute automated and remote brute force attacks.
Cross-site Scripting (XSS) attacks – An XSS vulnerability is code that is written in a certain way which lets a hacker write and execute malicious JavaScript that saves a user’s browsing data. This is done by the way of a link they can send to users of a site to steal any information a user entered while browsing the targeted site. For example, they could steal login details to gain admin entry into the site.
Cross-site request forgery (CSRF) – This is when a hacker has forged a user request by leveraging code. This means a hacker could make adjustments to a normal request to create a malicious one. Then, since they don’t have admin access, they trick a user into performing an action that authorizes their malicious request for them. This kind of attack could be used in an attempt to trick a user into doing many things including submit their login details for a hacker to use to gain entry into the user’s site.
The trouble is, the list above isn’t an exhaustive one and with so many methods available to hackers, it’s almost impossible to guess how your site has been hacked and how you should go about patching the problem.
If you do this, the chances of you getting it wrong are more than just a strong possibility. You’ll be giving yourself the runaround. The hacker would keep getting into your site and you may fix something else thinking the issue is solved. That’s when the hacker breaks in again and the vicious cycle continues.
The only way you can be certain you have secured your site after being hacked is by first knowing how exactly your site was attacked. Once you know, you can fix the exact problem and end the vicious cycle.
Getting Started with Your Logs
Your site logs can offer important clues as to how your site was hacked. Checking our your site’s error log can also be helpful.
Depending on where you get your hosting, finding these logs may be different for everyone so it’s a good idea to contact your hosting provider if you’re not sure where to find them.
In cPanel, you can find these logs in the Metrics section after logging in. The errors log is typically shorter, so you can click the Errors button to look through your error log or you can click the Raw Access button to check your access log first. Your access log should give you the best indication of how your site was hacked.
Your error log can give you a quick hint of what may have happened, but since it doesn’t show successful attempts to access your site, it can only tell you so much. Still, it’s a good place to start to give you an idea of what you should keep your eye out for in your access logs.
To get a copy of your access log, click the Raw Access button, then choose one of your sites from the list to download a copy.

Once downloaded, you can extract the contents and view the log in your favorite program such as the open source code editor Brackets.
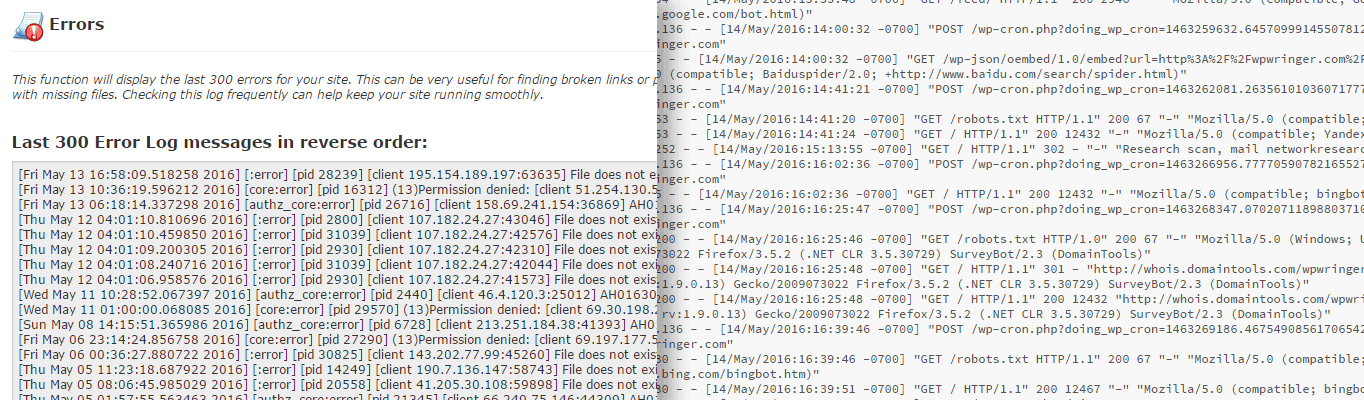
Keep in mind that cPanel only saves data for the last 24 hours, but you can turn on archiving to save data for an entire month or more. For error logs, typically, only the last 300 errors are logged.
To turn on archiving, click the checkbox located toward the top of the page with the label Archive logs in your home directory at the end of each stats run every 24 hours. You can additionally choose to select the checkbox below it to remove archives from previous months. This helps reduce the amount of storage space and resources your site needs to keep archiving logs.

Don’t forget to click Save so your changes aren’t lost. In most cases, these options are turned on by default, but this may not be the case for all hosting plans.
It’s also important to note that you may not have logs that go back far enough to take your time. Once your site is hacked, you need to view and analyze your logs right away since you only have a small window of opportunity before your logs are permanently deleted. Save what you can to prevent losing key data.
Understanding Your Logs
Your error and access logs may look like a similar and almost indecipherable mess of text, but once you know how information is displayed, it’s not as difficult to understand as it may seem.
When taking a look at your error logs, it’s important to know the structure they take:
- Date and time
- Type of error
- User’s IP address
- Description of error
- File path of the page that was attempted
- URL of the site which referred the user to the affected page
While this covers many different types of logs, your may be different so it may be helpful to consult the provided documentation from your hosting company or server type. The same applies for your access logs.
This is how access logs are most commonly laid out:
- IP address of the user
- Date and time
- HTTP method used and version
- HTTP response code
- Number of bytes received
- Referring software (browser or device OS)
- Who accessed your site (user agent)
Data Worth Finding
When you’re staring at a ton of data in a log, it can look like gibberish if you’re not aware of what to zero in on. Start by taking a quick look at your error log as it may give you a hint of what to search for in your access log.
If you notice that someone tried to access files that a normal user wouldn’t need to visit, but a hacker would, then make a note of it with the IP address. Hackers may try to get to files and pages such as your .htaccess file, install.php, wp-config.php and other similar parts of your site.
Here’s an example of a line in an error log generated by cPanel:
In this error, the server denied access to the user access because they didn’t have permission to view the file which was .htaccess. If you don’t recognize the IP address and it’s not your own, then it’s definitely a red flag and you should make a note of it.
If you don’t know your IP address, Google can tell you by searching “what is my IP address.”
When you see similar errors, you can move on to view your access log. Try looking for similar lines, but where the user was successful which would be shown by an HTTP response code of 200 in your access logs. This would indicate a success in the user’s request.
Beyond that, look for users trying to access pages that normally should only be accessed a handful of times at most and especially not all consecutively and a few seconds apart. Since a lot of components usually need to load for a single page to display properly, it’s normal to see the same IP address look like it’s accessing one page several times such as in the example below:
Keep in mind that in this kind of everyday visit to your site, each item in the access log would show that different aspects of the page are loading, such as JavaScript and images. The difference between a hacker accessing the same page and a regular visitor is a hacker may try using a hackbot to access the same page over and over so you would see a repeat in the same lines in the log.
The sample access log above shows a visitor that entered a site’s address in their browser followed by /wp-admin/network in the first line. This request was a success. They were then automatically redirected to the login page on line two.
Several lines later after many of the site’s assets were loaded, the user was successfully logged in and directed to the dashboard on lines six and seven. The action they made next was to go straight to the plugin editor on line 10.
While this is a truncated version of what you would actually see in your log, it paints a good picture of a series of events that look suspicious. Not many users would head straight to the file editor in the dashboard once they have logged in, but a hacker would. In such as case, a hacker would have already correctly guessed the username and password.
If you see in your error and access log that there were many unsuccessful attempts on the login or “forgot password” pages, then you have found your hacker and they broke into your site with a brute force attack.
The huge influx of failed attempts you would see before a successful one would be indicated by an HTTP response error code in the 400s for client side errors such as some of the common ones below:
- 400 Bad Request – This means the user has made an error such as using an invalid request or a syntax error.
- 401 Unauthorized – An error that occurs when authorization to view the page is required but it wasn’t given or it wasn’t valid.
- 403 Forbidden – Similar to the 401 error, this HTTP response code means that the user isn’t authorized to view the page they tried to access. It also means that while the request is technically valid, the server decided not to provide access and that’s the difference.
- 429 Too Many Requests – If you have a plugin installed that counts a rate limit, then a user could see this error if they made more than the allowed amount of requests over a certain period of time. This usually isn’t an issue for regular users so it may be an indication of a hacker using a bot.
While this isn’t a complete list of all the error codes you may see, it should give you an idea of what to zero in on when looking through your access logs.
The most difficult part about looking through your logs is that you’re likely going to see pages and pages of regular requests, even for smaller sites. Since an admin logging into the dashboard would usually yield more than 10 lines in your access log before they even click anything after logging in, you can imagine just how huge your log is going to be even if you only have a small audience.
Filtering Out Regular Visitors
Filtering out a lot of the normal requests can help you narrow down your search significantly. Sucuri Security has previously shared tips to parse your logs using grep and SSH. Crack open your favorite SSH client like Terminal for Mac OS X or PuTTY for Windows and enter one of the commands below that work best for your specific needs.
You can filter out over half of your log by setting aside all the instances where certain files and pages were accessed such as CSS, Javascript, image files and visits to the front page, /contact and /signup pages.
The front page is indicated in this example as the first / in the GET (/|/contact|/signup) segment. You can also change contact and signup to other pages you would rather include as it relates to your site.
If you find this command doesn’t filter out enough of the log and you still need to search through thousands of requests, you can try the command below to search for requests where there was an attempt to access the login page and admin dashboard:
Since these pages are often the subject of attack, it can be useful to examine these kinds of requests, especially if your error logs have indicated that there were many failed attempts at trying to access either of these pages.
If you know the IP addresses of all the admins of your site, you could also filter admin requests with the following command:
Keep in mind that you would need to replace 1.2.3.4 and 1.2.3.5 with the actual IP addresses of your admin users.
These commands should help narrow down the log to make the hacker’s requests more obvious, but it’s certainly not a fool-proof system. Since you only get a small time frame that the logs cover in most cases, you may not actually come up with any results. Even with the help of grep, finding how a hacker infiltrated your site can be like finding a needle in a haystack.
That’s why automating this process is so much more efficient and fool proof when compared to searching your logs manually.
Automating the Troubleshooting
There are many plugins out there that can keep an eye out and notify you if a hacker tries to break into your site, even while you sleep. Plugins such as Wordfence and Sucuri Security are great options for securing your site. They offer an impressive list of options for blocking hackers which could be a bit overwhelming for some users.
Alternatively, you could use Defender, which blocks hackers, lets you harden your site’s security in a couple clicks and fix the parts of your site that are vulnerable – all while being incredibly easy to use and understand.
Defender is also included in a WPMU DEV membership and you can even give it a try for free. Here’s how you can find out how you were hacked, properly clean up your site after it’s been attacked and secure your site so in the future, you can give hackers the smackdown with Defender. You can do all this by fixing points of vulnerability and hardening your site’s security in Defender’s settings.
Getting Started with Defender
Before you can clean up and protect your site, you need to download Defender, then install and activate it on your site. Defender is compatible with single or Multisite installs of WordPress as well as with BuddyPress. On Multisite, Defender is activated network-wide so you can manage the security of all your sites from your super admin dashboard.
Since Defender was launched we’ve added sooo much new stuff. Head over to the project page to check out all the new features!For details on how to install and activate plugins, check out our guides Installing WordPress Plugins and Activating WordPress Plugins Network Wide.
Since you’re going to be making major changes to your site, it’s also important to make a full backup of your site before you make any changes. You can backup your site with Snapshot Pro, VaultPress, BackupBuddy and other options.
You can also check out How to Backup Your WordPress Website (and Multisite) Using Snapshot for details on how to backup your entire site with Snapshot Pro.
Scanning Your Site
Once that’s all done, you can scan your site for vulnerabilities right out of the box. If you would like to double check the settings, go to Defender > Settings, otherwise, head straight to Defender > Scan and click the Scan My Website button.

For larger networks or sites, the scan may take a few minutes to complete, but you’re free to navigate away from the page or even closer your browser. When the scan is complete, you can go back and view the results.
If vulnerabilities or malicious files were found, they’re listed for you. You can click the wrench icon next to the item on the list to view more details about the issue and either delete the file, ignore the vulnerability if it’s a false alarm, compare it to a clean copy if it’s a core WordPress file or restore the detected file to a fresh version from WordPress.org.
You can also click the universal “don’t” symbol to ignore the file right away. You can restore the result at any time to resolve it later on. There’s also a trash can icon to delete the file straight away.

In future versions, automatic and ’round the clock, live logging is also going to be included, but since Defender detects changes to your files, you could theoretically see how a hacker got into your site without having to look through a bunch of logs. As long as you keep Defender installed, you shouldn’t have to worry about hypotheticals, since hackers are smacked down before they have a chance to get in, anyway.
You can also help make sure hackers can’t weasel their way in by hardening your site’s security. You can do this in a couple clicks by going to Defender > Hardener.
Vulnerabilities that haven’t yet been resolved are highlighted in yellow. You can click the “plus” button to reveal details about the vulnerability. In one click, you can apply the fix or ignore it. Ignored vulnerabilities can be restored at any time.
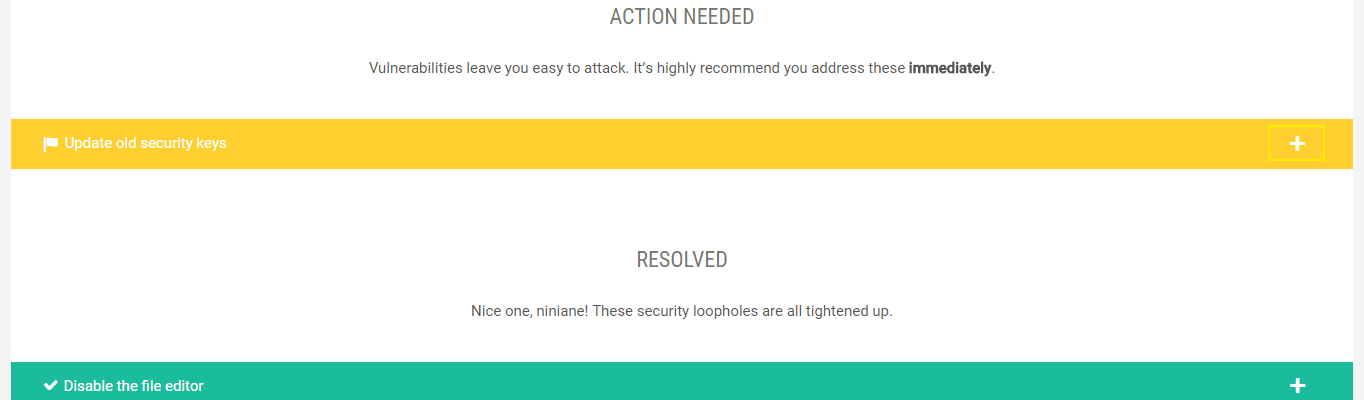
Besides disabling the file editor and updating security keys, you can also change your database prefixes, change the default “admin” account name, hide front-end error reporting, prevent unauthorized PHP execution and more. With Defender, all your bases are covered for full security hardening.
You can also automate scans by going to Defender > Automated Scans so you can rest easy knowing your site is looked after even when you’re busy. You can set the day and time for auto scans as well as whether they should run daily, weekly or monthly.
Keeping Your Site Safe
Once you have figured out how your site was hacked by manually checking your logs or through automatically detecting it with Defender, you can patch up the exact security hole the hacker used, rather than resorting to feeling around in the dark and blindly guessing what to fix.
But once you have cleaned up and secured your site, the battle isn’t over. It’s important to keep a security plugin such as Defender installed for total security around the clock. Keeping Defender running means future hacking attempts are blocked before they can become a problem because no one has time for that. Defender can also help keep your WordPress site and its plugins and themes up-to-date with the latest security releases as well. For more details on the importance of keeping your site completely up-to-date, check out our posts The Ultimate Guide to Updating WordPress and Multisite and Why You Should Have the Latest Version of WordPress.
Share article
All the good WordPress stuff, once every two weeks
Subscribe
Create your free account to post your comment
Login to post your comment